After two years of drinking bone broth, I HAD to find a way of making it at home that didn’t require constant attention and hours upon hours of work. Today I’m sharing an amazing Instant Pot Bone Broth recipe and 3 hacks for prepping to make it so much easier and simple storing options too.
Making bone broth at home is an absolute pain in the arse. That’s why I’ve had to purchase mine in the freezer section or online in order to make sure I’m able to drink it regularly.
With two small children at home, I simply don’t have the time or patience to put towards making bone broth every week.
But with so many readers asking for a great bone broth recipe, I had to give myself the challenge of coming up with one that would make it possible for you to make it at least once a month, and be delighted by the process!
The problem with making bone broth at home
- You have to have enough bones to allow a good amount of collagen to be released into your broth for maximum benefits.
- Even butchers often don’t have bones saved for you to use, and if they do, they likely aren’t hormone or antibiotic free.
- You have to butcher the meat yourself, which adds another thing to do for prepping bone broth.
- In a slow cooker or on the stove it can take 12-24 hours to slowly simmer bone broth so you extract the collagen out of the bones!
- You have to skim the foam that rises to the top of the broth semi-regularly while simmering, so it’s not totally hands-off.
Today I have solved all of these issues for you (and for myself)!
Hack #1
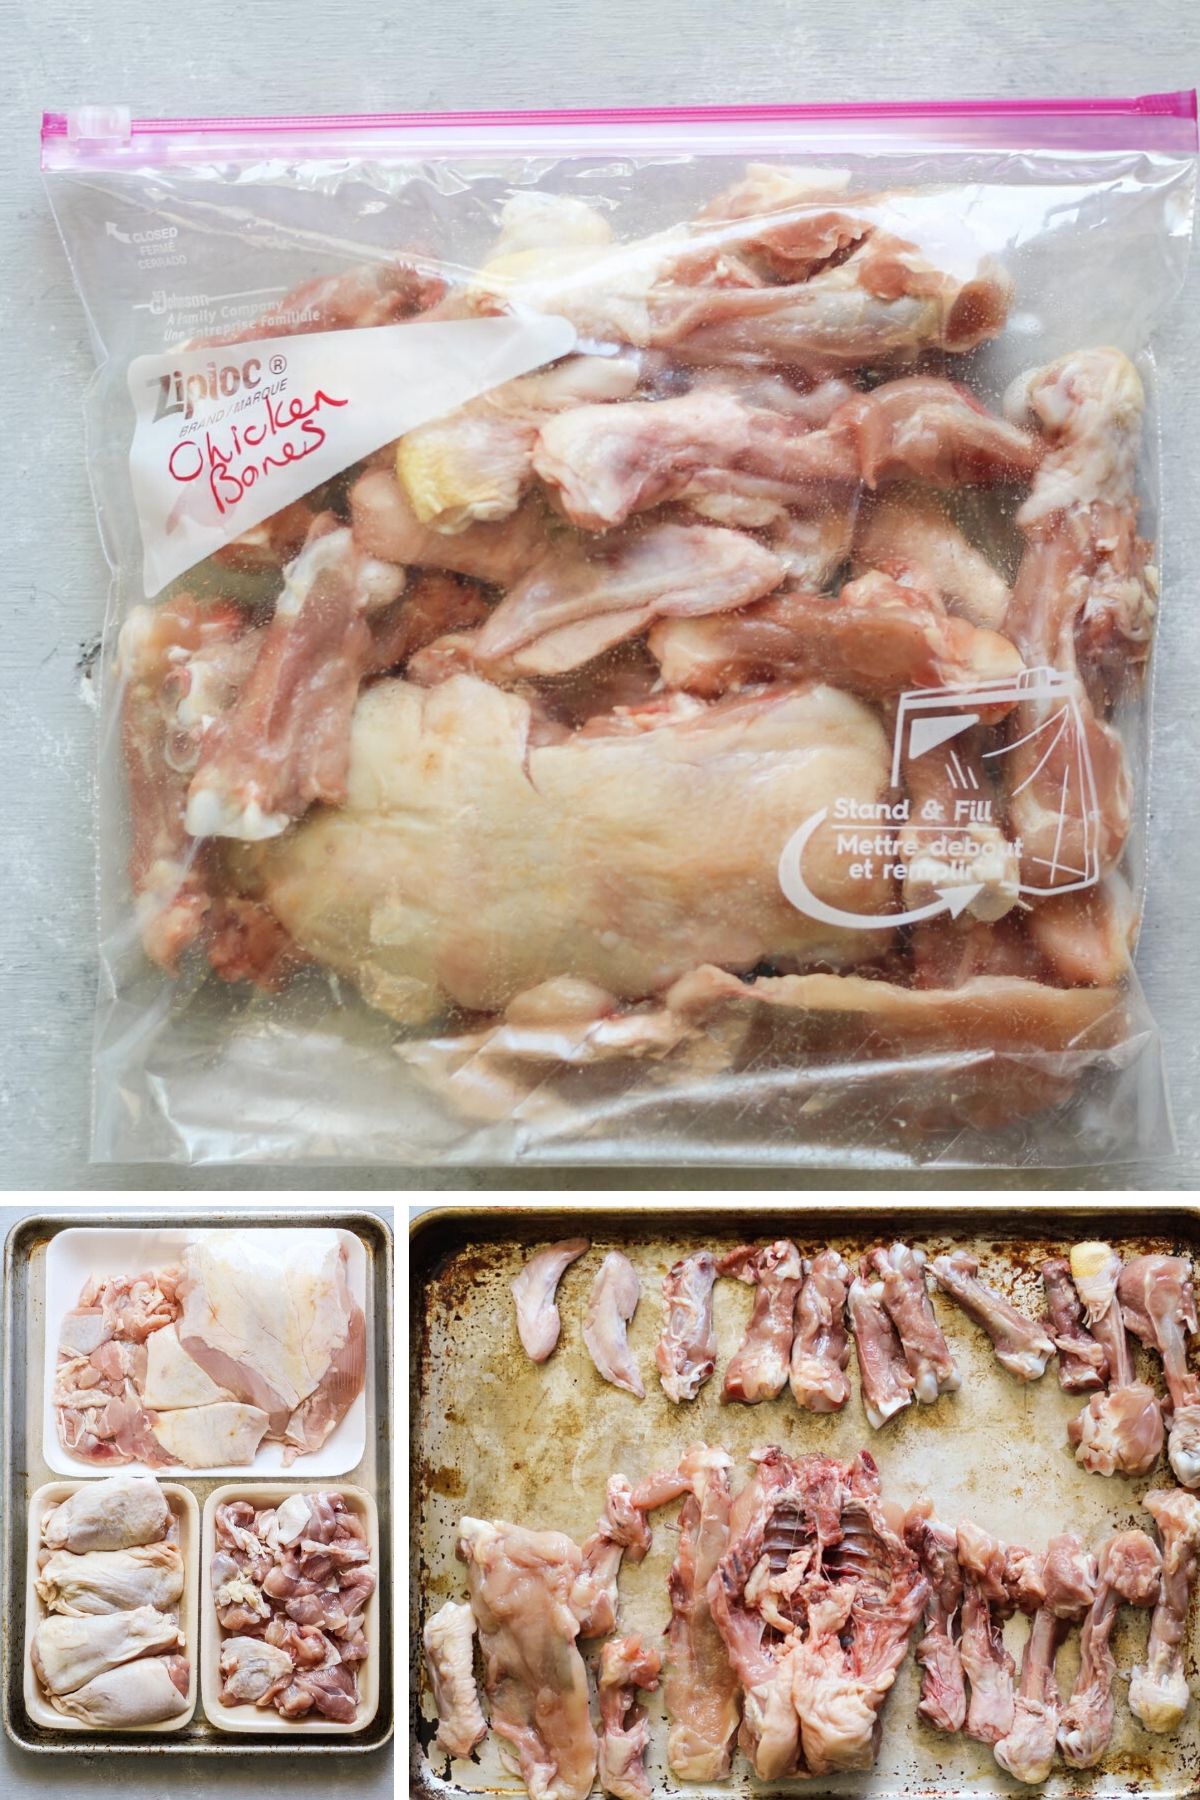
Pick out your meat at the grocery store and ask the butcher if they can remove the meat from the bones for you while you shop.
I discovered this tip by accident while talking to the butcher at the grocery store. He told me that he didn’t have any bones saved and they don’t usually save them for customers.
BUT, he asked me what kind of bones I needed and told me to go ahead and pick out what I wanted and he would separate the meat and skin from the bones for me and it would only take about 15 minutes!
Why this is so awesome:
- Butchers are professionals, therefore they know how to properly de-bone meat without destroying it.
- They have the proper tools/knives for this process
- I was able to get this step done for me while I shopped so that I could get right to making the broth as soon as I got home.
- It is a MUCH bigger time-saver than you can imagine. When was the last time you de-boned 2-5 pounds of meat and separated and wrapped everything in 15 minutes?
- Because the meat was neatly separated for me I could cook the meat however I wanted. In the past, I’ve simmered the meat on the bones until it was cooked, then removed the cooked meat to use in meals (which is an extra annoying step), then finished cooking the broth. AND, it was the same soft simmered meat for an entire week, which is really boring.
Pro tip:
Go to the store during off-peak times so the butcher doesn’t have a line. You may need to call your store ahead of time and ask if this is possible, but I find Publix grocery stores to be the most helpful with this task.
As you can see below, the meat and skin were perfectly separated from the bones so it could be sauteed, grilled, baked, or simmered in a lovely bone broth soup for several meals throughout the week!
Hack #2
Make delicious bone broth in under 3 hours with an Instant Pot!
For the longest time, I couldn’t justify buying one more kitchen appliance. But I finally broke down and purchased an Instant Pot and I couldn’t be happier!
Why the Instant Pot is so awesome:
- Because the Instant Pot is a pressure cooker, it is able to extract a lot of collagen from the bones and make rich bone broth from start to finish in only 3 HOURS instead of 12-24 hours in a crockpot or on the stove top! You cook the broth for 2 hours, but allow 30 minutes for the pressure to heat up, then 30 minutes after cooking to release the pressure.
- The instant pot has several functions to make it the most versatile kitchen appliance! It’s a steamer, food warmer, pressure cooker, yogurt maker, slow cooker, rice cooker, and it can even saute directly in the pot!
- Because of the different functions, you can transport cooked food to your party and family gatherings.
Pro Tip: The creators of the Instant Pot have many videos on their resources page for how to properly use it.
Options for Instant Pots on Amazon (affiliate links):
- I purchased this Instant Pot 6 quart 7-in-1 Multi-Use Pressure Cooker and I LOVE it. On this same Amazon listing, you can also purchase a 3 QT or and 8 QT Instant Pot.
- Or you can snag the 9-in-1 Instant Pot that has all of the features of the one above, PLUS you can boil eggs and sterilize with it. I didn’t need this function, but if you love to can fruits and veggies, this is a good option.
- Ok, if you want to get real fancy, the 10-in-1 Instant Pot does all of the above PLUS it’s a cake maker (who knew)!
Hack #3
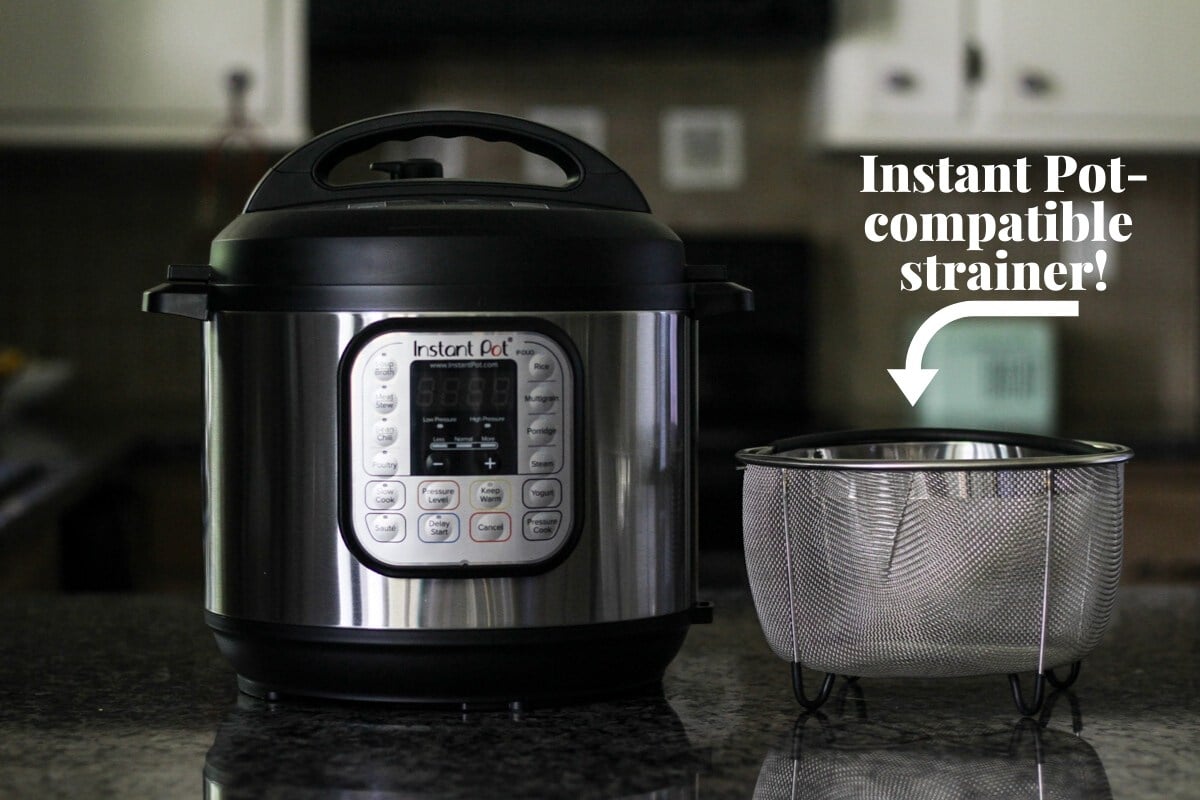
Use an Instant Pot-compatible strainer to instantly strain out all of the veggies, spices, and bones all at once!
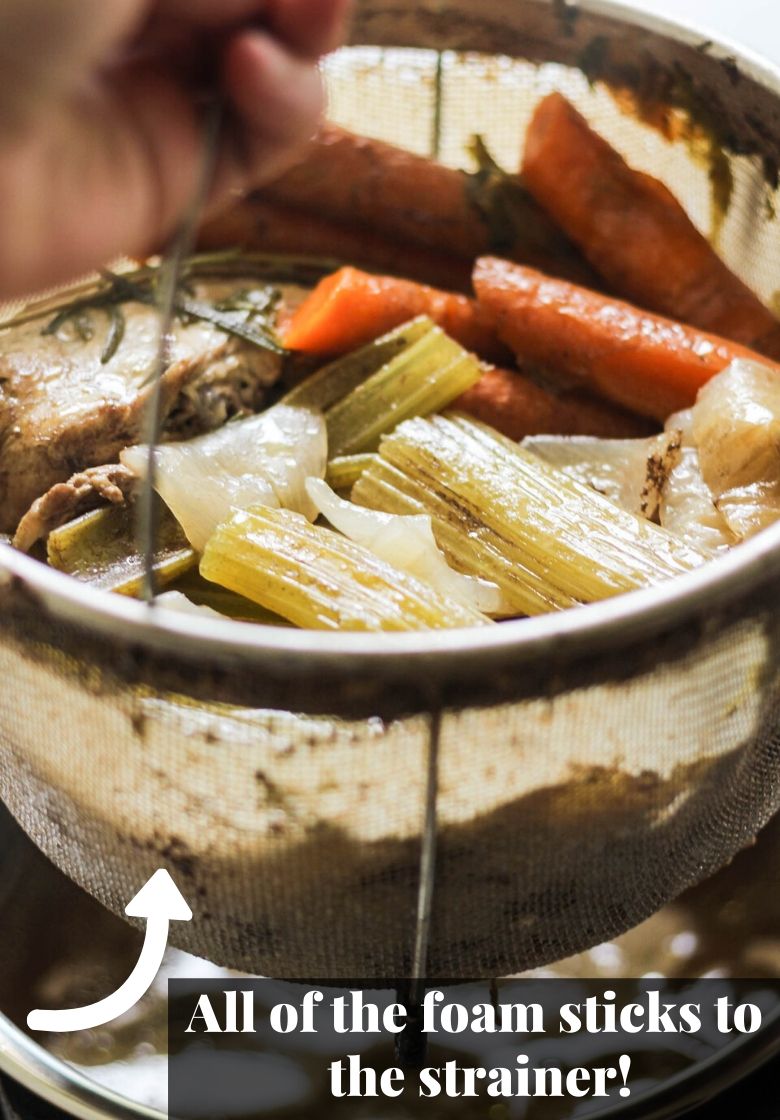
Why the strainer is SO awesome:
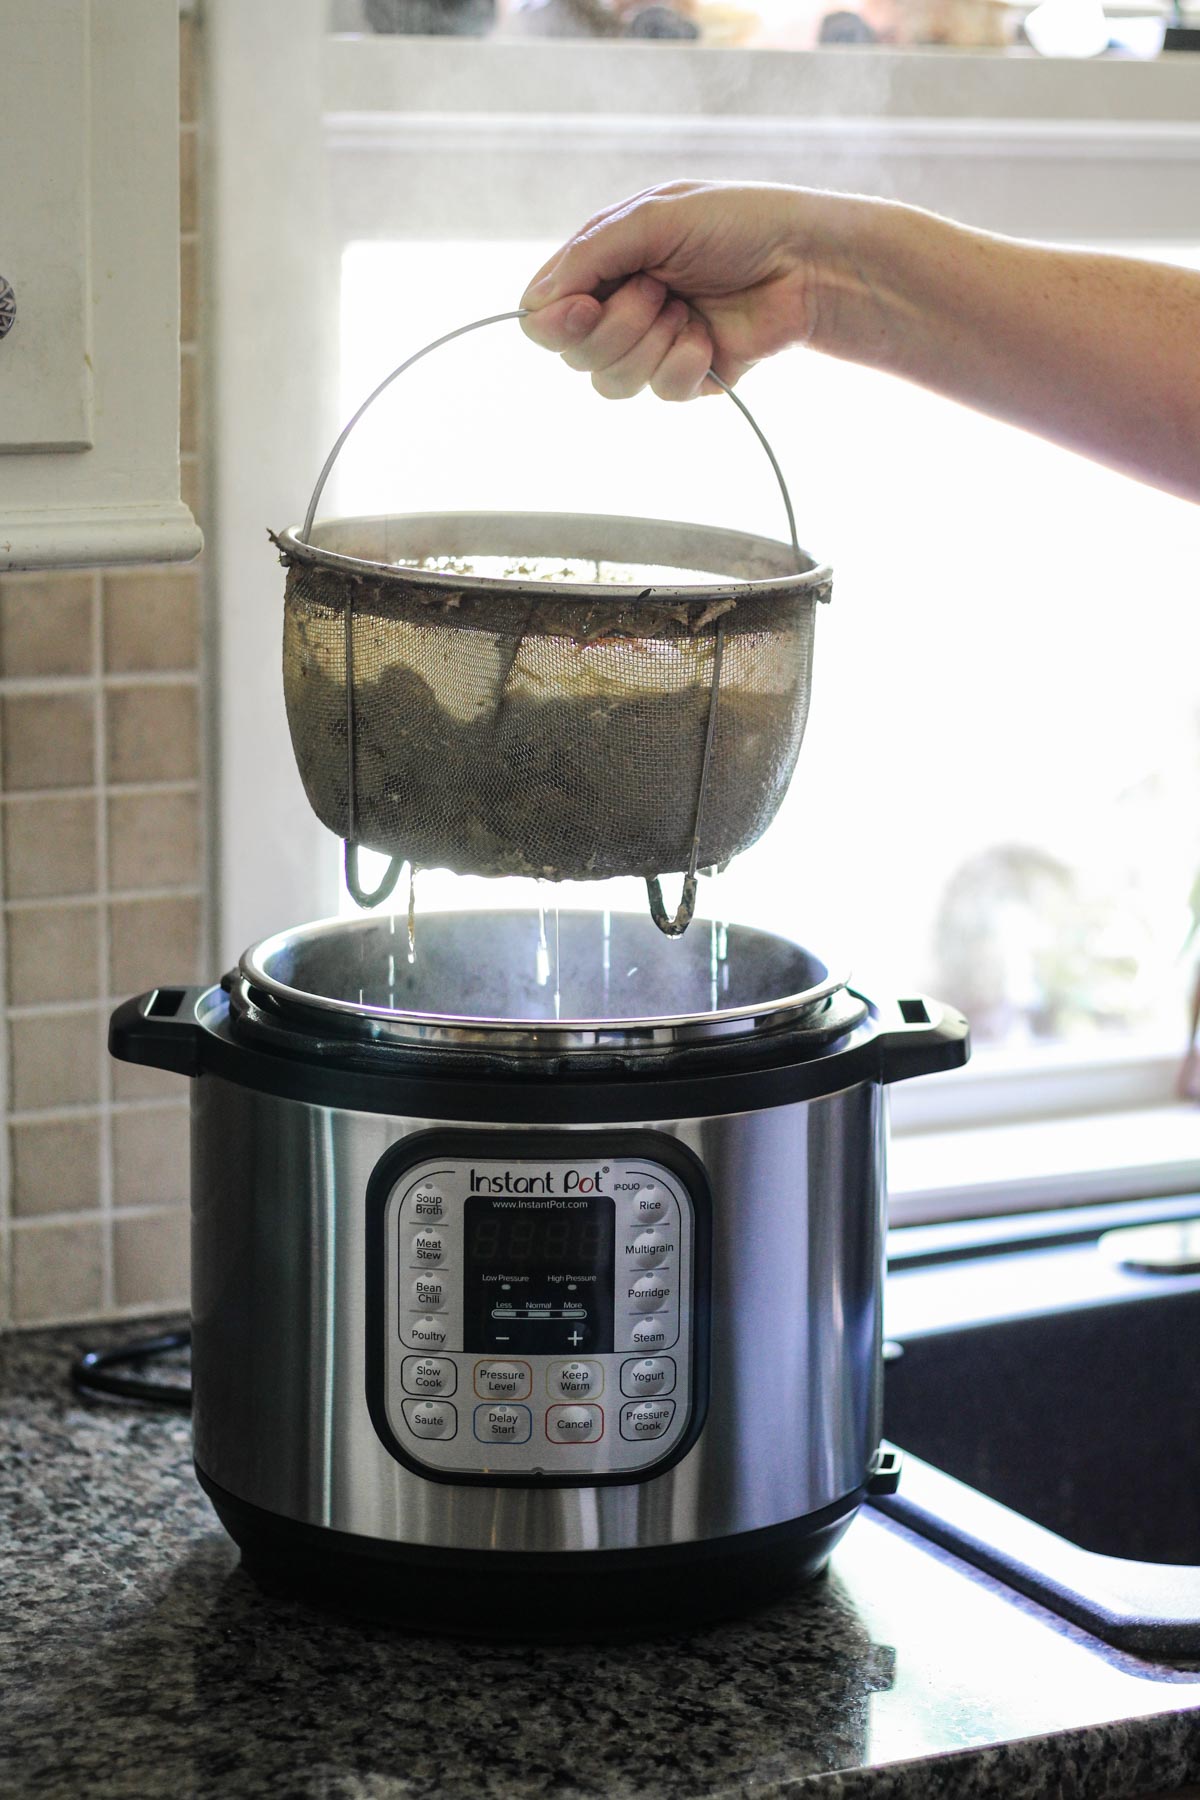
- You INSTANTLY lift out all of the broken bones, tiny peppercorns/whole spices, and veggies with the strainer (see the first photo below).
- All of the foam sticks to the strainer…YES! That means, no need for skimming the foam after it’s cooked (see second photo below).
Thee two little things make such a difference when finishing your broth.
Pro tip: My strainer had a rubber covering over the handle, but I cut it off with scissors because I didn’t want the rubber to leach any chemicals into my food.
Instant Pot-compatible Strainer (affiliate link):
- This Hatrigo Instant Pot strainer is what I purchased and it’s great! This Amazon listing allows you to purchase a strainer that fits inside a 3-quart, 6-quart, or 8-quart strainer. Be sure to purchase the one that matches the size of your Instant Pot.
Can you use more than one type of animal bones at the same time?
Yes! You can add beef bone marrow bones, turkey bones, etc. to the same pot with the chicken bones to create your own special recipe. The flavor combo of different bones together in one pot is quite nice.
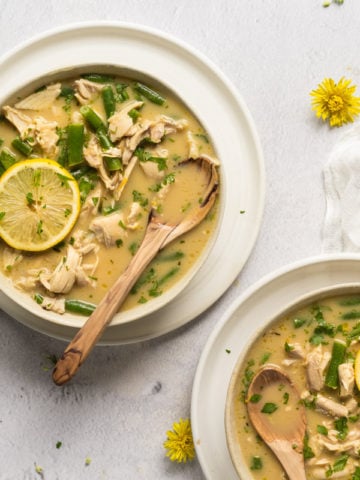
What kind of veggies and spices can you use for bone broth?
Really, the sky is the limit for adding flavor to your broth. But a good broth base always starts with onions, celery, carrots, bay leaves, and whole peppercorns. I love adding fresh rosemary, thyme, and parsley.
I personally like to keep my bone broth flavor more neutral with these aromatics and herbs. That way if I want to make some incredible coconut curry soup, I can add that flavor when I actually make soup. If you start with a powerfully flavored broth, it’s harder to add to any kind of recipe.
But if you love, love, love the flavor of curry and see yourself drinking it straight like that, then by all means, spice it up as you wish!
Step-by-Step Instructions
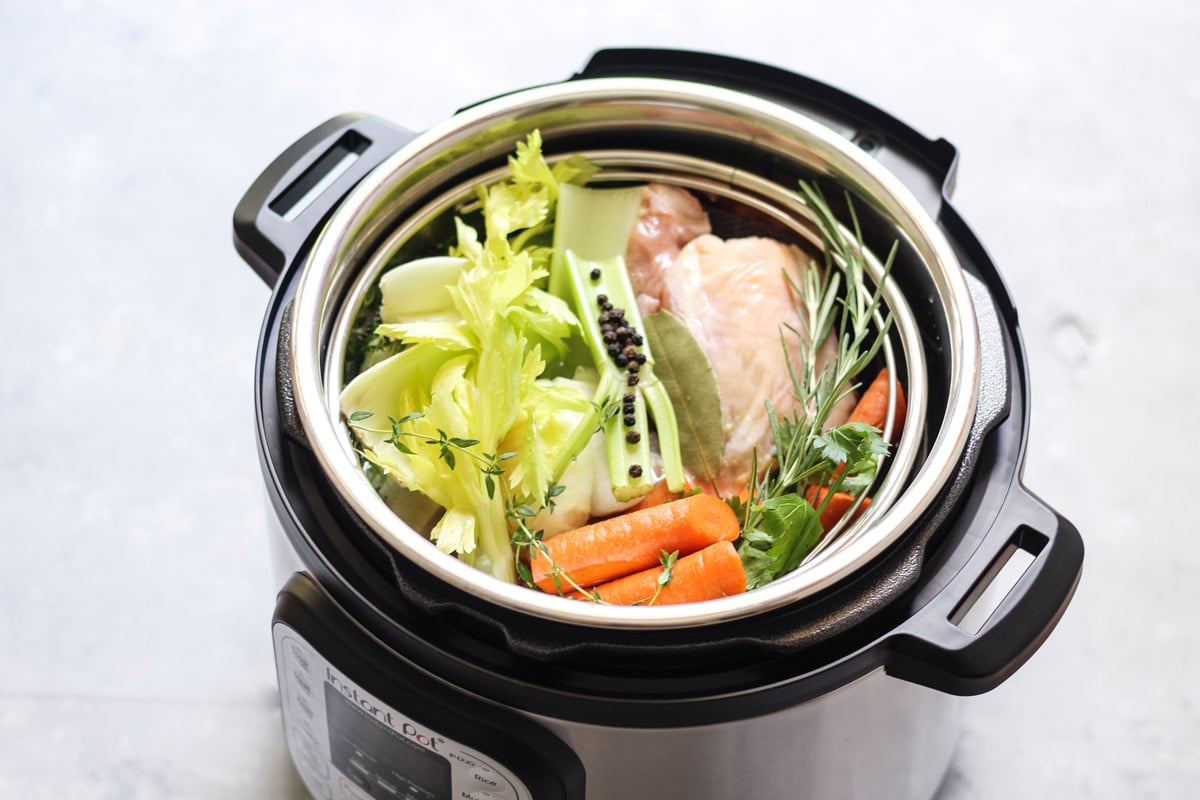
For this recipe, I used 2.5 pounds of chicken bones from 1 whole chicken, 1 package of chicken drummettes, and 1 package of chicken thighs. The weight of the bones obviously depends on the weight of the chicken you use.
You can use up to 5 pounds of bones in one recipe, however, you have to take into consideration that the more bones you use, the less broth you will end up with because you will have less space inside your pot to fill with water.
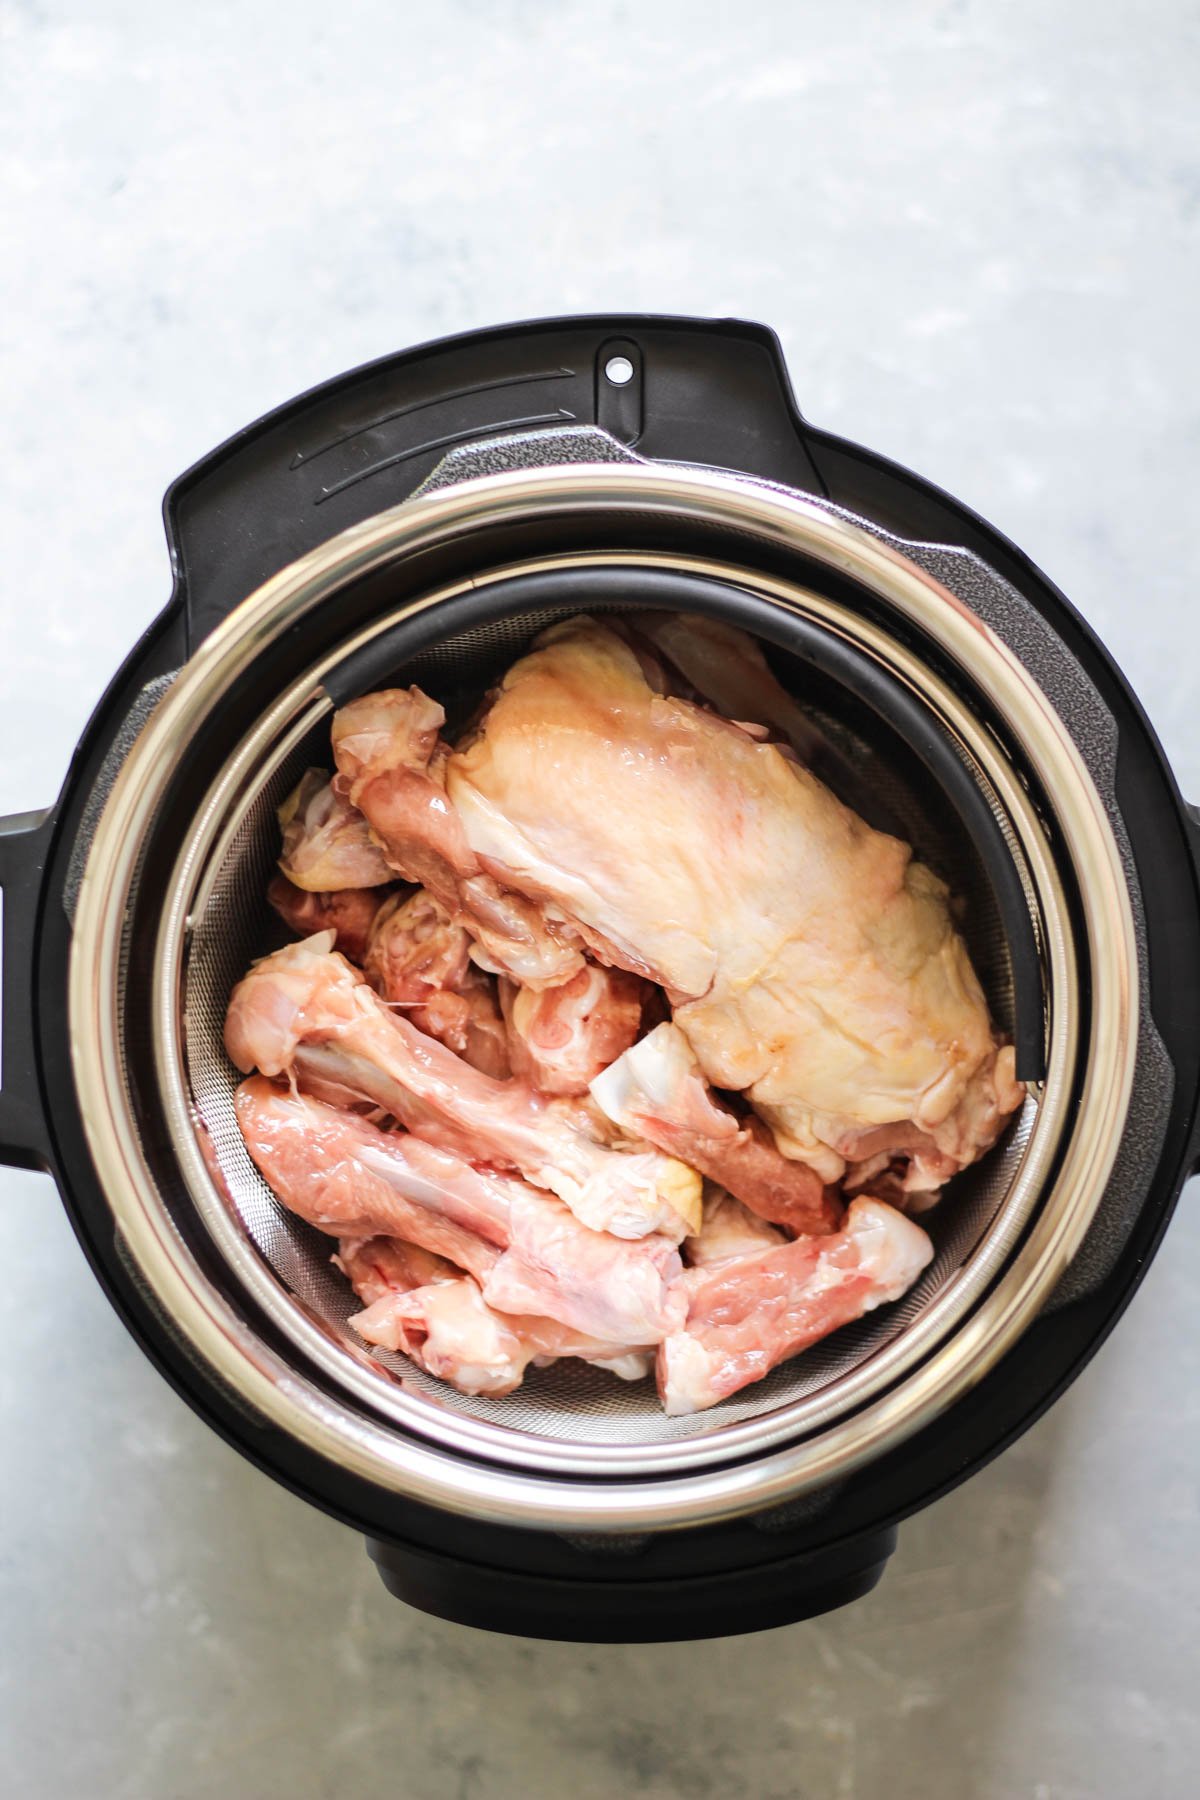
- Add the bones to the bottom of the pot first.
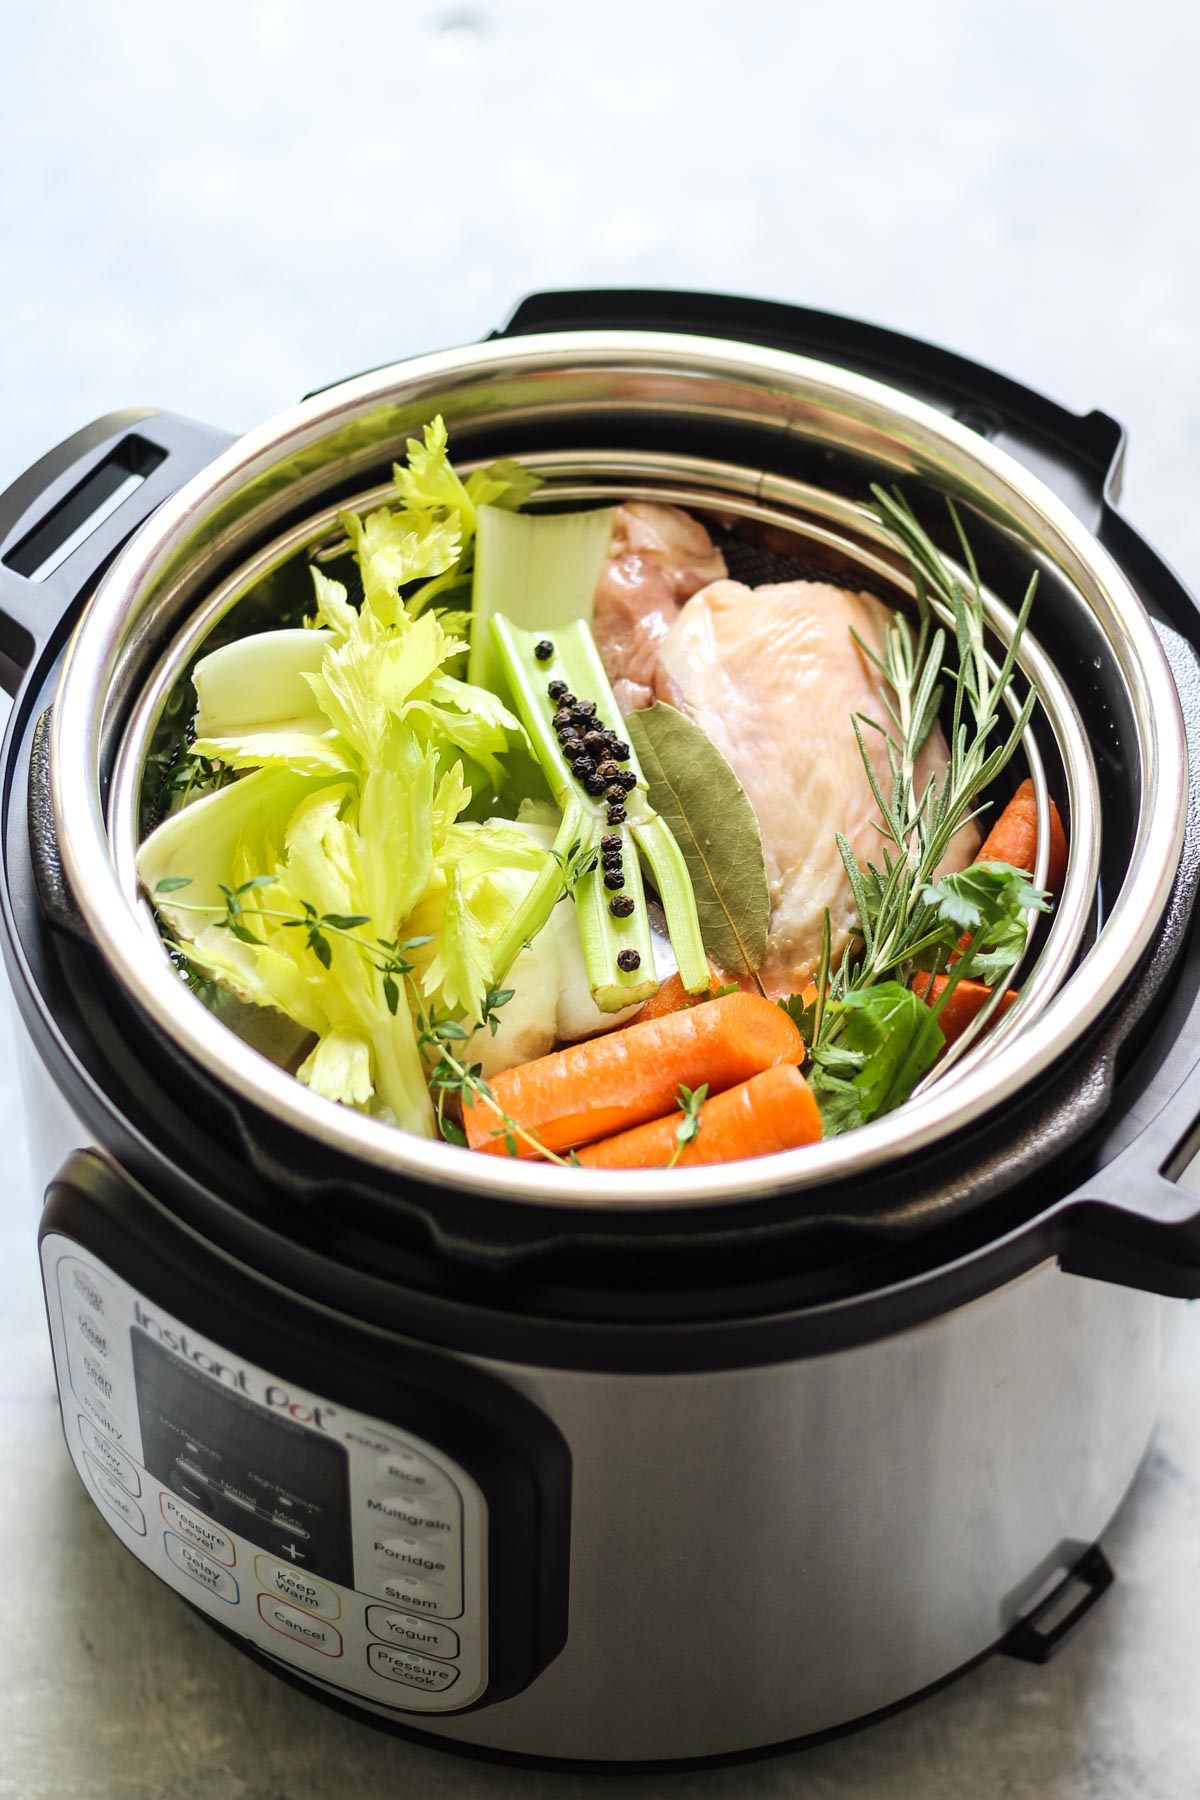
- Then add the onion, celery, carrots, peppercorns, and herbs on top. Fill the water to the fill line inside the pot, and no more. How much water you’ll add depends on the size of your Instant Pot.
The cooking time for the Instant Pot
Please note: The panel and the buttons may look different on your instant pot depending on make and model you own.
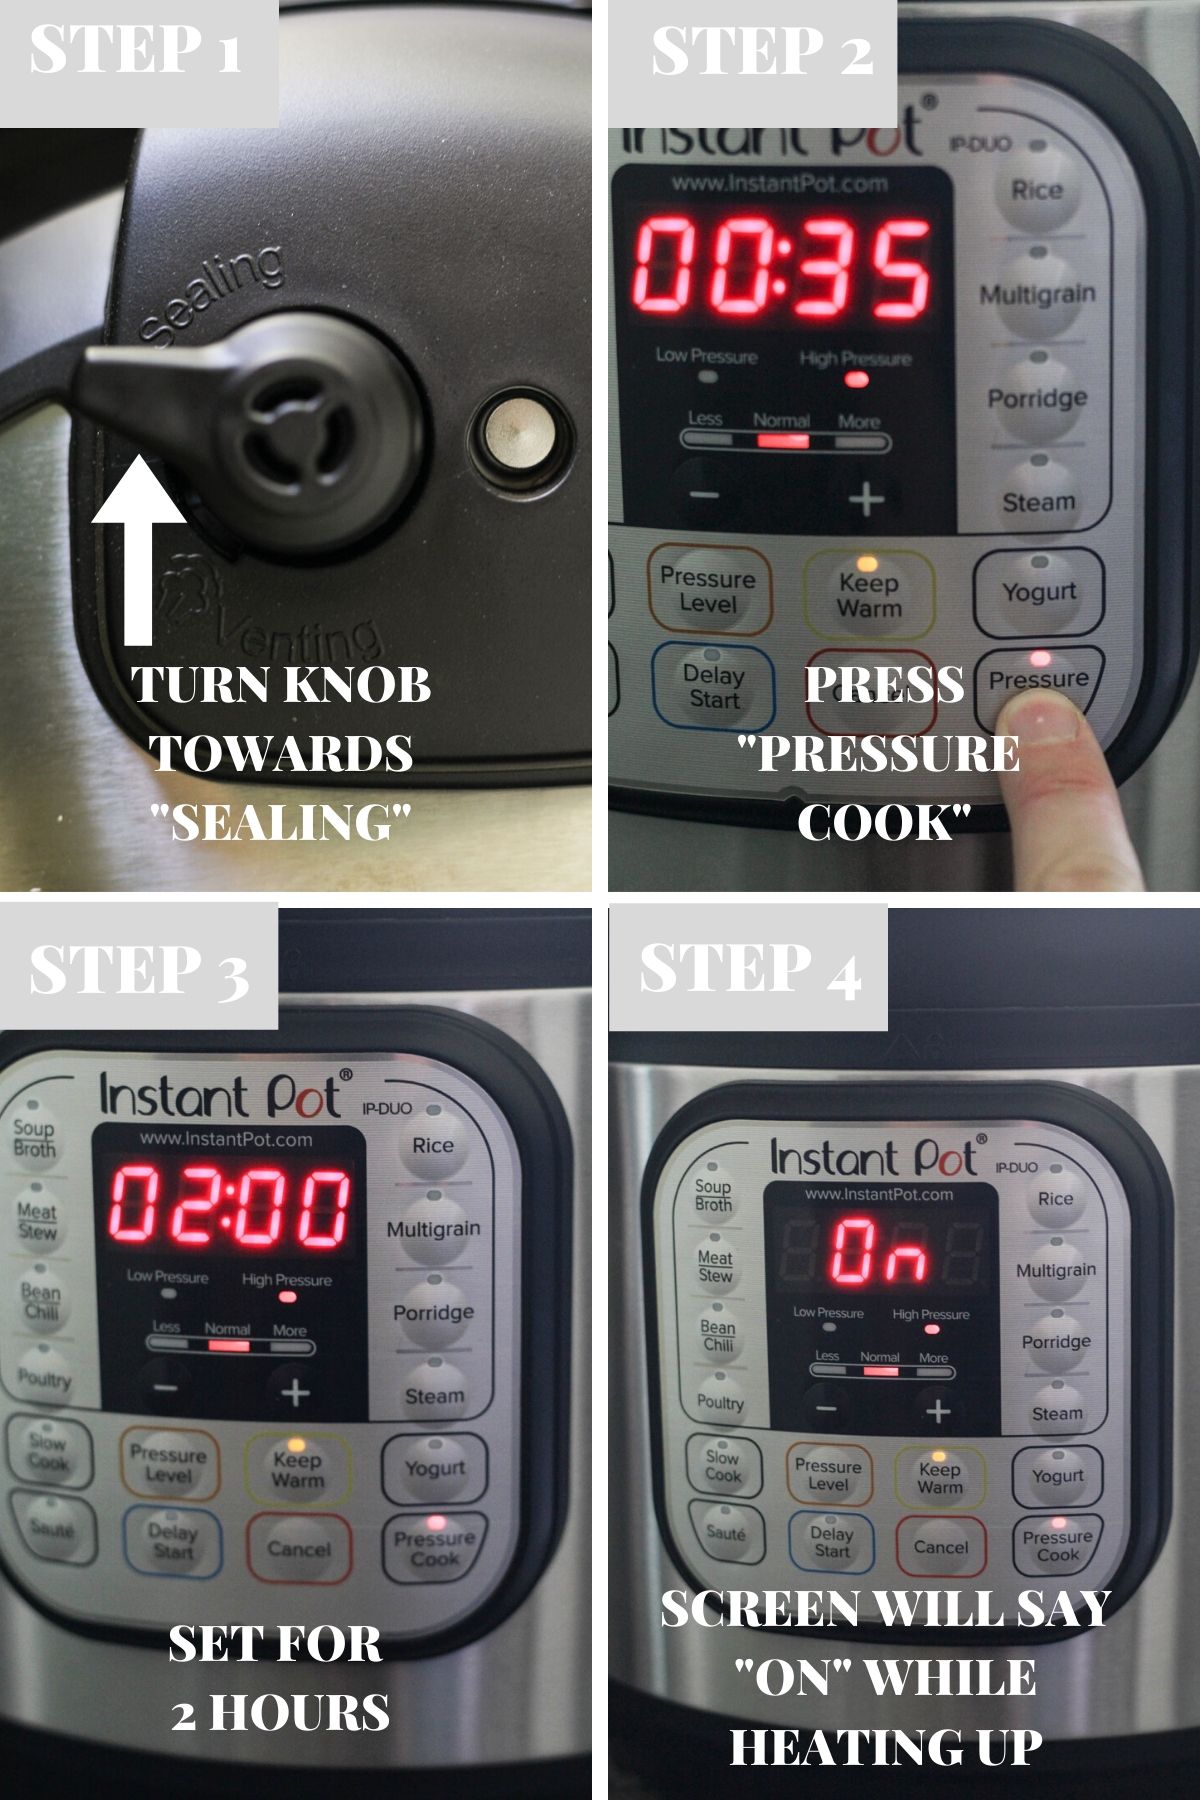
- On top of the Instant Pot, turn the knob towards “Sealing”. This will seal the heat/steam inside the pot while cooking
- Press “pressure cook”. A time will pop up on the screen.
- Set the timer to cook for 2 hours.
- The screen will then say “On” to let you know it’s heating up. It will take several minutes to heat up.
- Once the pressure heats up in the pot, the timer will start showing an will tell you how much longer the cooking time is.
Releasing the steam from the pot…natural release vs. quick release method, important!
I don’t recommend the quick release method for venting, here’s why:
In the photo below, you can see that I tried the quick-release method to release the pressure from the Instant Pot. However, hot steamy broth shot all the way up to the ceiling!
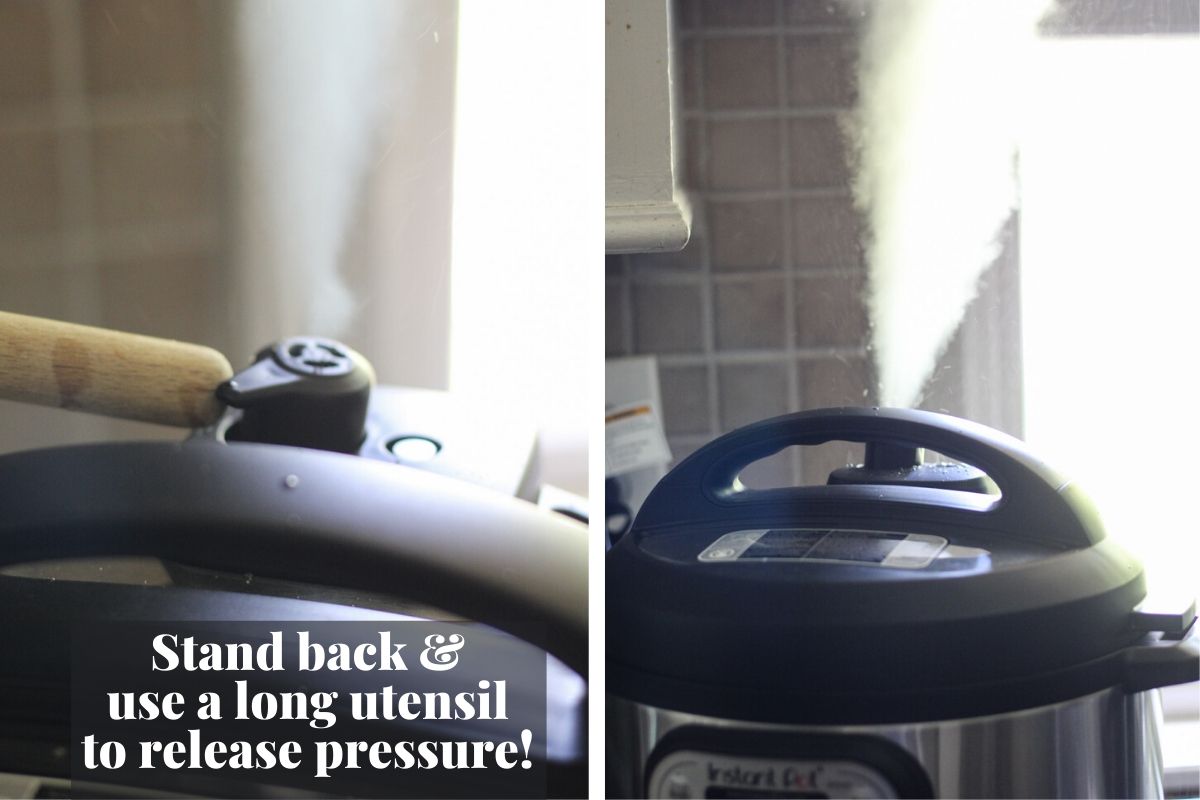
Instead, I recommend the natural-release method shown in this quick 1-minute video here:
Straining the ingredients from the pot
- If you have an instant pot strainer, simply lift the strainer out of the pot to remove ingredients. The foam will stick to the strainer
- If you don’t have a strainer use a slotted spoon to remove the ingredients. You’ll need to remove the foam as well with the spoon.
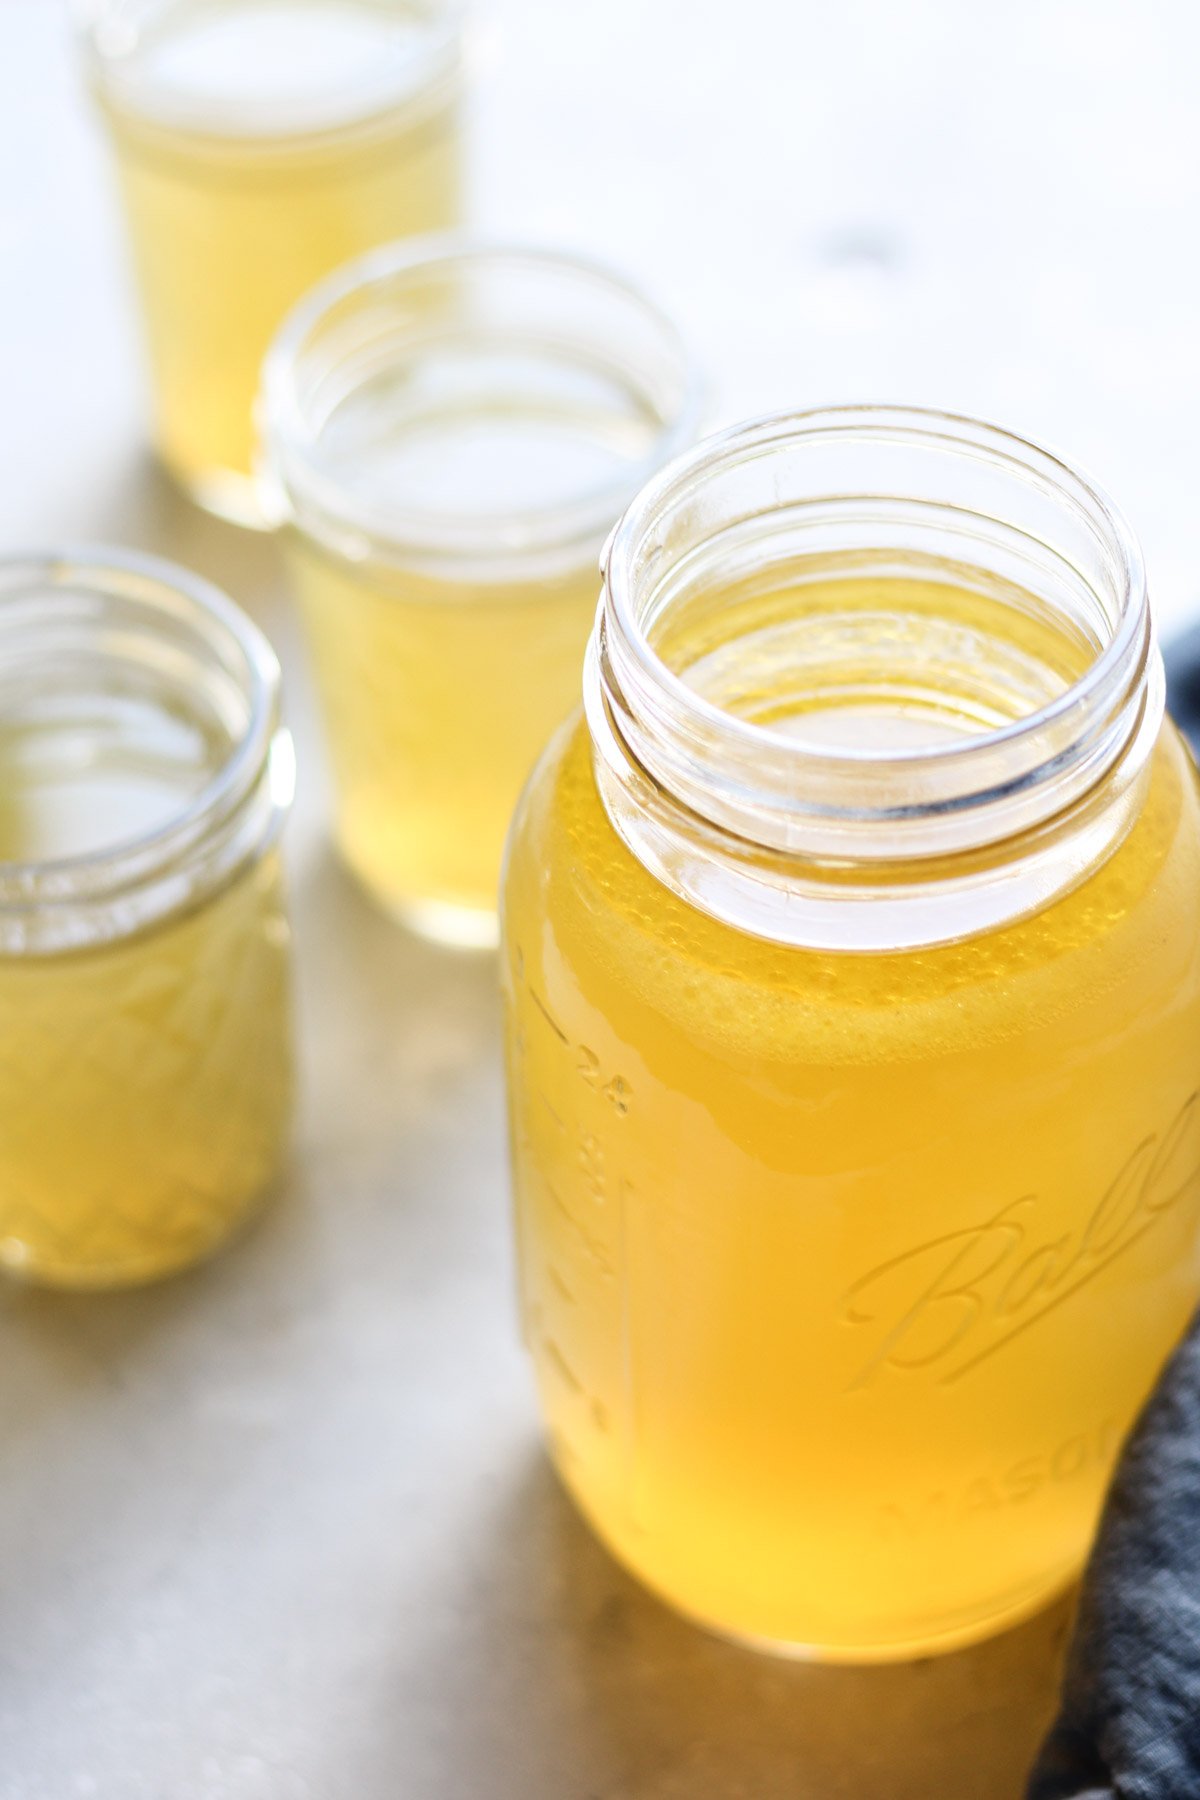
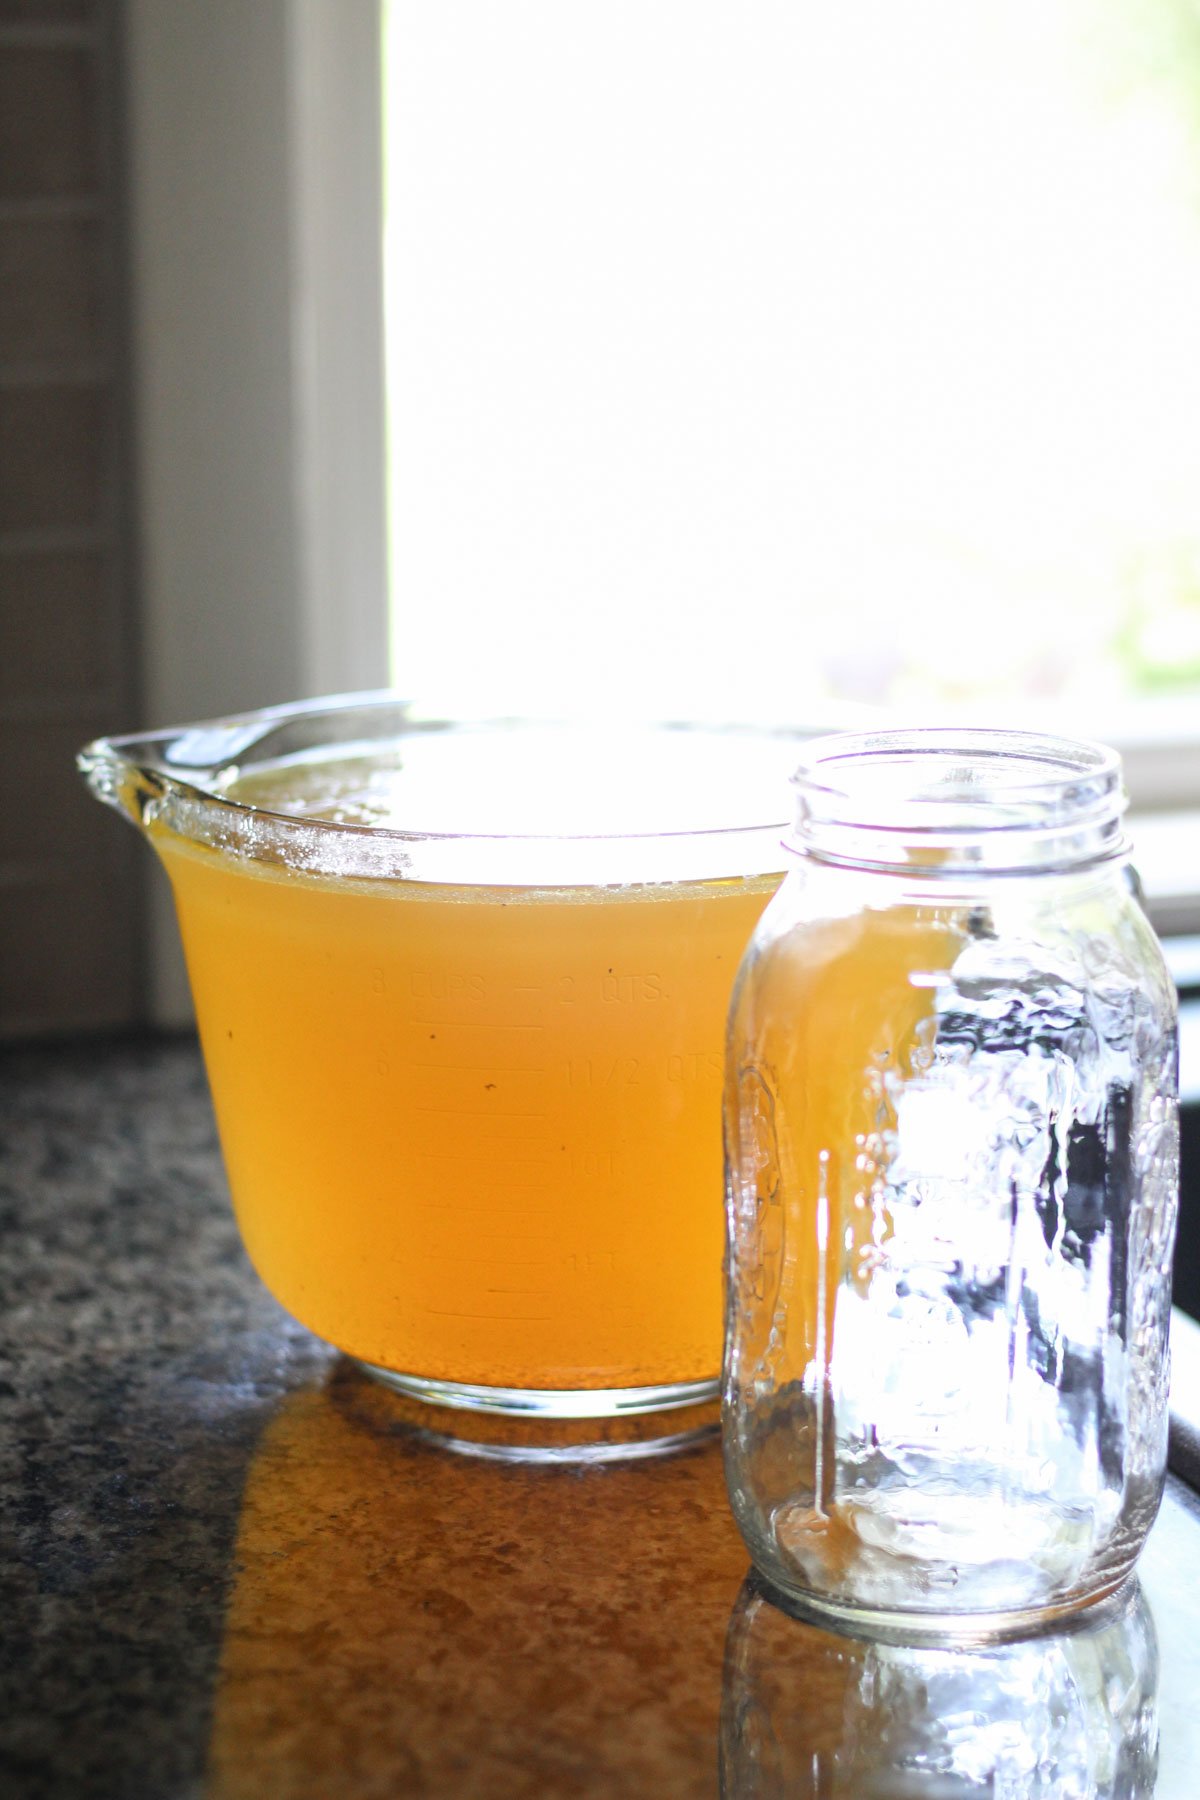
Pouring the broth into jars or containers
You can pour the broth into a container with a spout to make it easier to pour, or you can use a ladle to pour into mason jars.
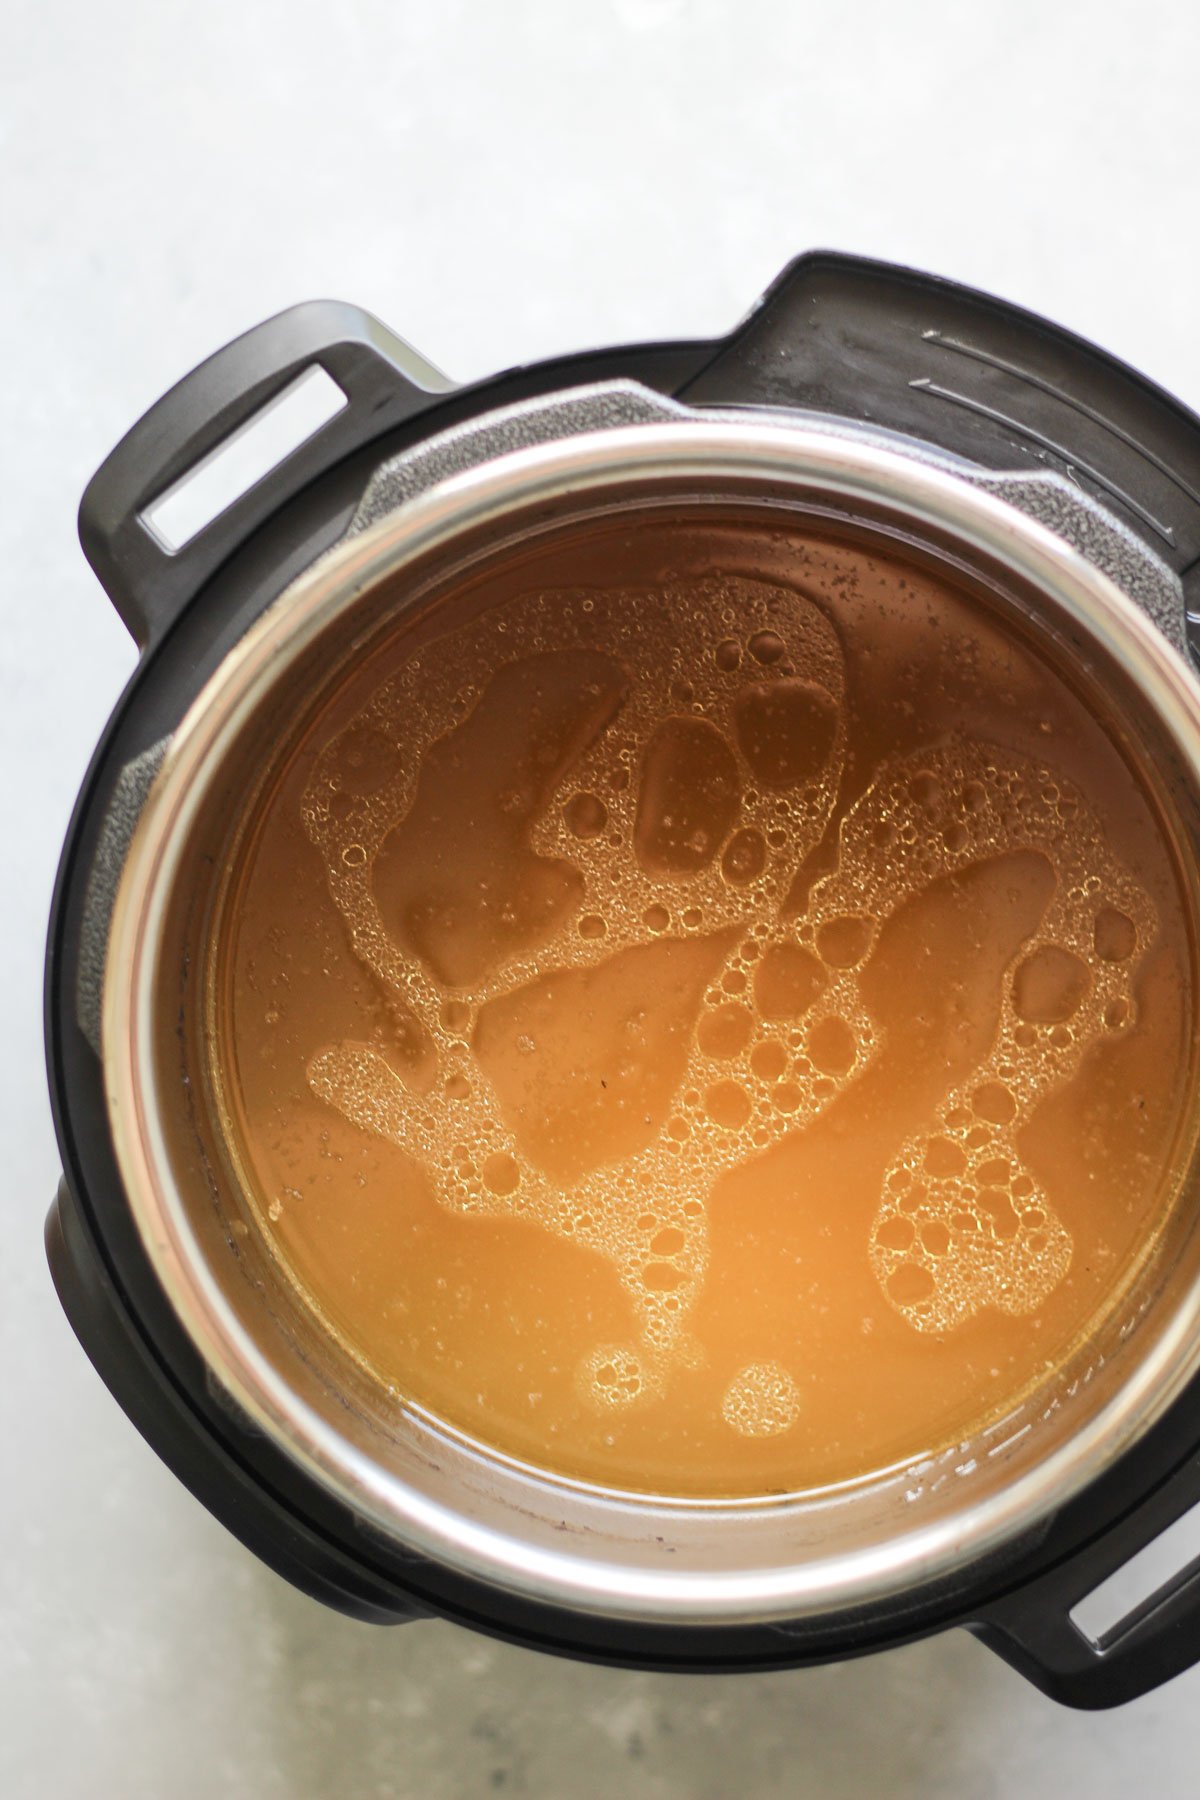
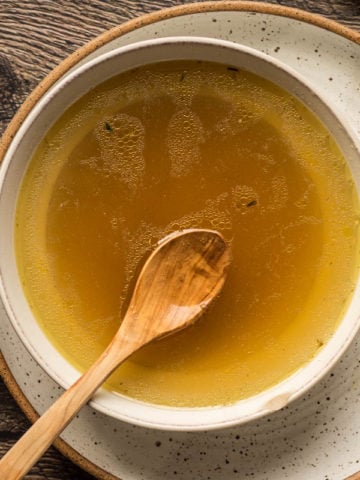
See how nicely this Instant Pot bone broth gels below?
Before pouring into all of your mason jars, be sure to give it a good stir to distribute the collagen throughout the mason jars, otherwise, some jars will gel, while others may be more liquid.
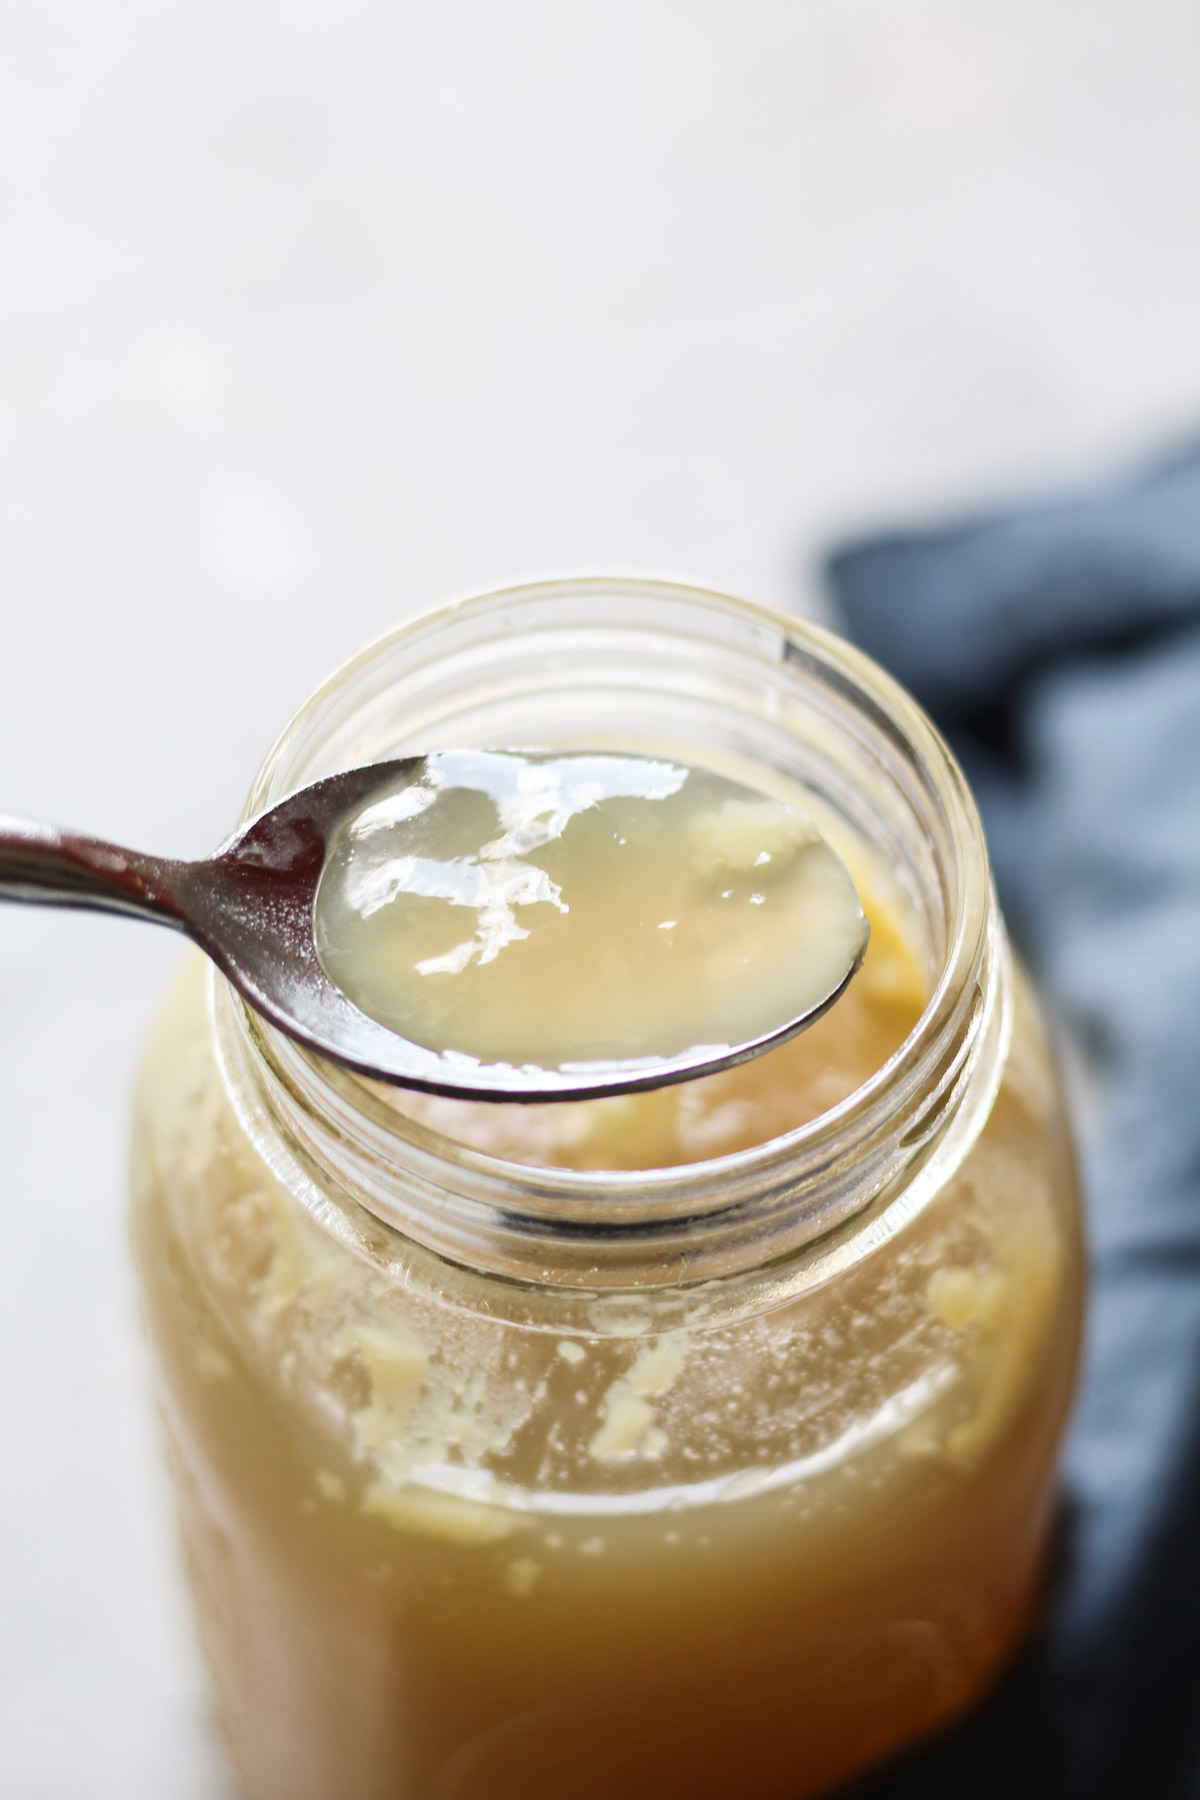
What if my bone broth doesn’t gel?
If I’ve used at least 2 pounds of bones per 6-8 quart pot of broth, I’ve never had an issue with my broth not gelling. However, if you make a pot and it doesn’t gel that much it could just be the ratio of bones to water.
Adding bones with a lot of collagen, like chicken feet and beef marrow bones, will really make your broth gel nicely. However, they can be hard to find and I honestly don’t like looking at those toenails! #sorrynotsorry
But don’t worry, your broth is plenty nutritious and good for you even if it doesn’t gel like you want it to.
So drink up, as you will still get amazing benefits from your healing bone broth!
How long will my broth last in the fridge?
I would use the broth within three days of it being in the fridge.
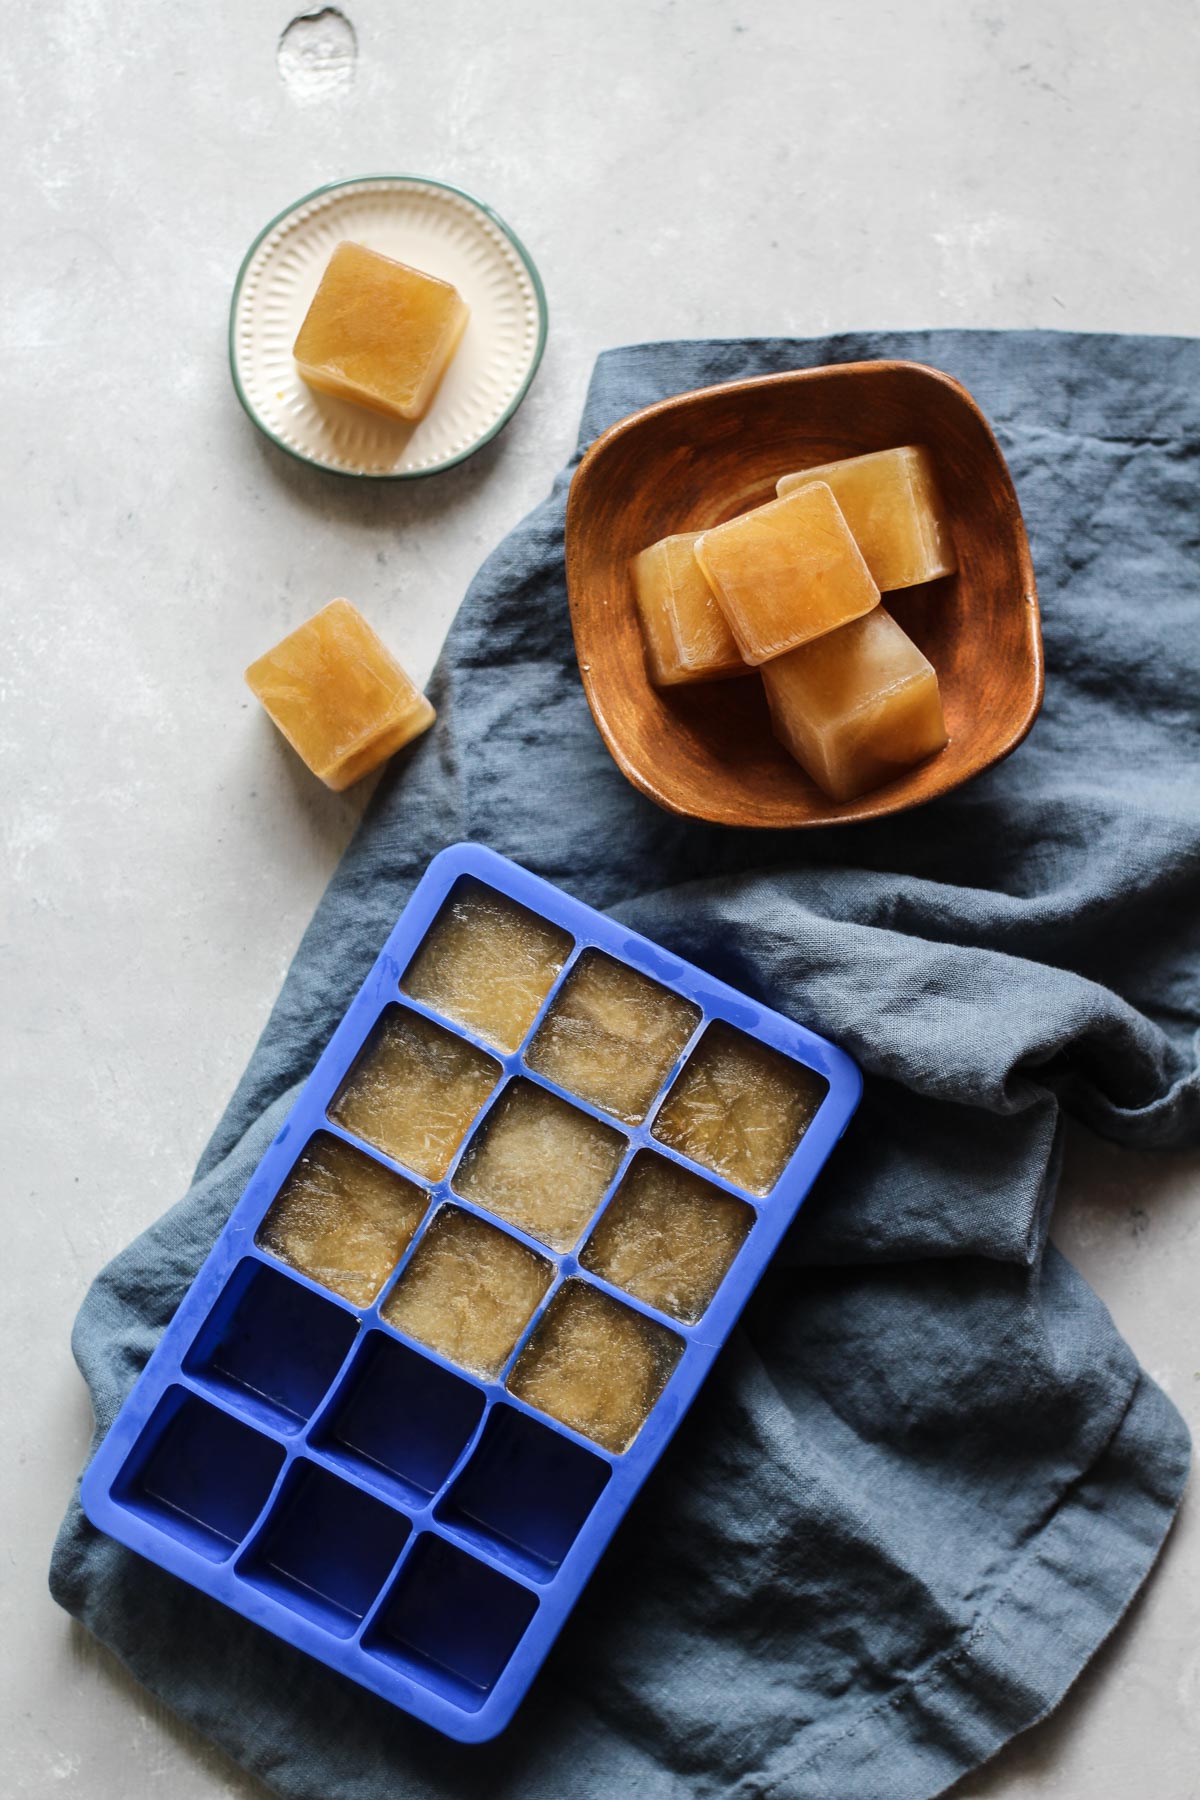
Can I freeze bone broth?
Absolutely! You can do this a couple of ways. I recommend freezing small amounts per container so that when you need to thaw it, you aren’t having to thaw 4 cups at once if you don’t need that much.
Option 1:
Freeze in mason jars but make sure to let the broth cool down before freezing. Also leave an inch of empty space at the top of the jar to allow for expansion, otherwise the glass jar could crack in the freezer.
Option 2:
Freeze your broth into ice cubes so you’ll have smaller servings to thaw when you need it.
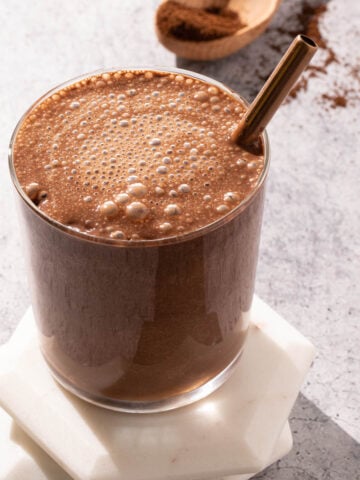
You can use this rich broth several different ways:
- Use the broth when cooking risotto or rice
- Make sauces with it
- Drink it by itself for nourishment
- Make soup
Related recipes and posts on my site
Apple and Chicken Dumpling Soup
Thai Butternut Squash Soup with Cajun Sausage
White Bean Pesto Chicken Meatball Soup
Bone Broth Chili
Bon Appetit Ya’ll,
Leslie O.
Instant Pot Bone Broth + 3 Hacks
Ingredients
- 3-5 pound whole chicken
- 1-2 pounds bone-in chicken drumsticks or wings
- 1-2 pounds bone -in chicken thighs
- 1-2 whole carrots chopped in large chunks
- 1/2 large onion cut in half
- 1-2 celery stalks chopped in large stalks
- 1 tsp whole peppercorns
- 1 large sprig fresh rosemary
- a few sprigs fresh rosemary
- handful fresh parsley
- 1 glug apple cider vinegar
Instructions
- For ease of prepping, pick out your meat at the store and have the butcher separate the meat from the bones for you while you shop. (You may need to call your butcher ahead of time for this and go during off-peak times)
- Place the bones from the whole chicken, drumsticks, and thighs inside the Instant Pot strainer, including neck bones from the carcass.
- Add the onion, celery, carrots, whole peppercorns, fresh herbs to the strainer.
- Fill the Instant Pot below the fill line with water. Place the strainer inside the pot and check to make sure the water hasn't risen over the fill line. Add apple cider vinegar.
- Do not add salt to your broth. You can add salt to your broth once you drink it or cook with it.
- Make sure the Instant Pot lid is sealed. Flip the knob towards "sealing" to seal in the pressure.
- Plug in the Instant Pot and press "pressure cook". Turn the time to 2 hours or 120 minutes. The instant pot should say "on" at this point. This means that the pot is heating up and pressurizing. This should take about 30 minutes. Once the instant pot is up to temperature, it will start timing the 2-hour pressure cooking, so you will know how long this will take.
- Once the instant pot is done with the cooking process, the heat will turn off. At this point, you will need to release the pressure from the pot. However, I do NOT recommend releasing the pressure manually from the pressure knob. Instead, allow the pressure to release naturally, which takes 10-25 minutes, but will keep steam/broth from shooting all over your ceiling!
- When the silver knob drops next to the knob, the pressure has released. Please watch the quick 2-minute video linked for this in the post to see exactly what I mean.
- Remove the lid and remove the strainer with all of the ingredients. Pour the liquid broth into a large vessel and ladle or funnel the broth into mason jars. Place the lid on, but not too tight.
- The broth will keep for about three days in the fridge, or up to one month in the freezer.
Notes
- Pick out your meat at the grocery store and ask the butcher if they can remove the meat from the bones for you while you shop.
- Use an Instant Pot-compatible strainer to instantly strain out all of the veggies, spices, and bones all at once! I cut off the rubber cover on the handle so it wouldn't leach chemicals in the pot.
What if my bone broth doesn't gel?
If I've used at least 2 pounds of bones per 6-8 quart pot of broth, I've never had an issue with my broth not gelling. However, if you make a pot and it doesn't gel that much it could just be the ratio of bones to water. Adding bones with a lot of collagen, like chicken feet and beef marrow bones, will really make your broth gel nicely. However, they can be hard to find and I honestly don't like looking at those toenails! But don't worry, your broth is plenty nutritious and good for you even if it doesn't gel like you want it to.How long will my broth last in the fridge?
I would use the broth within three days of it being in the fridge.Can I freeze bone broth?
You can do this a couple of ways. I recommend freezing small amounts per container so that when you need to thaw it, you aren't having to thaw 4 cups at once if you don't need that much. Option 1: Freeze in mason jars but make sure to let the broth cool down before freezing. Also leave an inch of empty space at the top of the jar to allow for expansion, otherwise the glass jar could crack in the freezer. Option 2: Freeze your broth into ice cubes so you'll have smaller servings to thaw when you need it.If you’d like to receive updates on new recipes please subscribe to my blog in the form below!
Leave a Reply