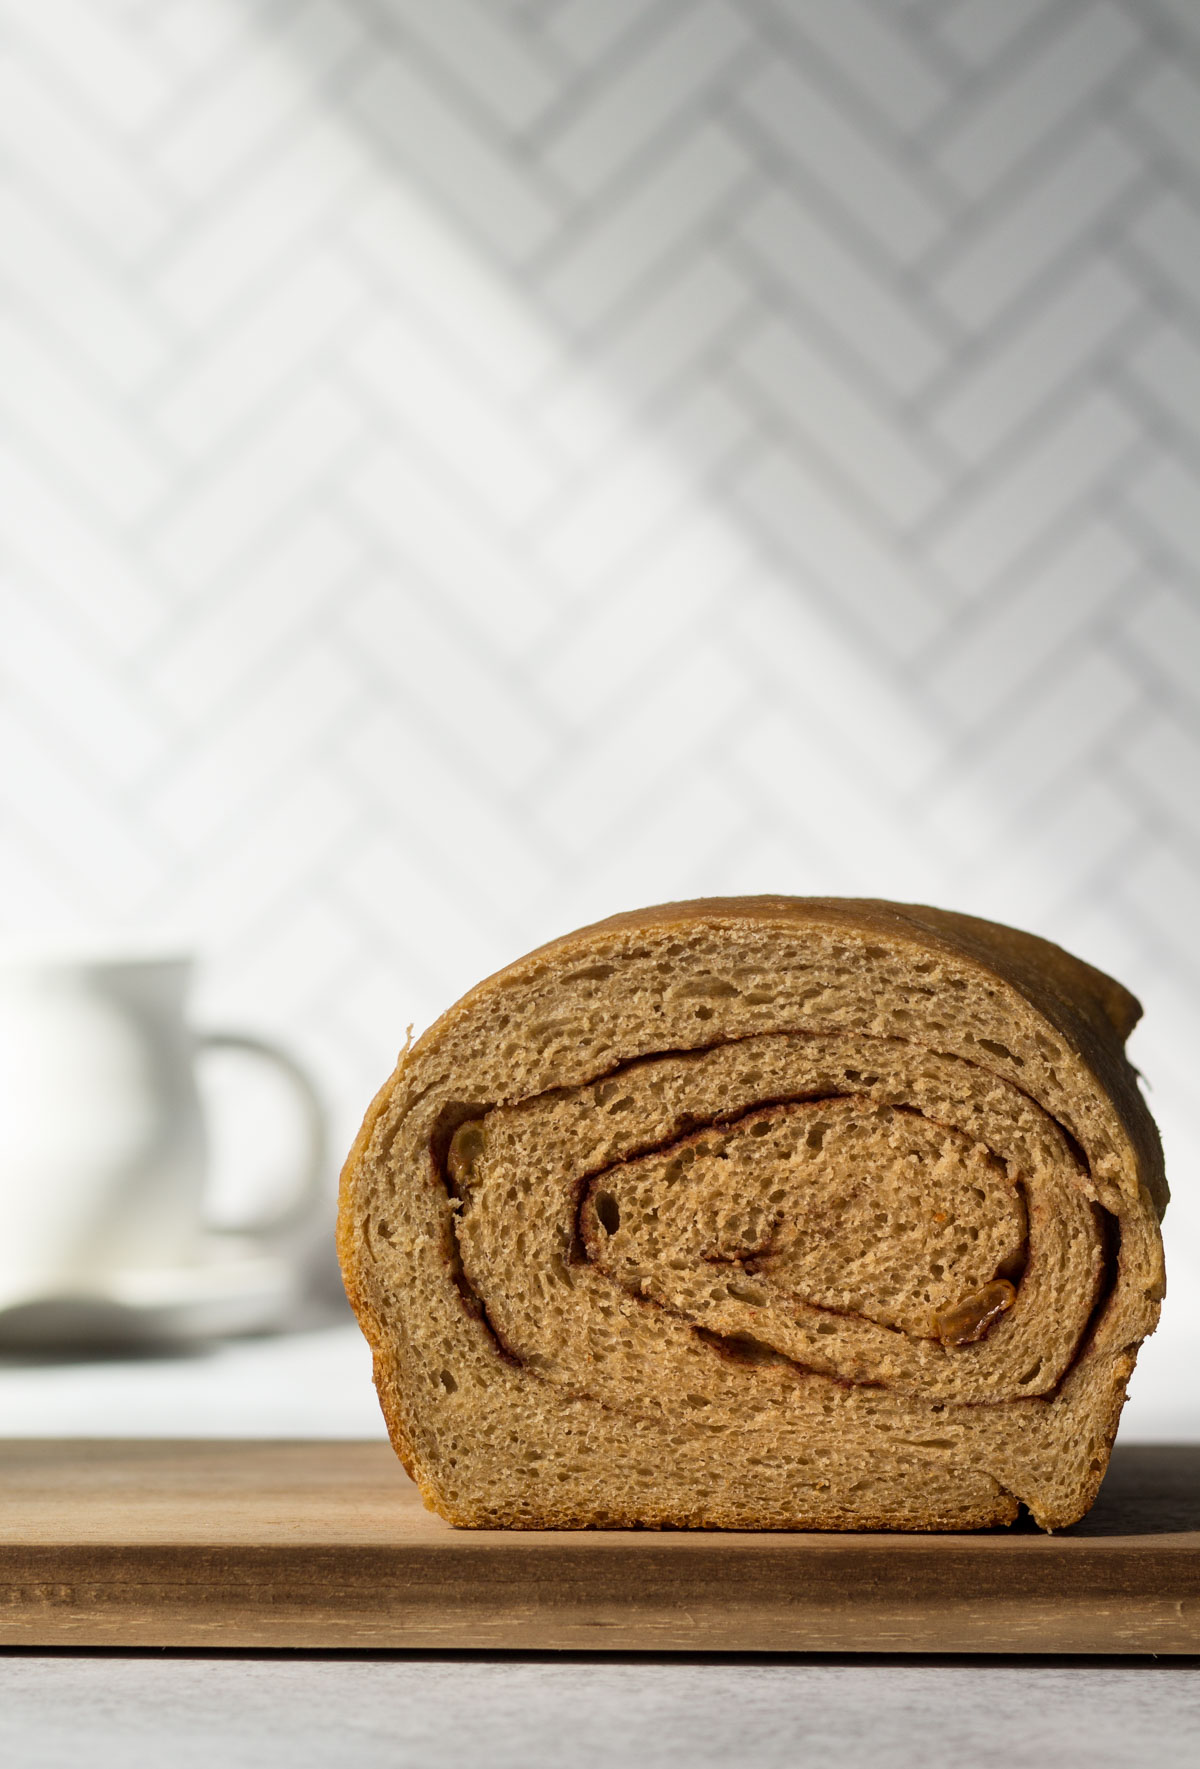
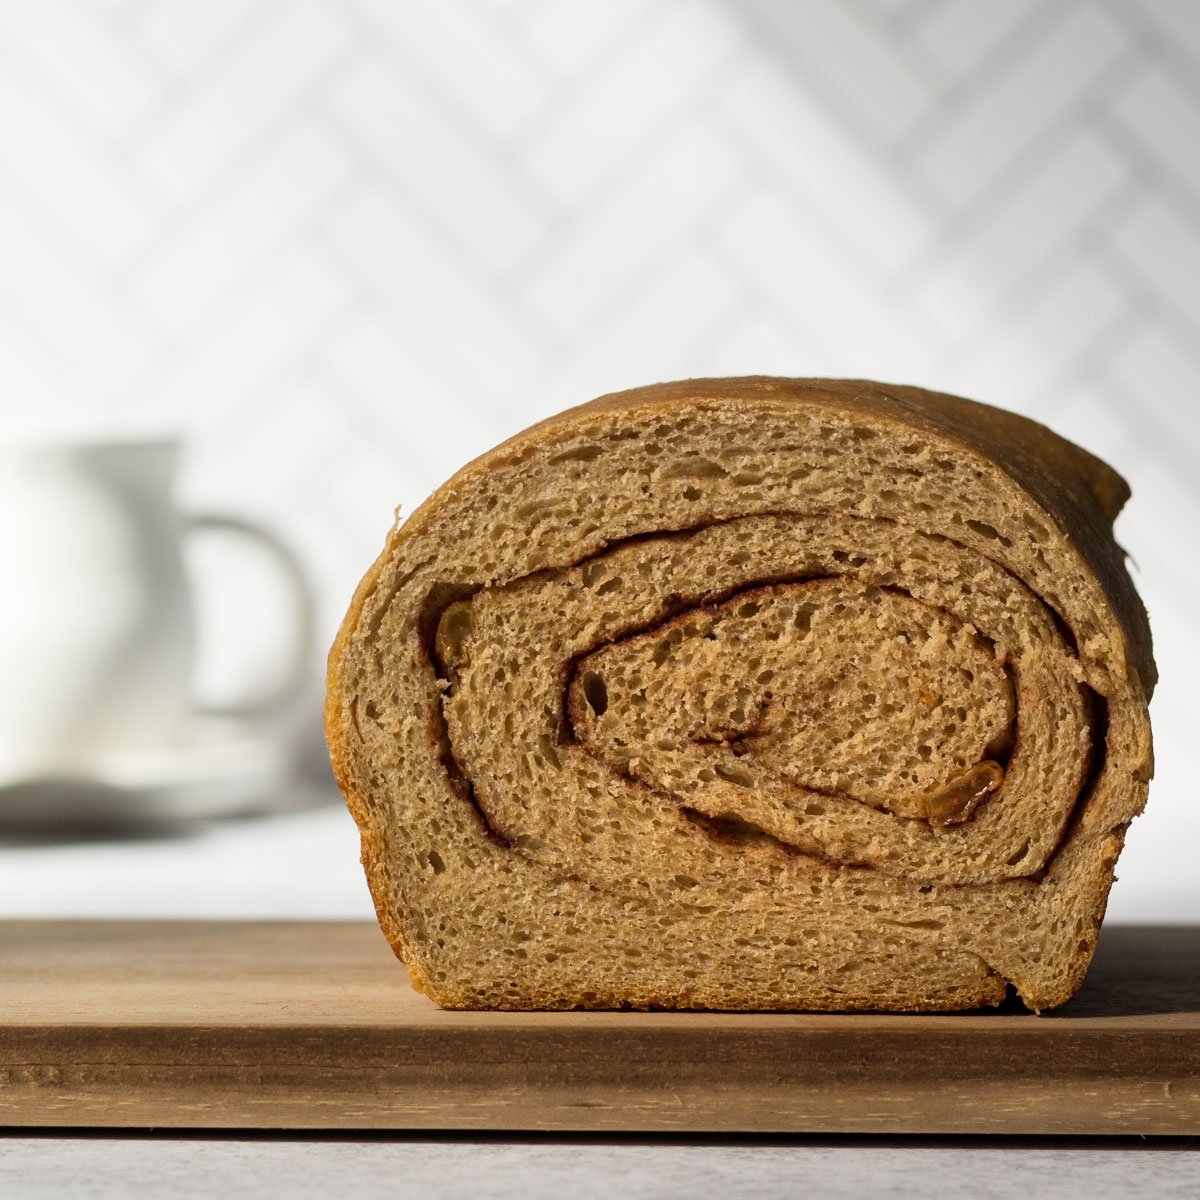
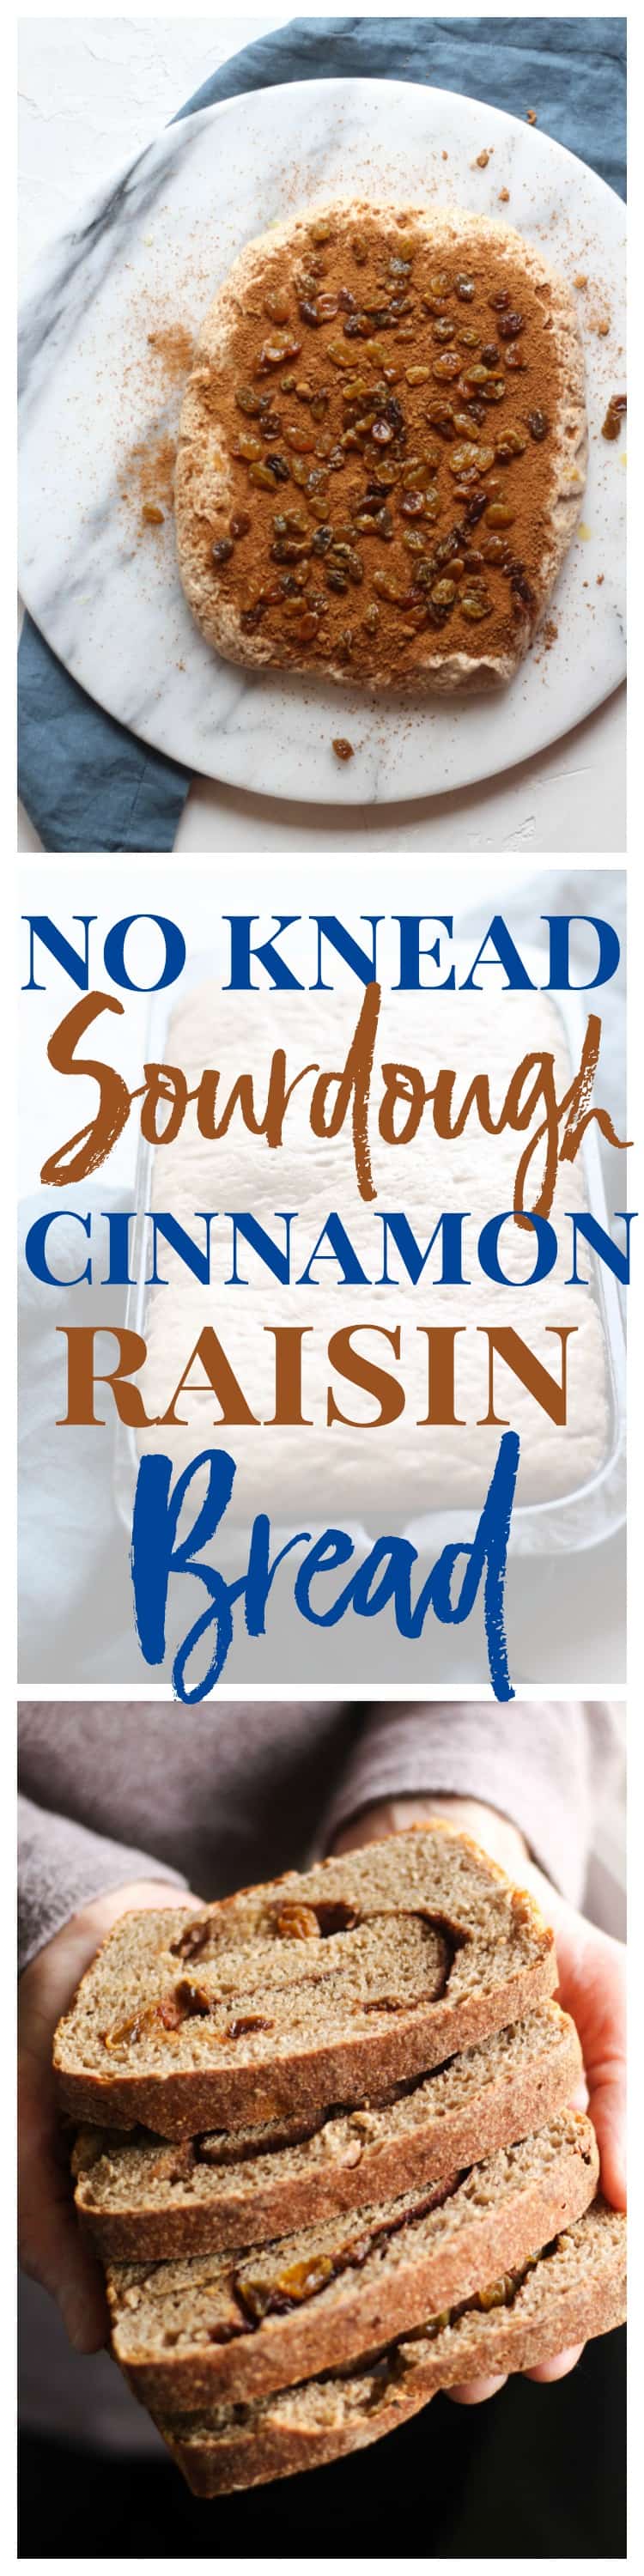
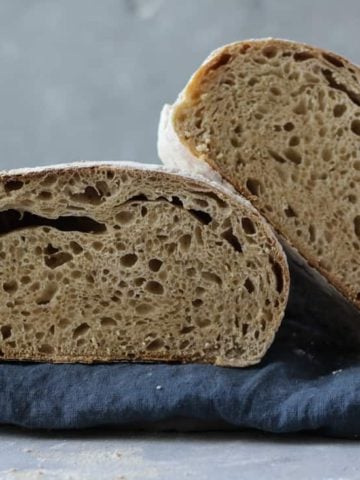
There are moments in life when your body and soul wants nothing more than cinnamon raisin toast with butter on top. The aroma of this no-knead sourdough cinnamon raisin bread is unbelievable and you’d be amazed at how simple it is to bake this beautiful bread!
Recipe Update:
After a few readers had trouble with this recipe, I decreased the amount of whole wheat flour to lighten up the loaves and the texture and flavor of this bread is 1000 times better! In the comment section you will read that this recipe actually makes two loaves instead of one (a mistake on my part).
Original Recipe vs. New Recipe
Below you will see the original recipe and the updated recipe and the difference in the texture and how much it rises. I also updated how long you stretch the dough out before rolling. The extra length makes for better swirls and overall shape once it’s baked.

“So how do you put together this soft and tender bread”, you ask? In the words of Lionel Richie, “It’s as easy as Sunday morning”.
The mantra for bread here at Bessie Bakes is slow and easy. Slow as in, long fermentation. Easy as in, you barely lift a finger and let a sourdough culture and natural fermentation do the rest.
Recipe Notes
- A sourdough starter ferments dough more slowly so it won’t over-proof after a long fermentation like this.
- You can add a few tablespoons of water at a time after you’ve mixed the dough if it needs more moisture.
- I use brown sugar and golden raisins in the filling but you can use regular raisins if you prefer.
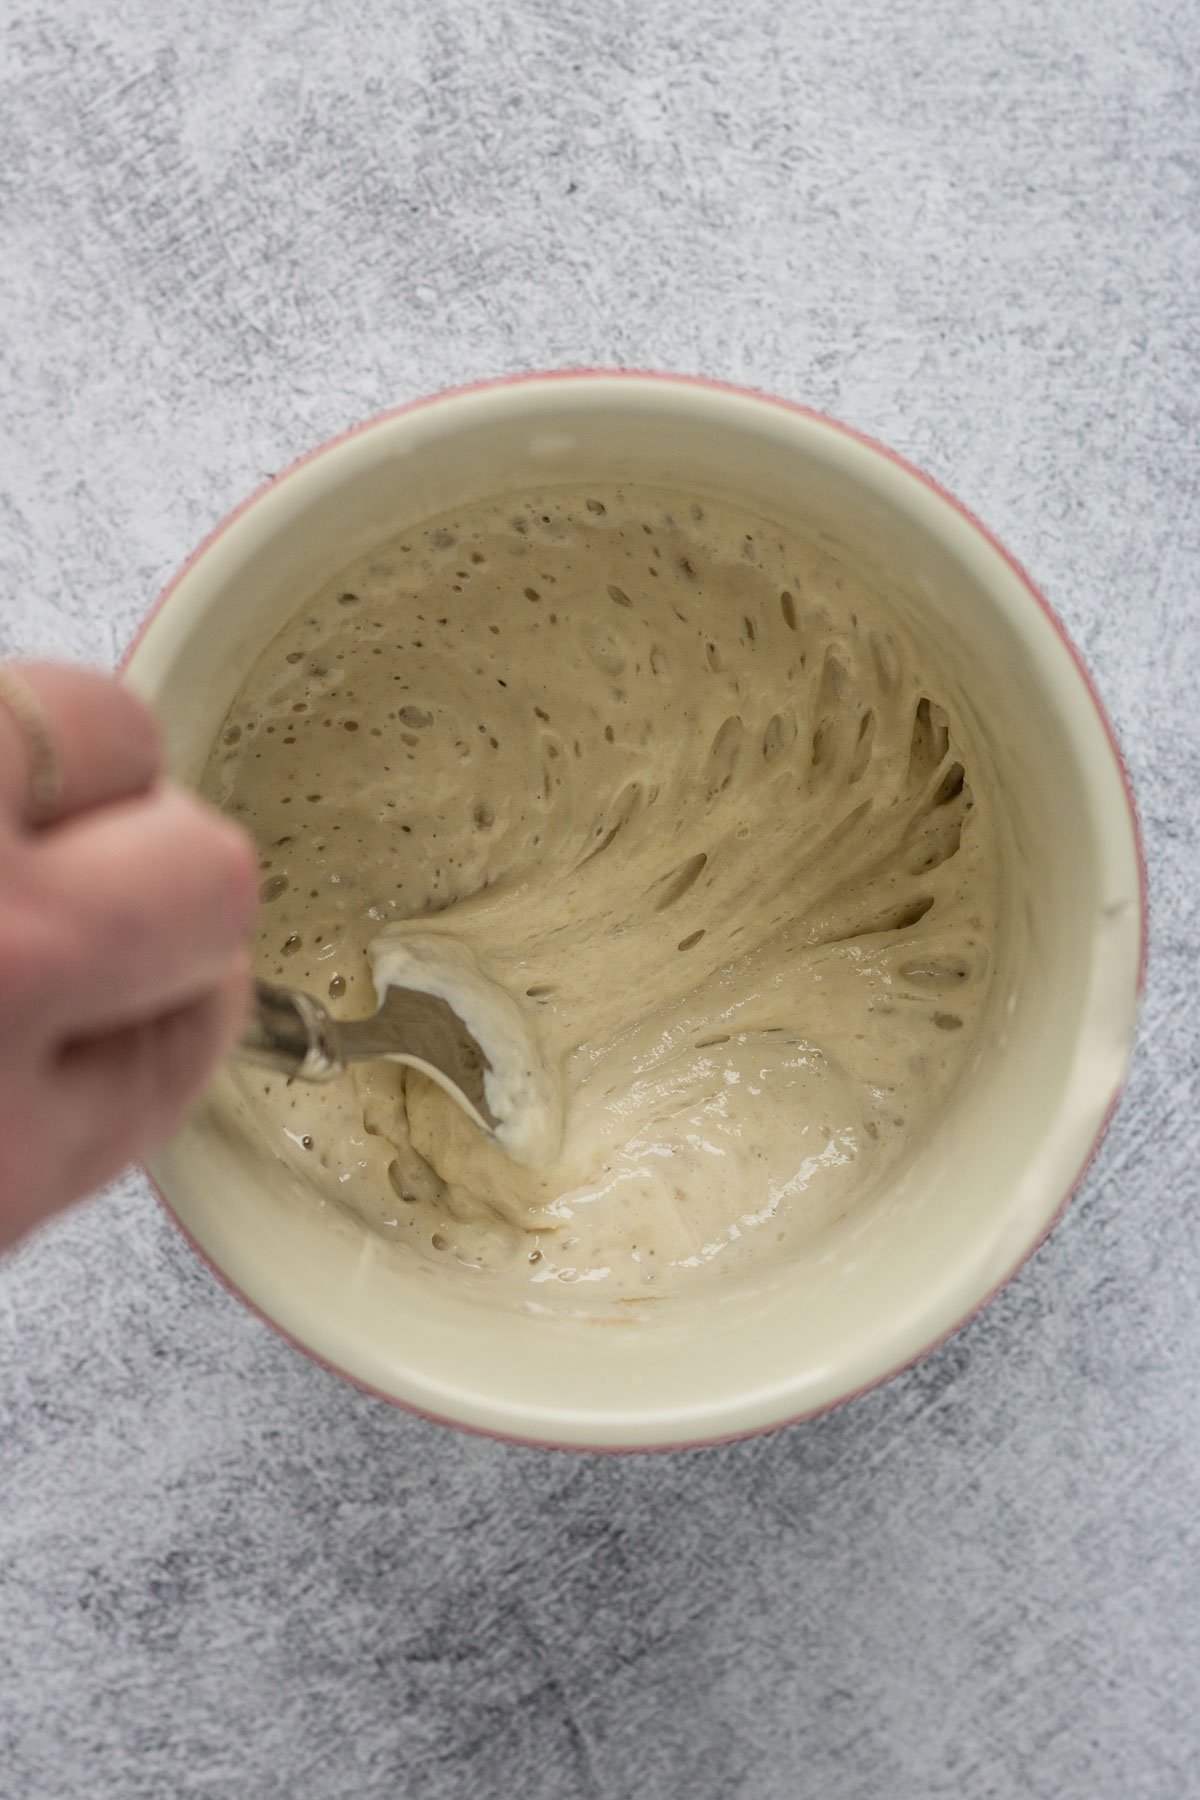
- Feed your starter about 8-10 hours before you are ready to mix the dough to ensure it’s nice and bubbly and ripe like the photo below.
- You can freeze individually wrapped slices of this bread or you slice the loaf in half and freeze one section if you don’t see yourself eating the entire loaf within two days.
Easy step-by-step instructions
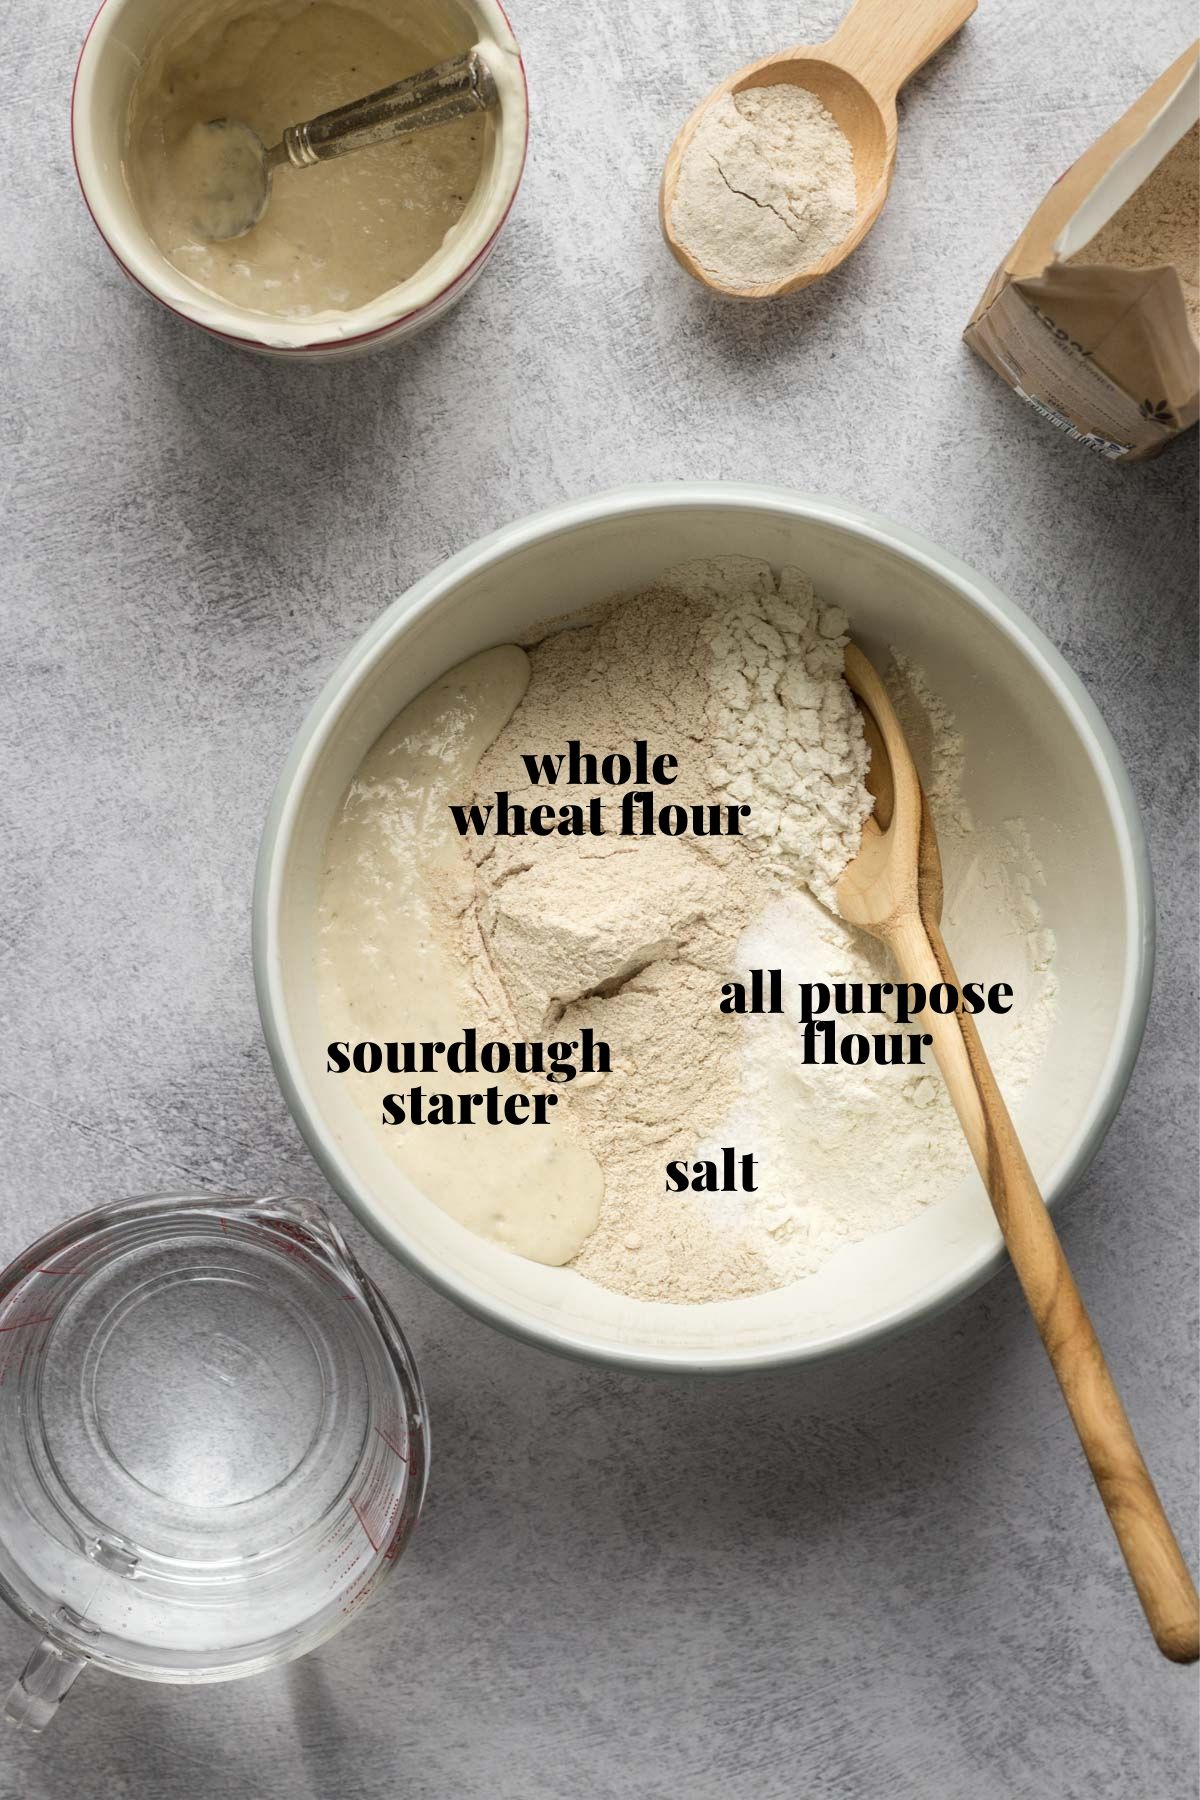
- Mix the ingredients together with a wooden spoon until combined, cover and let ferment all day or overnight.
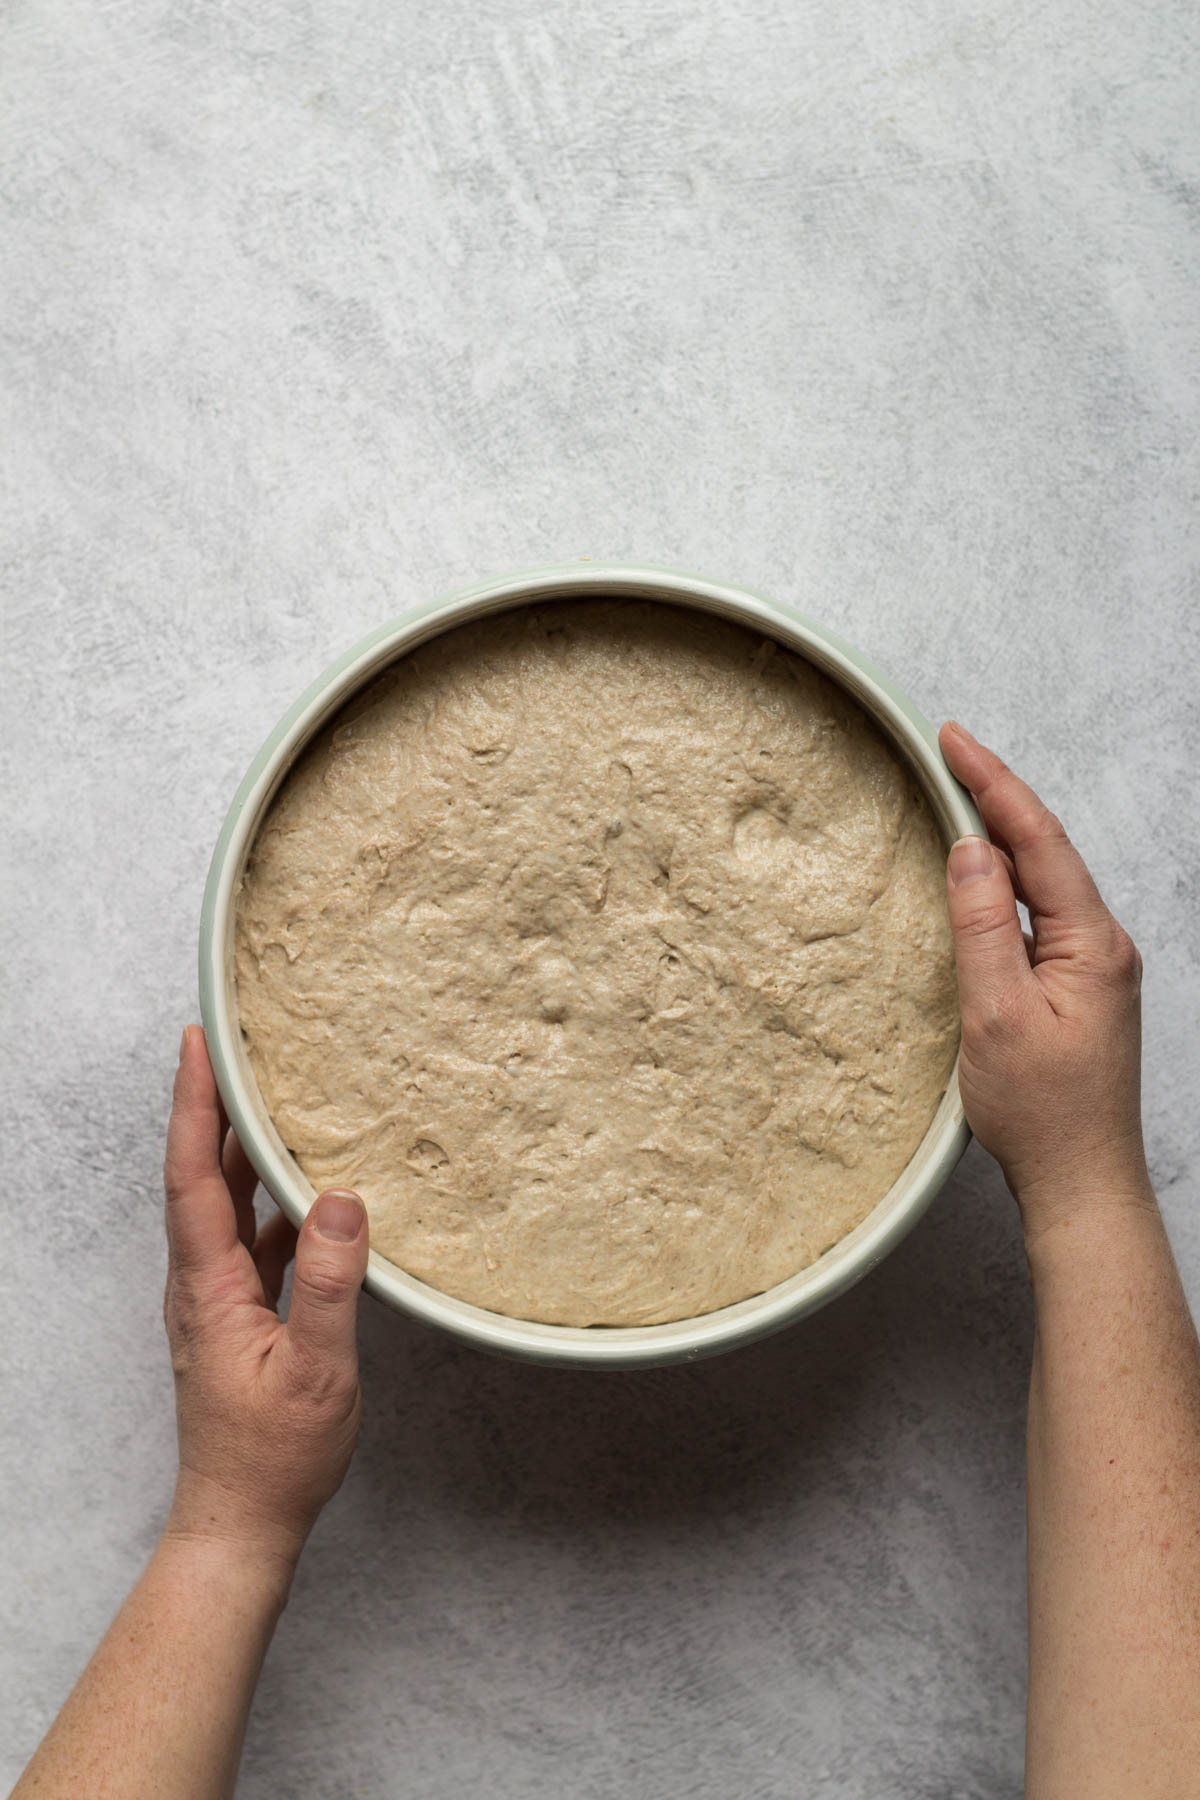
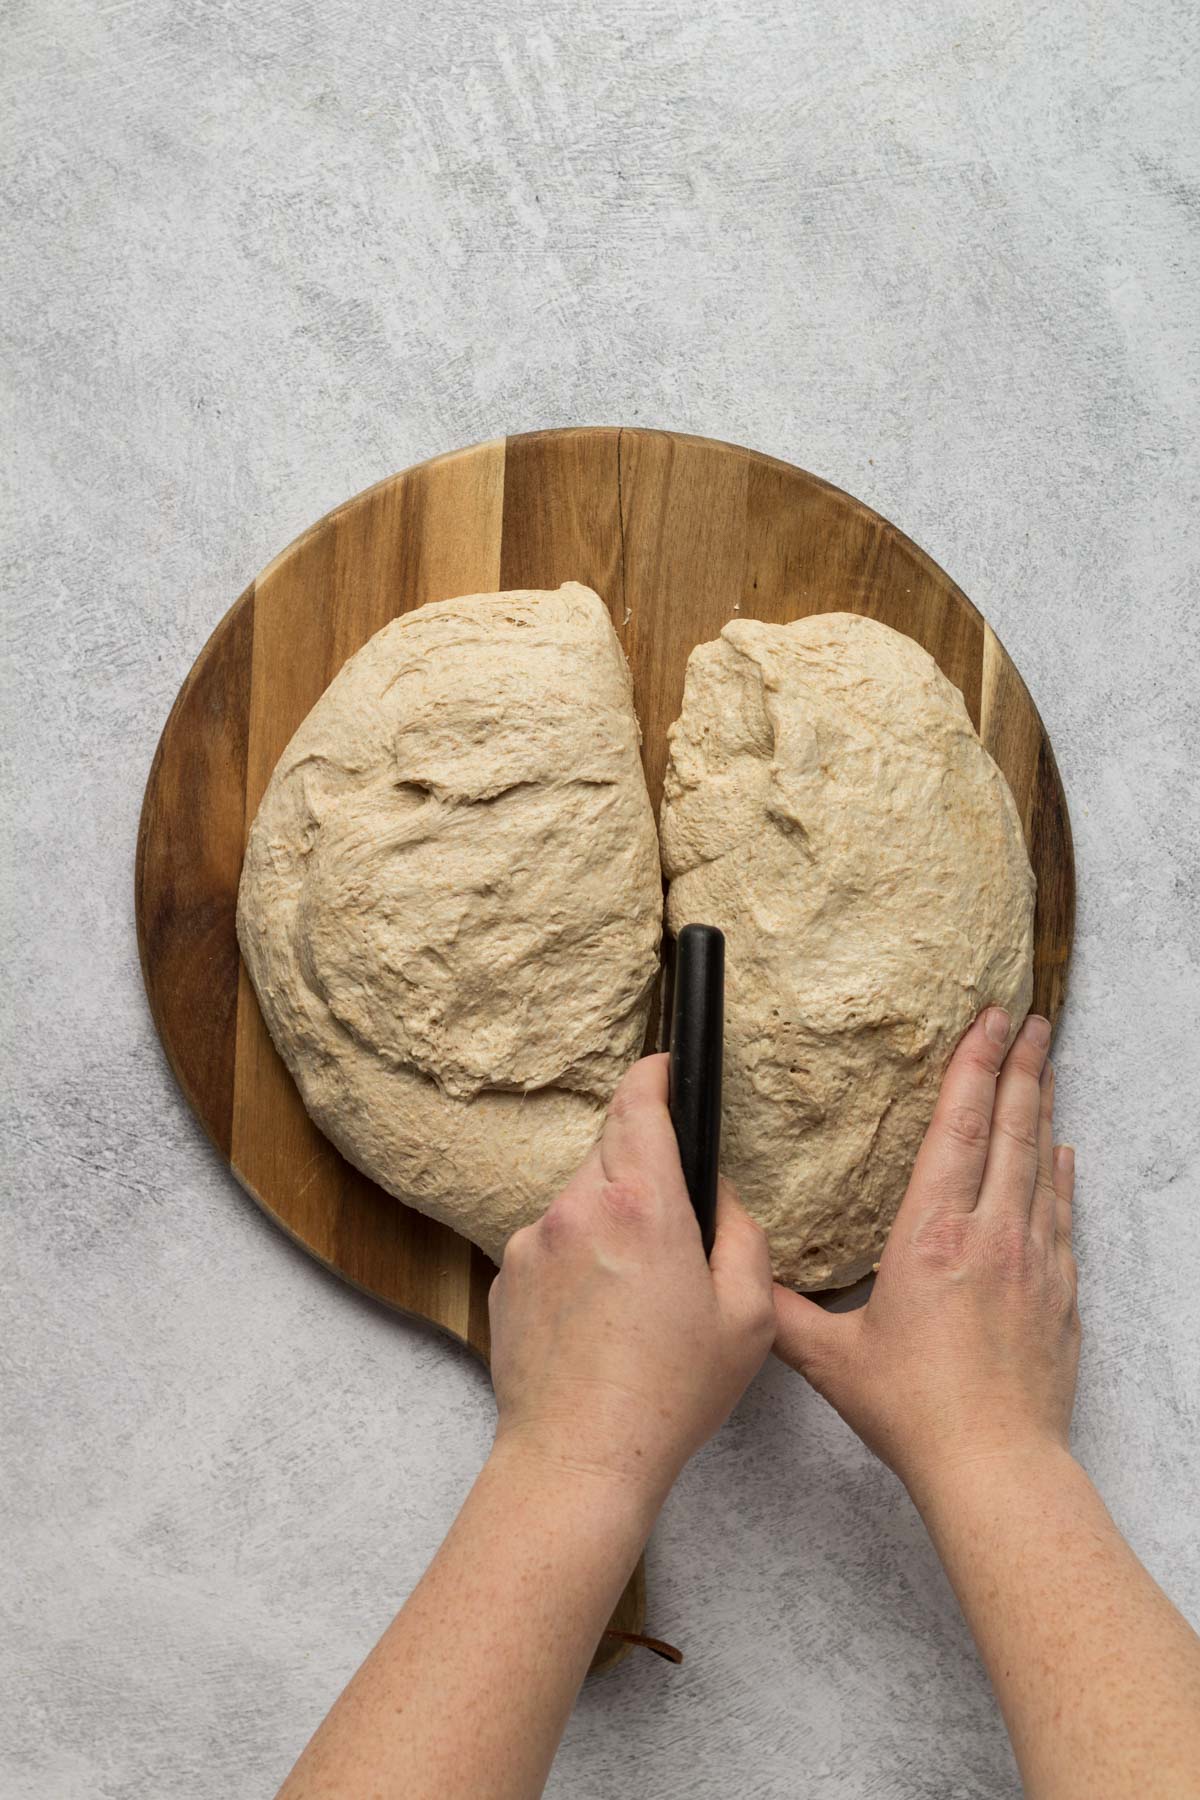
- When it’s risen, place on your countertop and cut the dough in half to make two loaves
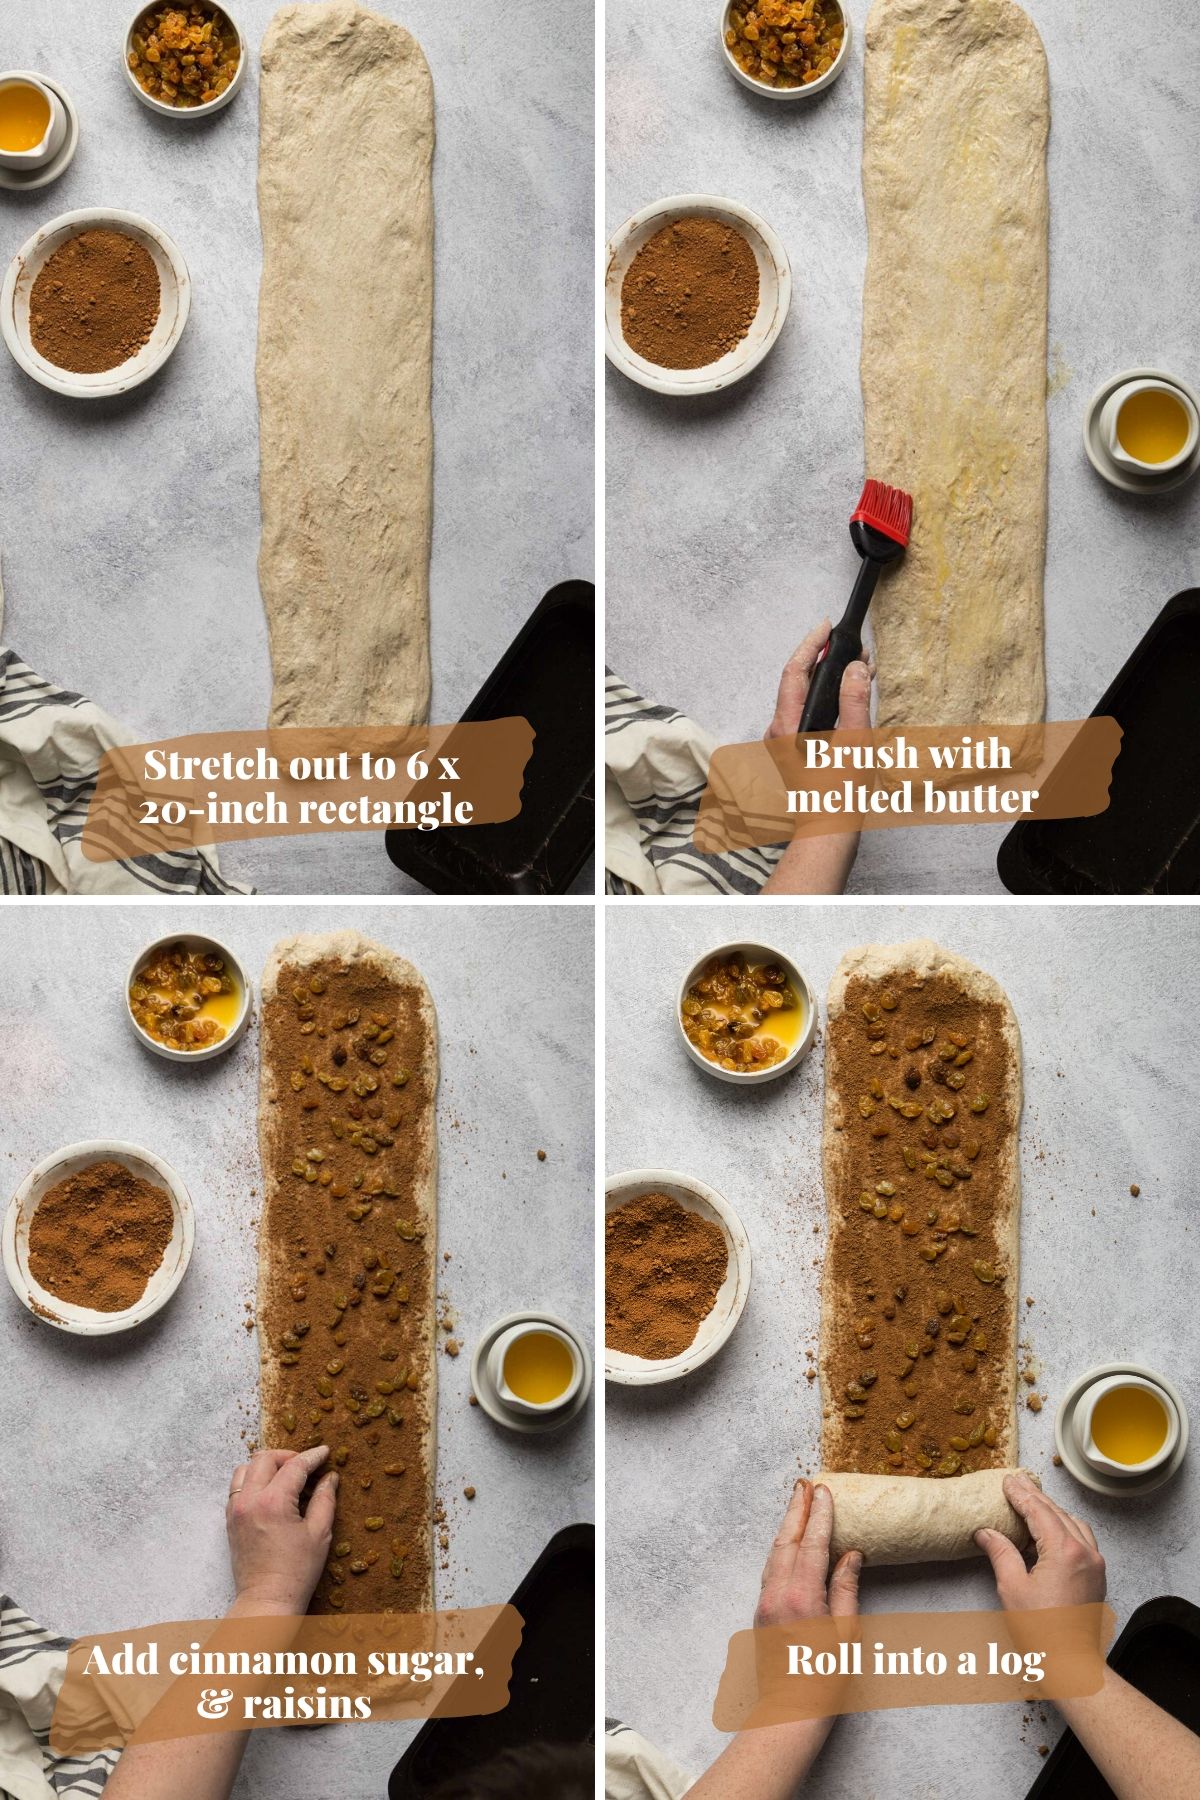
- Roll out to a 6 x 20-inch long rectangle. Sprinkle with brown sugar, cinnamon, and orange juice-soaked raisins.
- Roll like a jellyroll and pinch the ends together to seal
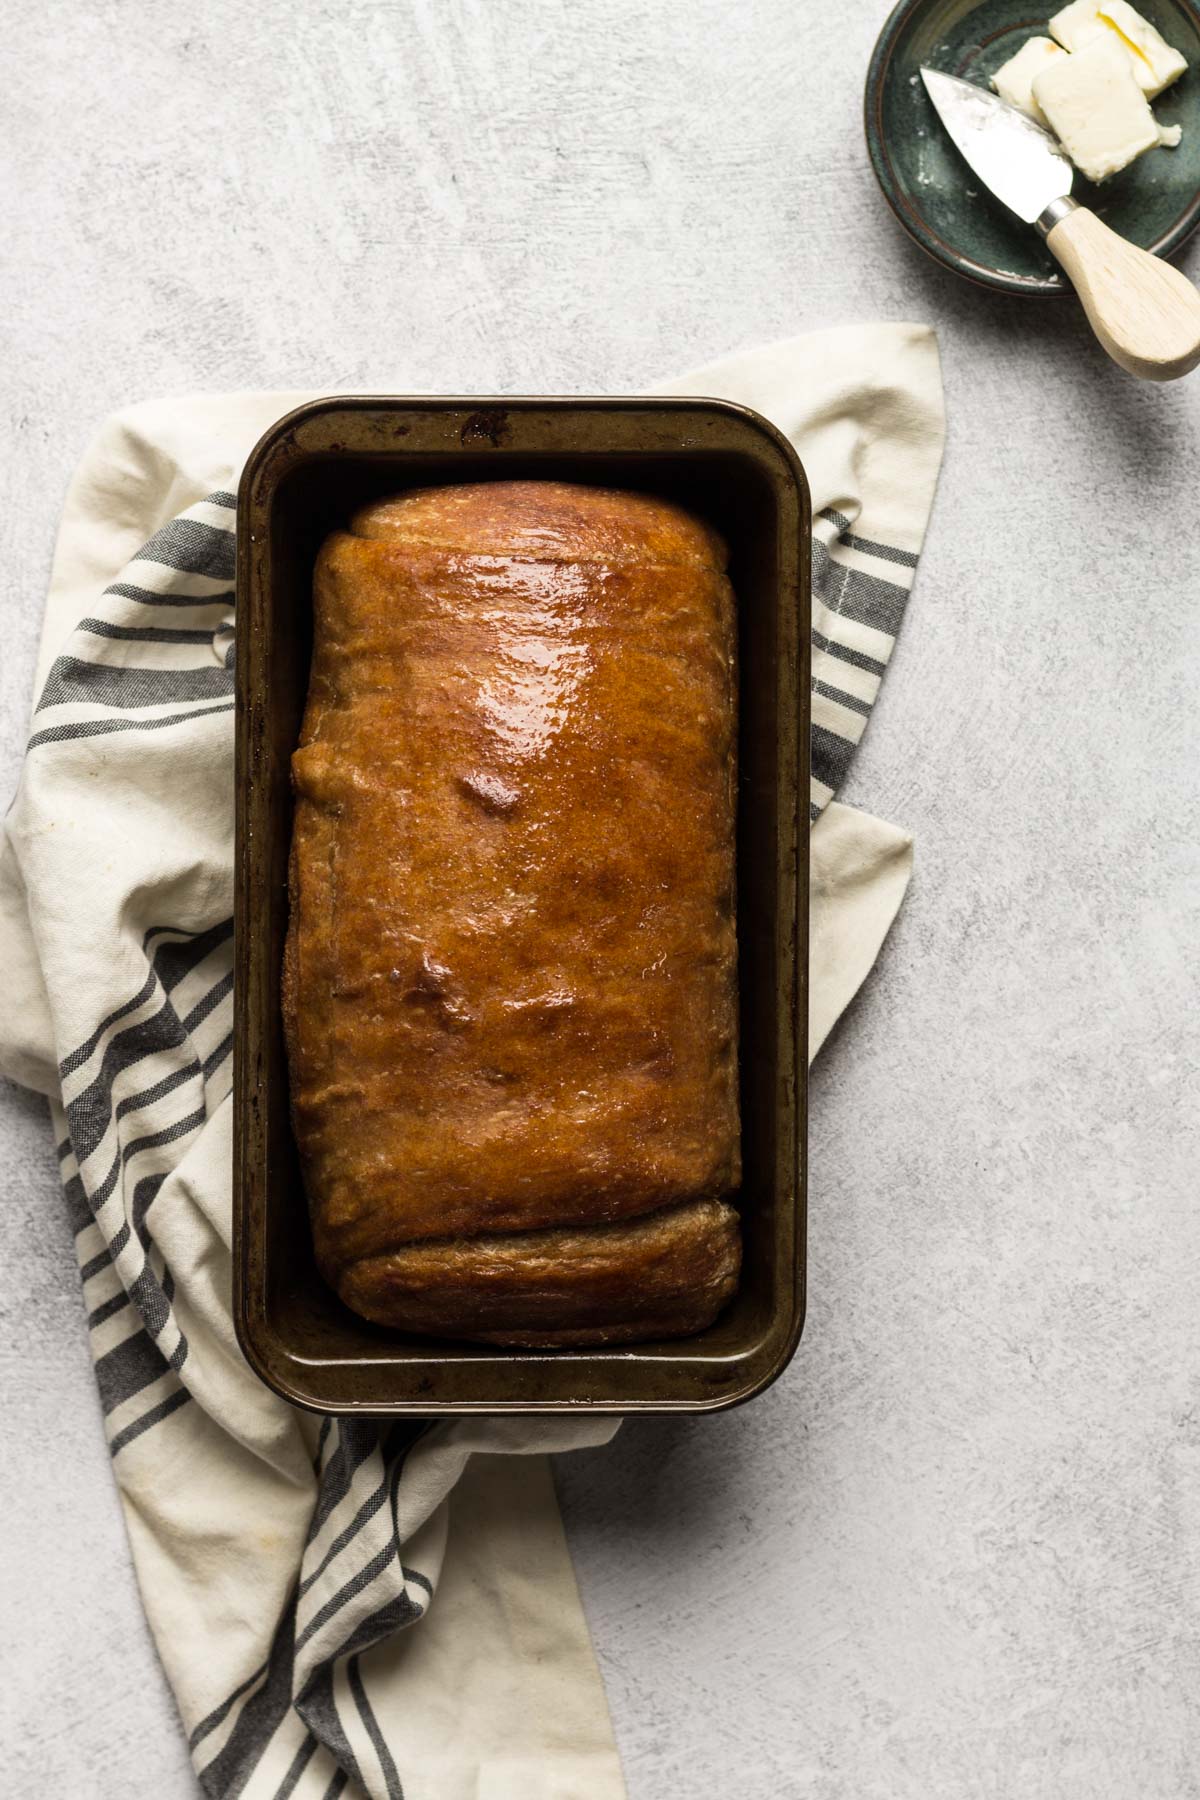
- Proof for about 60-90 minutes, and bake at 350 for about 55 minutes.
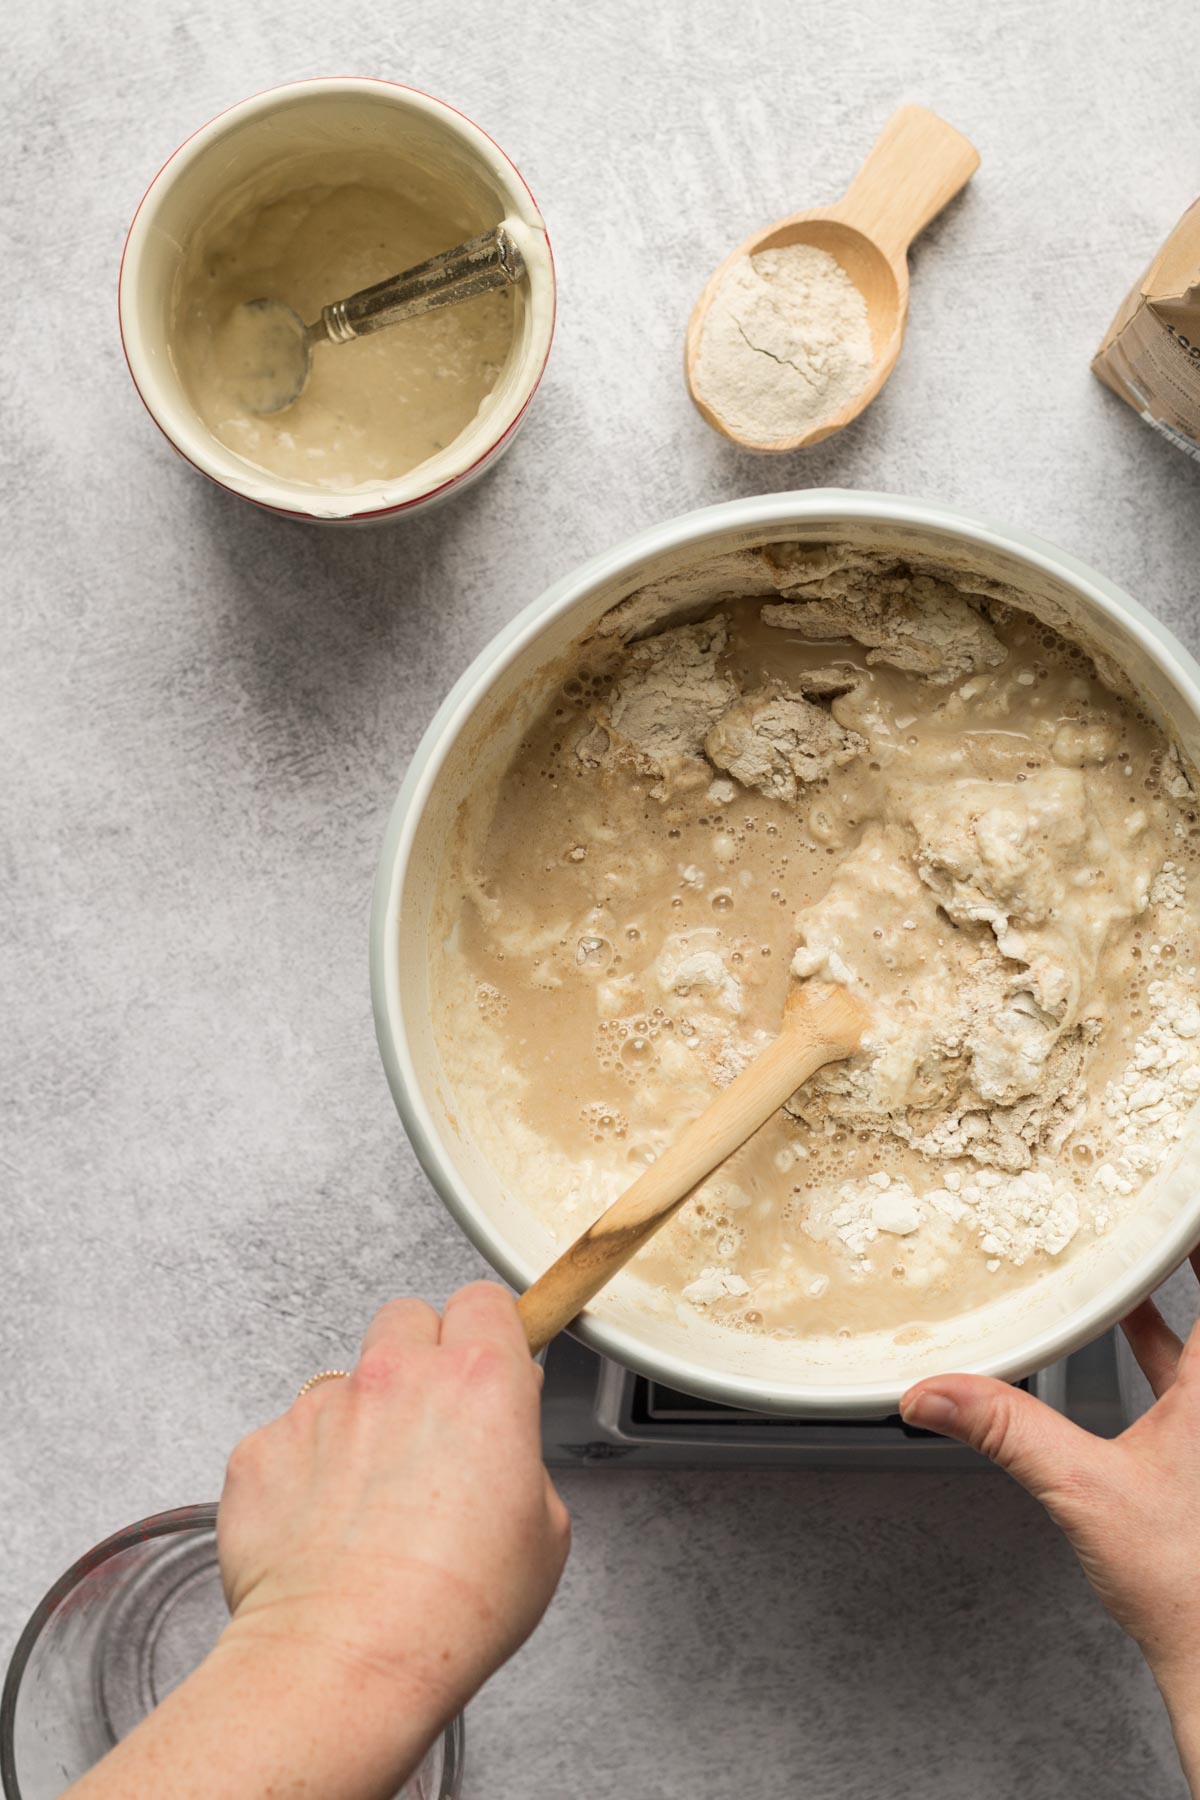
Below is what the dough looks like after mixing. Your only aim is to mix the ingredients together. This is a no-knead recipe so the long fermentation will help create the structure of the dough.
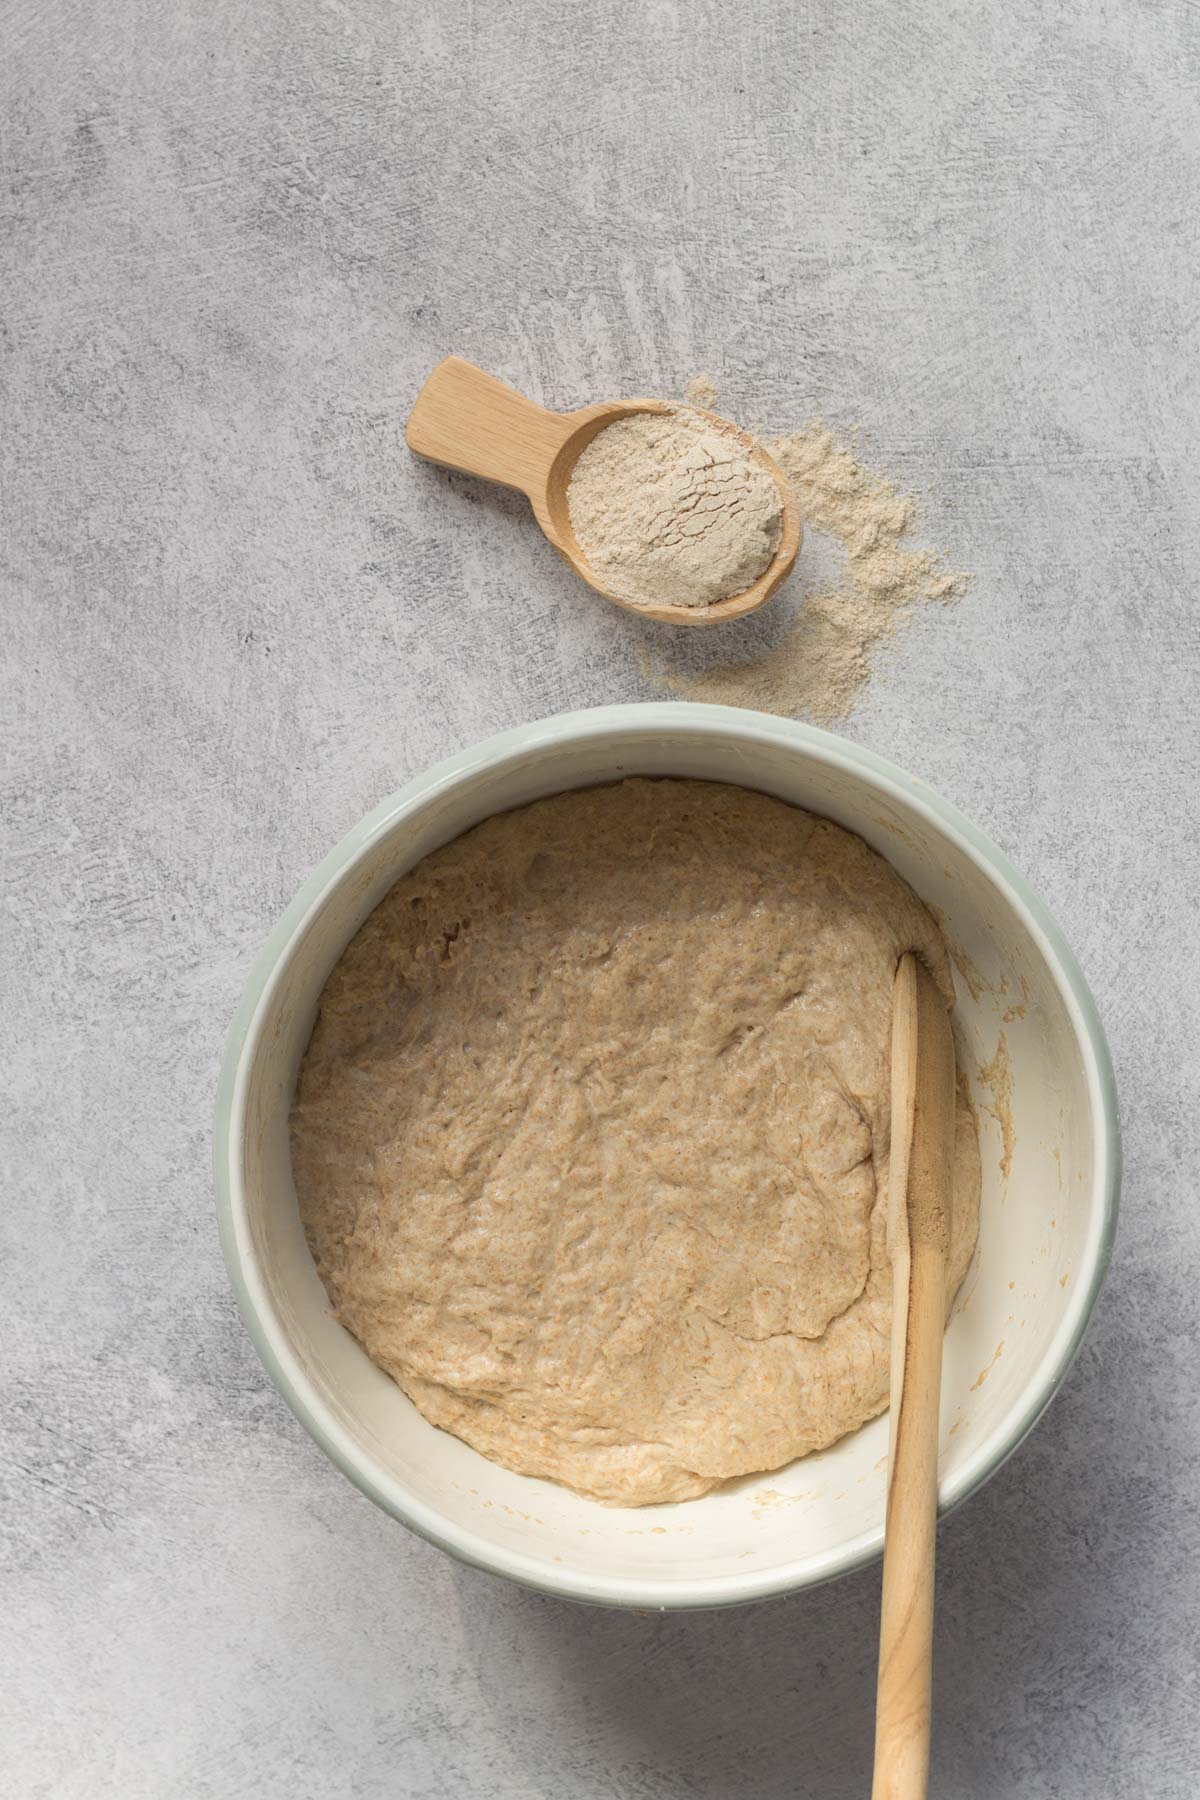
Cover and let the dough ferment all day or overnight at room temperature. The photo below shows what the dough looks like after it’s doubled in size.
I used a bench scraper to cut into two equal portions. You could use a knife if you don’t have a bench scraper.
As you can see below, I gently stretched out the dough to a 6 x 20-inch rectangle. I just used my hands to gently get it to that size. You don’t need a rolling pin for this.
To seal the roll, pinch the ends of the dough together with your fingers.
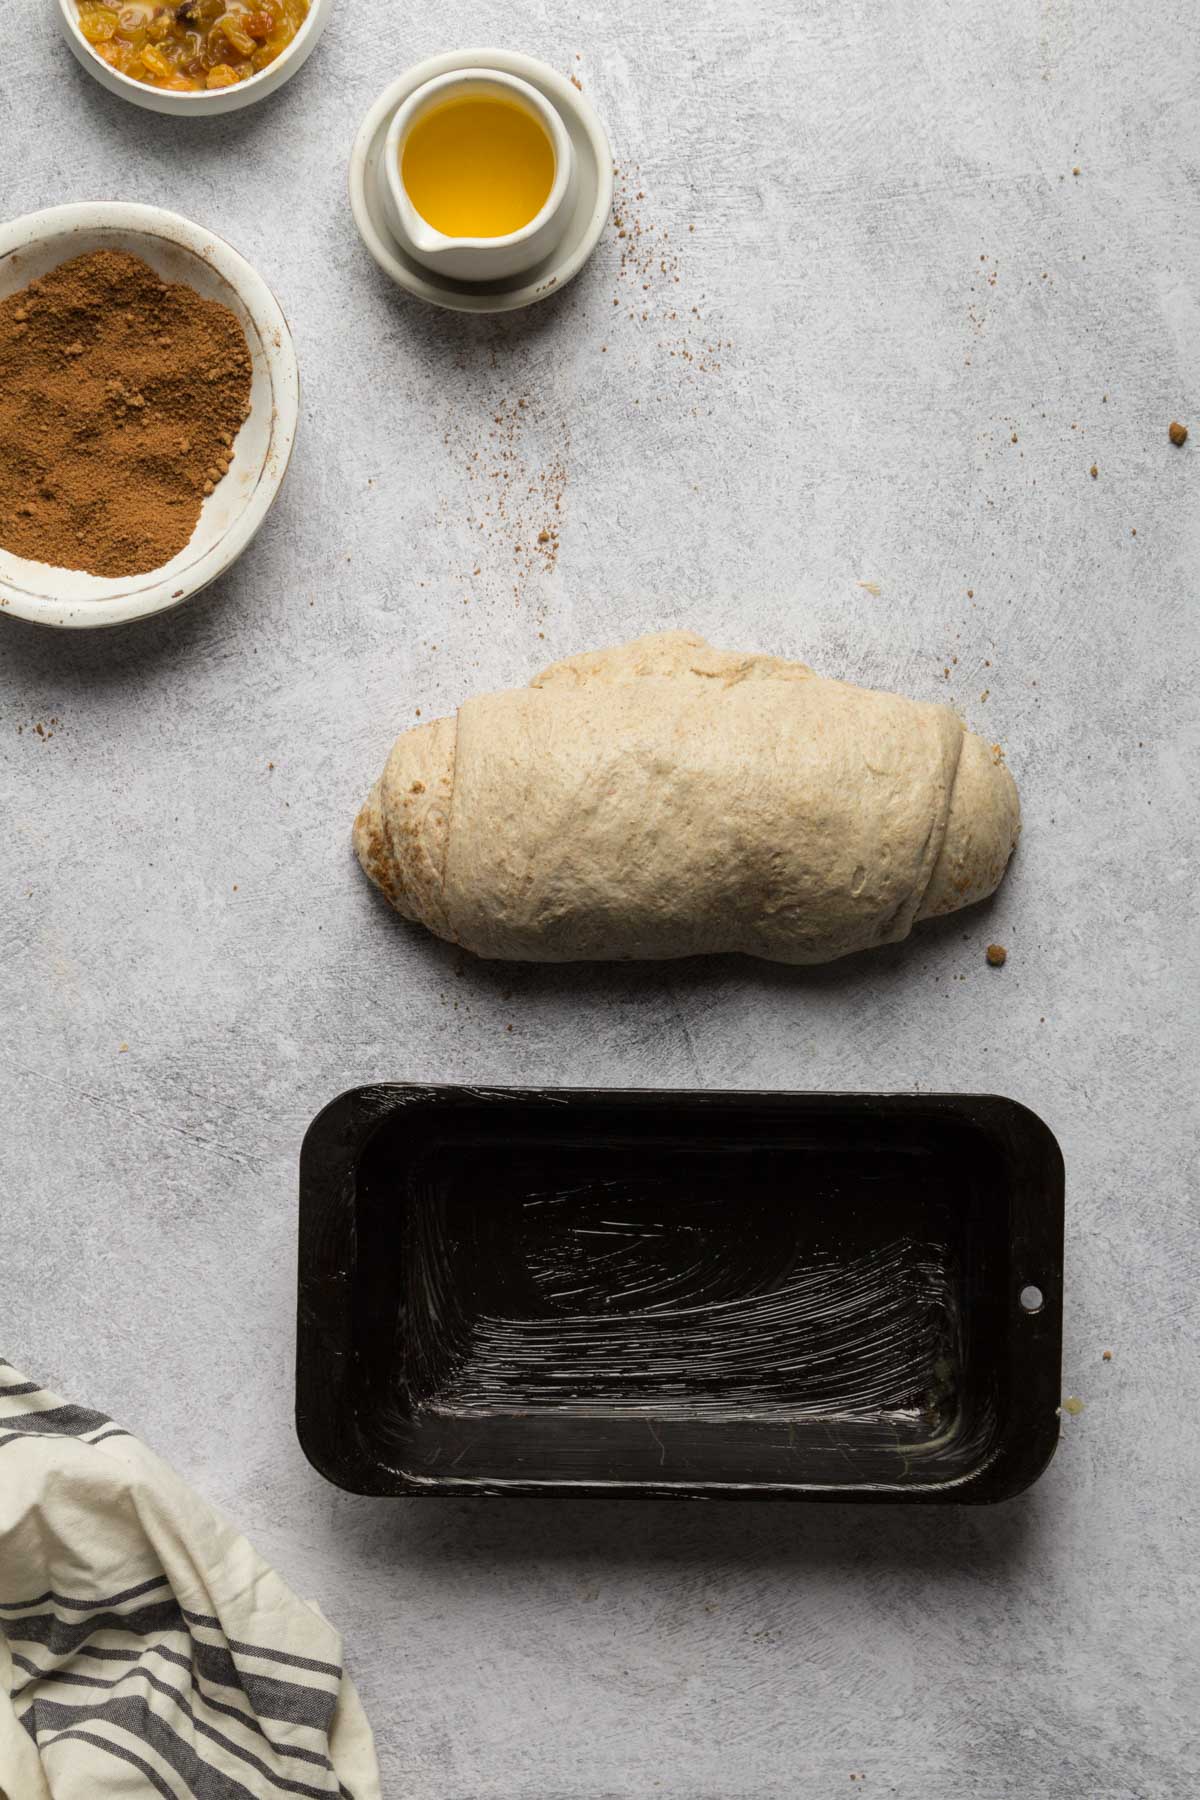
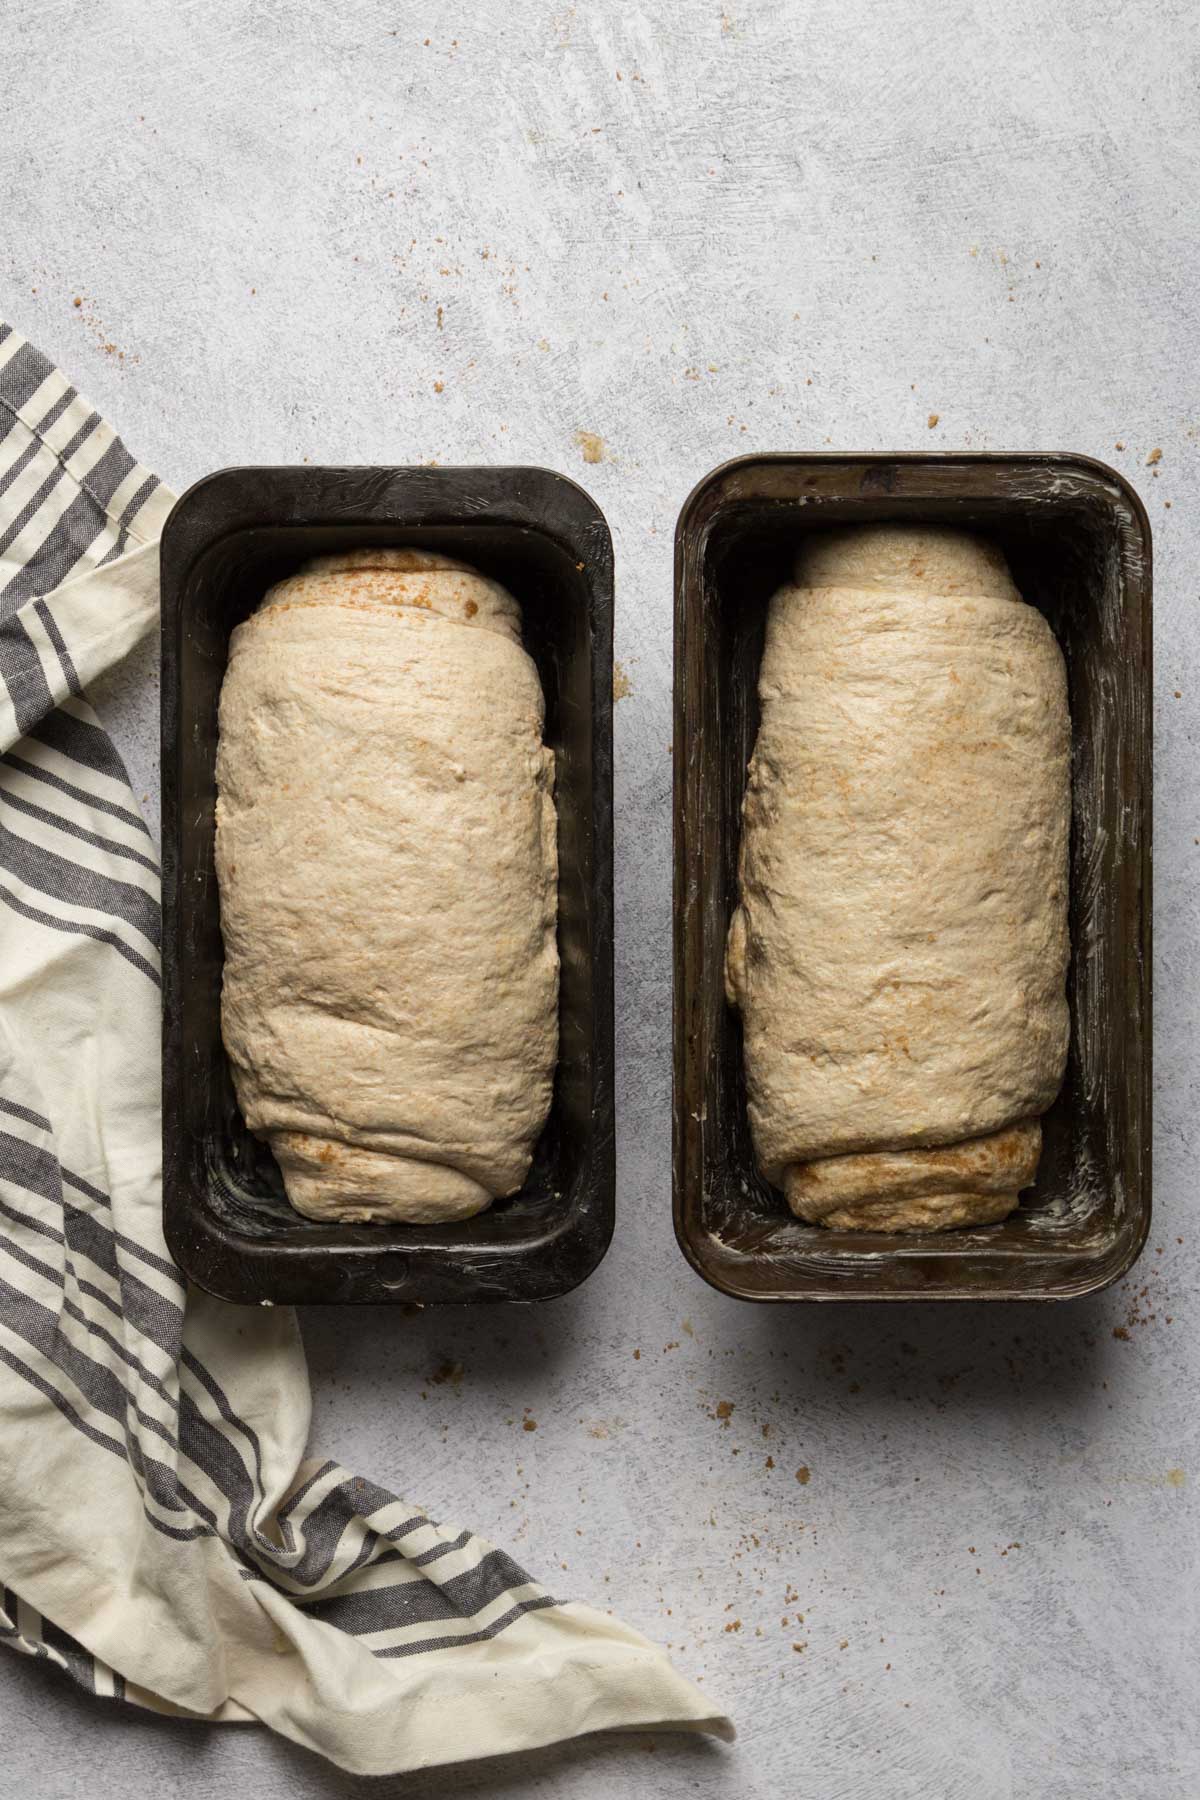
Brush two loaf pans with softened or melted butter and place the two shaped loaves in the pans. Cover with a clean kitchen towel and let proof for 60-90 minutes.
Bake for about 55-60 minutes or until the top is a pale golden brown. Brush some butter over the bread when it comes out of the oven. The photo below is the color of the bread after I brushed butter on top.
Always wait at least 30 minutes before slicing into your bread as the center is still setting.
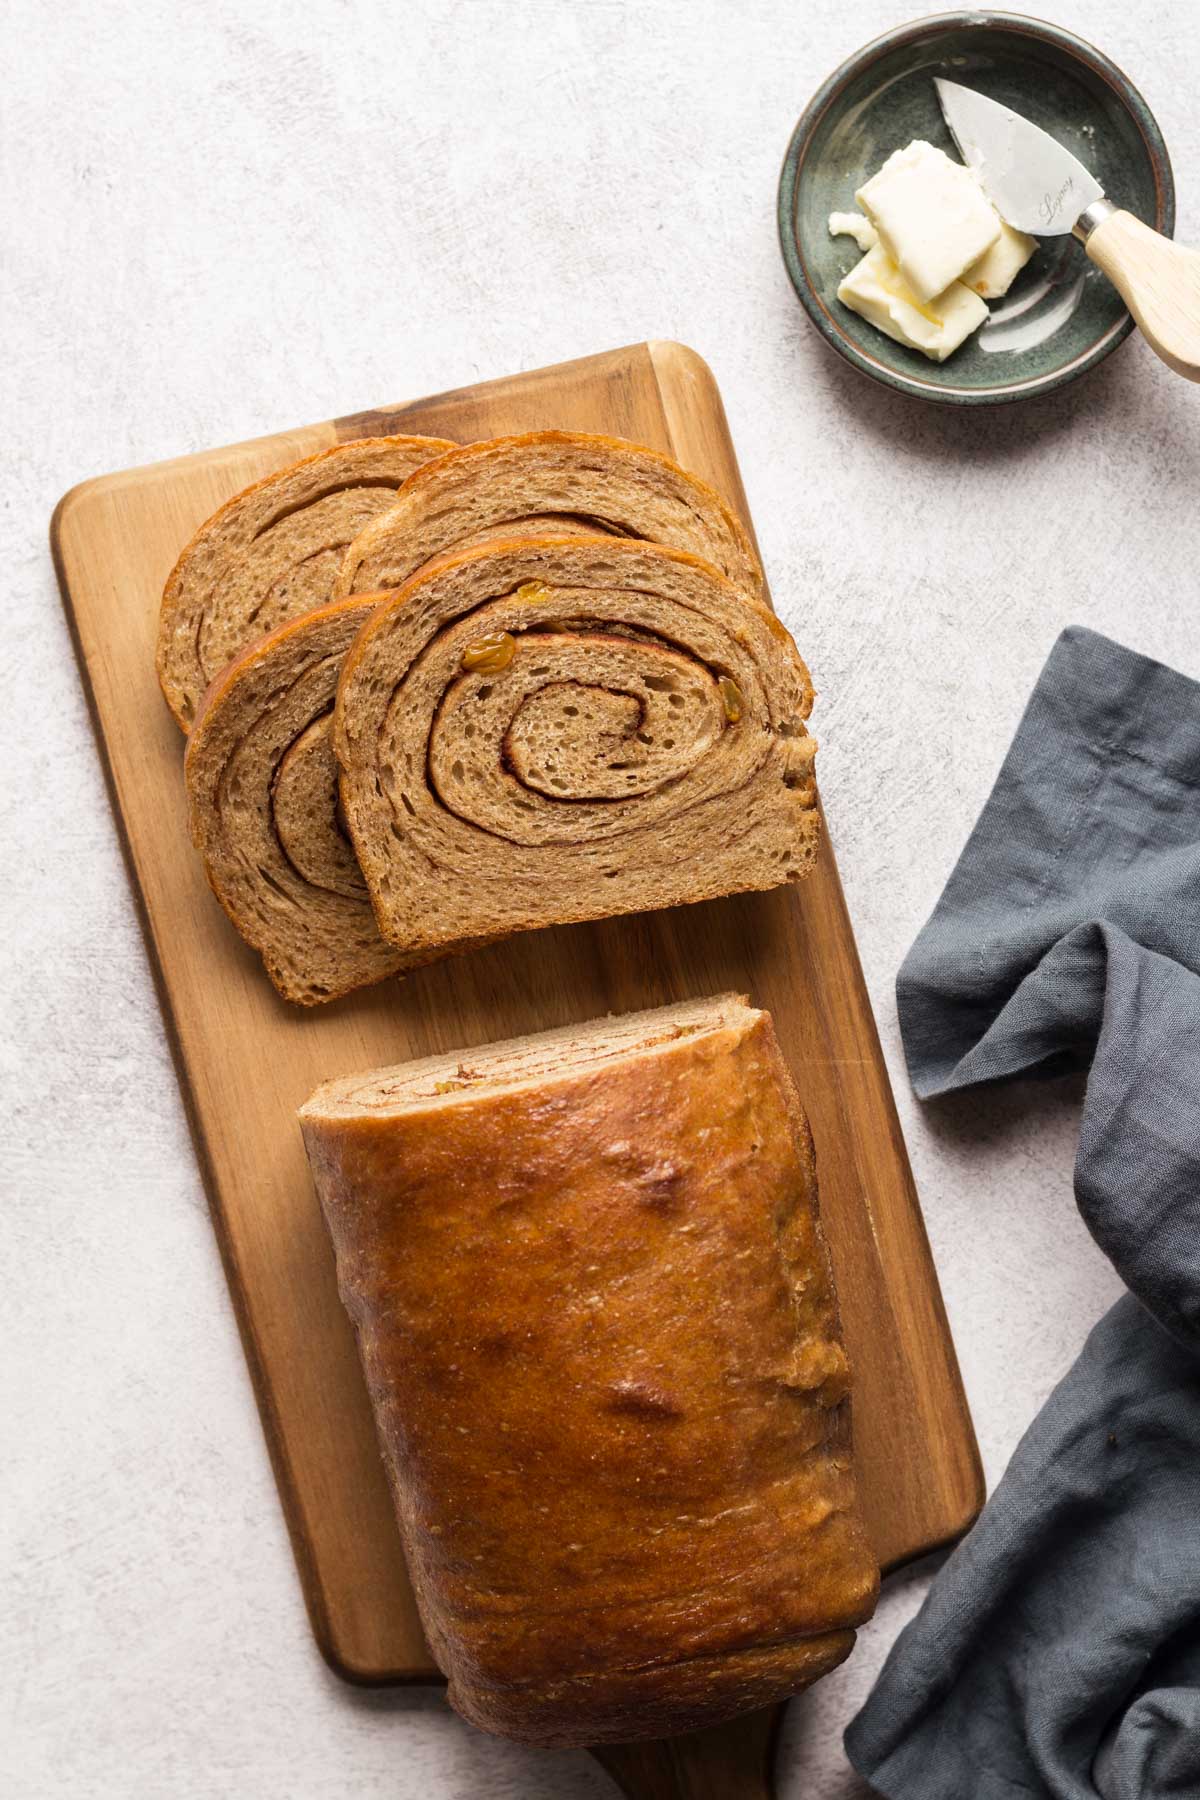
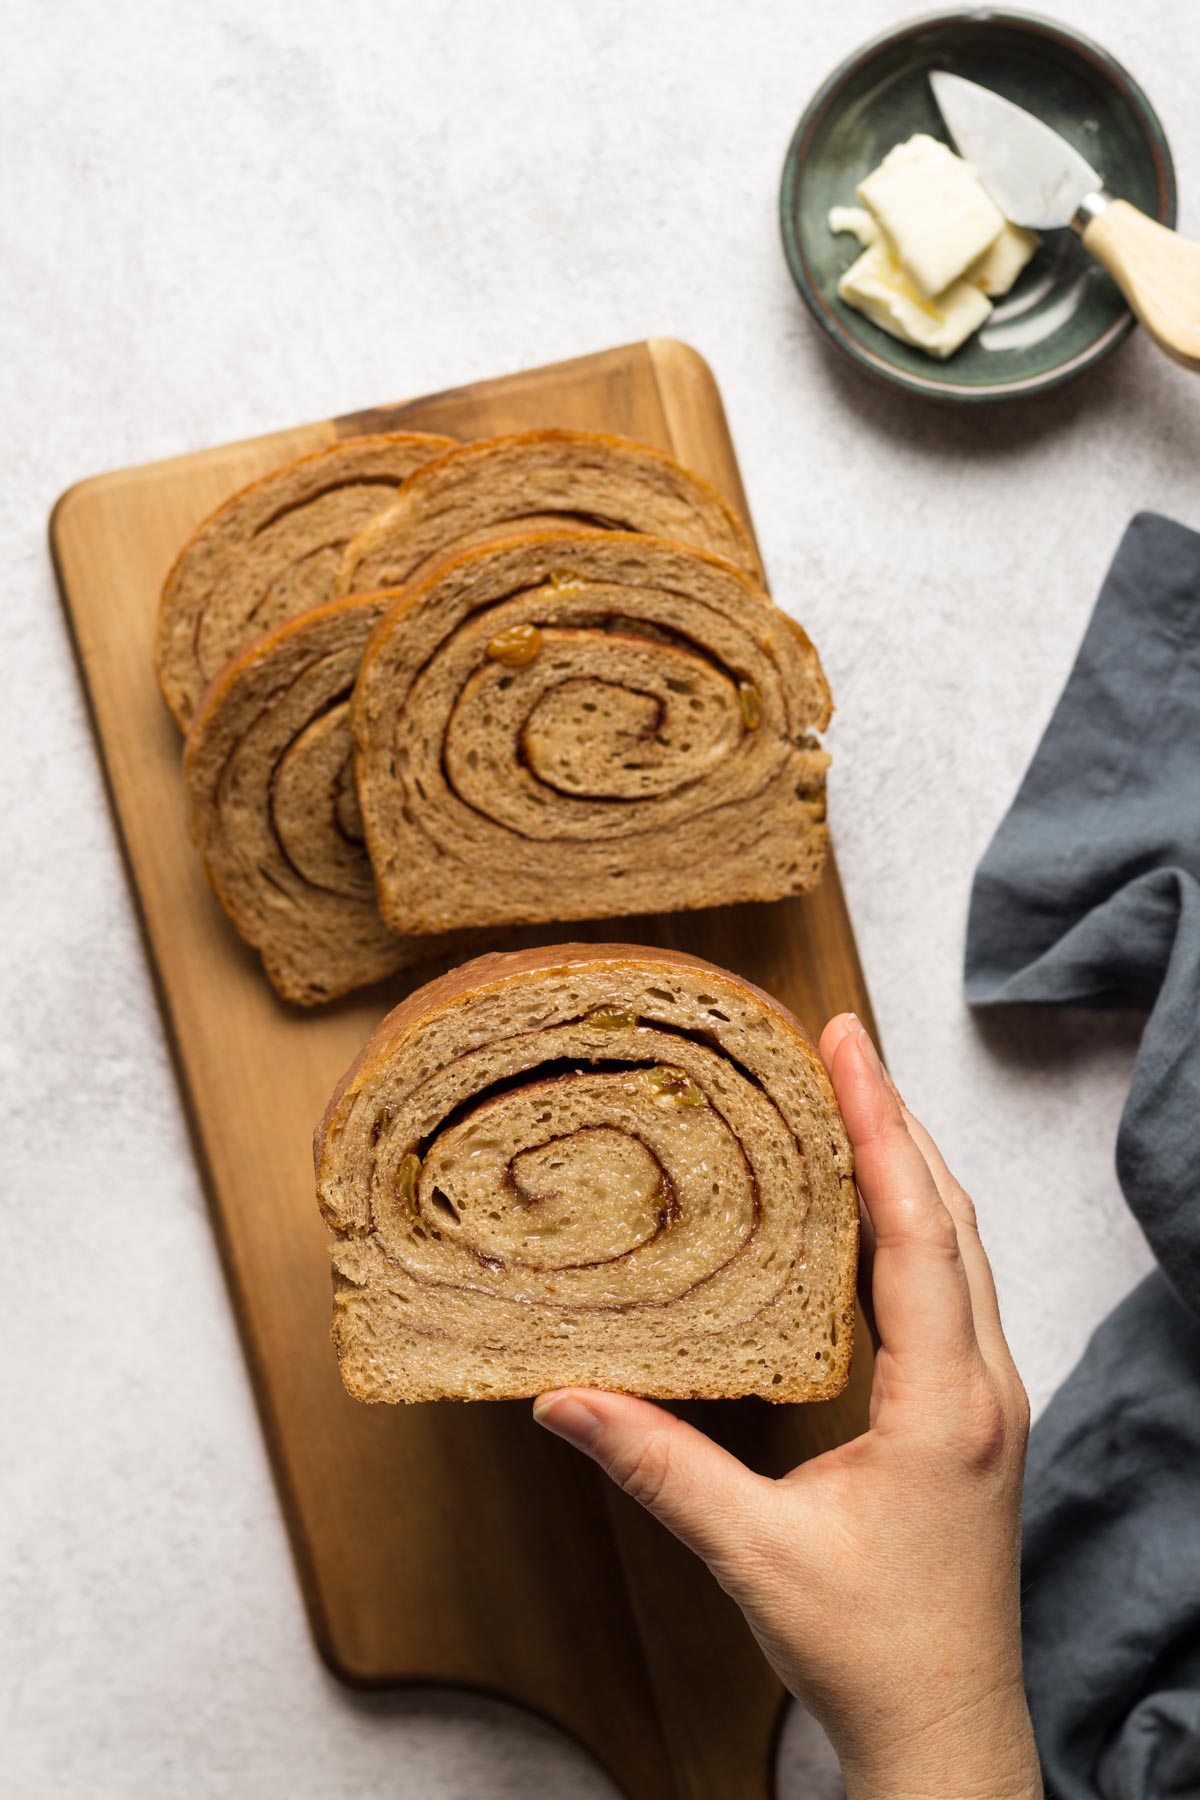
Slice and serve with butter, and maybe reserve some pieces for French toast. Mmmm…good.
More Sourdough Recipes on Bessie Bakes
The lazy baker’s guide to caring for a sourdough starter
Easy Sourdough Bread Recipe + Shaping Video
Easy Sourdough Discard Biscuits
Bon Appétit Ya’ll,
Leslie O.
No Knead Sourdough Cinnamon Raisin Bread Recipe
Ingredients
For the dough
- 555 grams Whole Wheat Flour
- 555 grams All Purpose Flour
- 809 grams Water, room temp 3¾ cup
- 20 grams Salt 1 Tbsp
- 116 grams ripe unfed Sourdough Starter/culture ½ cup
For the Filling
- 1/2 cup brown sugar firmly packed
- 2 Tbsp Cinnamon
- 1/2 cup Golden Raisins or regular raisins soaked in 2 Tbsp orange juice or warm water to soften
- Butter or oil for brushing the dough and the pan
Instructions
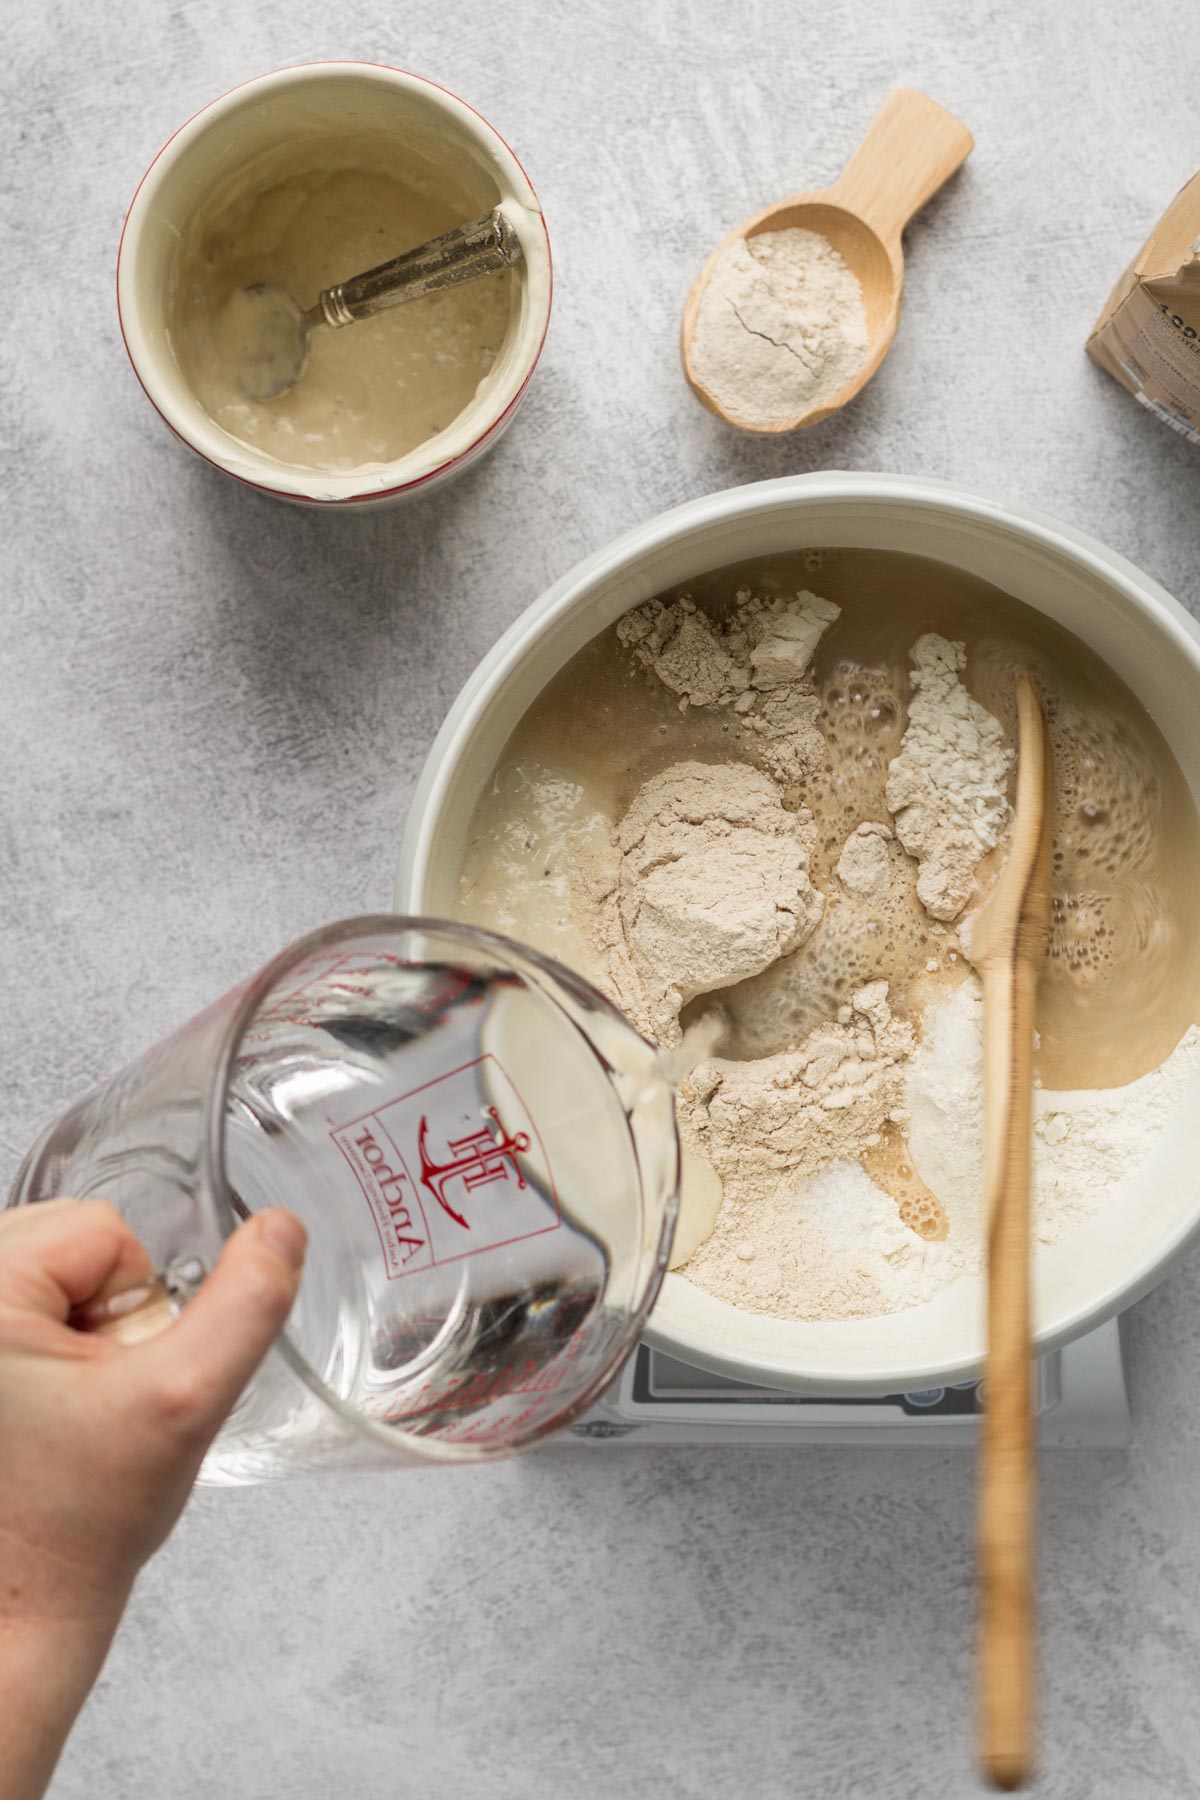
- Mix the whole wheat and all purpose flour, and salt together until combined.
- Add the water and sourdough culture/starter and stir with a wooden spoon or spatula until combined. If the dough looks a bit dry, you can add an extra tablespoon of water at a time because whole wheat flour absorbs a lot of water. You don't have to knead the dough because the long fermentation will create the structure you need.
- Cover the bowl with plastic wrap and let ferment at room temperature for 8-12 hours. Because there is no dry yeast added, the sourdough fermentation is very forgiving, in that it takes a lot to over-ferment a sourdough bread dough.
Make the filling
- Add orange juice or warm water to the raisins to soften for a few minutes.
- Mix the brown sugar and cinnamon together.
Shaping the Dough
- When the dough has doubled in size, place the dough onto your counter and cut the dough in half. Shape each half into a 6 x 20-inch rectangles. You want it to be the same width as your loaf pans after rolling it up. Spread melted butter or oil over the rectangle.
- Spread the cinnamon and brown sugar filling all over the rectangle, leaving about an inch open at the ends. Add the raisins on top. Roll the bread like a jellyroll and pinch the ends together to seal the bottom.
- Brush a loaf pan really well with butter or oil. Place the dough in the pan. Once it's in the pan, take your fingers and lift the dough away from the sides all the way around and add a little extra butter or oil around the edges of the dough to keep it from sticking. Smooth back out and cover with plastic wrap to proof.
Proofing the bread
- You can proof the bread one of two ways.* Proof the bread in a warm spot in your kitchen or inside a completely cooled oven with the light turned on to keep it warm for 60-90 minutes or until it's almost doubled in size.* Or for convenience, you can proof the bread overnight in the fridge if you want to bake it first thing the next morning. The temperature of the fridge will slow down fermentation so it doesn't over-proof. If it's still not completely proofed in the morning, you can put in on the counter for 15-30 minutes until it's proofed.
- Bake at 350 degrees for about 55 minutes. The top should be a golden brown color. If you are unsure if it's baked in the center, remove it from the loaf pan and tap the bottom of the bread. If it sounds hollow, it's ready.
- Let rest for 30 minutes before slicing because the center will still be setting.


This makes at least two loaves, I’m not sure why this isn’t mentioned. I made the mistake of cramming it into my standard loaf pan and it overflowed. Fortunately it still tastes good! I definitely recommend changing the recipe to reflect that it makes two loaves and to separate the dough.
Thank you for your feedback Meg! The loaf pan I use is 10.5 x 5.5 and 2.2 inches deep. This recipe only made one loaf for that size pan. I have another loaf pan that measures 10.5 x 6 x 3, so in that pan, the bread would have spread out a touch more. It could have been that your loaf pan is a bit smaller and therefore it was a tight fit. This is the tricky part of creating bread recipes when you have to use a vessel to bake in. Everyone’s vessel is going to be a slightly different size, so sometimes you have to cut the dough a bit to fit your pans or the pans are too large for the size that you have.
If the dough was already level to the top of the pan when you put it in, then it will certainly overflow. Bread baked in loaf pans or any type of vessel needs a bit of room to expand when you proof it. Another issue could be how it was shaped. If it is spread out too long, you will have to cram it in. I certainly did this when I did my first trial run of this recipe, so I had to adjust the shaping for the second time I made it. When I create a new bread recipe, I always have to play around with how I shape it because I know that bakers will have issues with the sizing depending on what they are using.
The last possible issue could have been the proofing time. I have to give people a time for proofing, but bread proofs at different speeds depending on how warm or cold your kitchen is. The proofing time isn’t an exact science, but rather it’s how the dough looks and feels. It’s a bit hard to give people instructions that seem so vague for fear they won’t know exactly what to do. When proofing a dough in a vessel, it shouldn’t expand 50%, but rather 20-30% tops. It doesn’t sound like this was the issue for you, however, but I thought I would mention it just in case.
I’ll make sure to add these to the notes of the recipe, so thank you for letting me know how it turned out. I appreciate you making the recipe and giving excellent feedback!
This commenter may have also been following your gram measurements as I did. It seems like you made a mistake with the conversion. Here is what King Arthur Flour says the conversions should be: https://www.kingarthurflour.com/learn/ingredient-weight-chart.html
Thank you for the link! I’ll make the bread again and check all the measurements in cups and grams. What might have happened is that the recipe could be for two loaves as stated above, and I just didn’t catch that. I’ll update you when I’m able to re-measure everything. Thanks for the feedback!
I can tell you, being a home bread baker, that amount of flour is for 2 loaves, and a normal loaf pan is 9 X 5. I’m not sure about the conversion from cups to grams either, I can’t check it but 4 cups flour is roughly 500g. It seems the cups don’t match the grams, being well over 1000g.
Thank you for your feedback! It took me a while to respond to your comment because I needed to test the recipe again and check the measurements. It does in fact make two loaves so I’m going to update the notes on the recipe, take a couple of new photos to show the shaping process and make a video for this recipe as well to reflect the changes.
I’m hoping to finish that this week or next week and I’ll let you know when those changes are up on the website. Thank you!
Yes for a 8” or 9” pan, it will make two loaves. Mine is proofing now in two pans. I’ve learned that a recipe calling for 6+ cups of flour will make two standard loaves or a huge single boule.
Fed or up fed starter??
Great question! Always use ripe unfed starter when making sourdough bread. This means about 4-8 hours after you have fed your starter it will be at it’s peak ripeness.
To me that would mean “fed”since I will be feeding it before using it. When I take my starter from the fridge I usually give it two feedings about 12 hours apart before making my bread. Should I do the same with the cinnamon bread?
Sorry for the delayed response! “Fed” starter refers to starter that has just been fed. Unfed starter is starter that needs to be given a feeding, and if it’s still ripe and bubbly, it’s ready to use for bread.
So you would want to do your feedings, and since you make bread dough 12 hours after your last feeding, then you can use your starter for this cinnamon raisin bread recipe at this time, provided that your starter is still nice and ripe. The dough will “feed” your starter. And, of course, reserve some starter to give it a feeding at this time to keep your batch going.
Think about it this way. Whenever your starter is ready to be fed, it’s hungry, so it’s unfed until you feed it with flour and water. “Fed” starter just means that you just fed it and it needs to ferment to get nice and bubbly and ripe.
Does that make sense?
Hello! I have baked it at the suggested temperature but do you know why the top of my bread is not browning? the bottom seems to be, as it is touching the pan.
How long did you bake the bread for? Sometimes bread recipes may need more time in the oven to get a little more brown on top, depending on your oven.
Hi Leslie I was wondering if I have to use whole wheat flour. Is it ok to just use wheat Montana premium all purpose flour. It has as much protein as bread flour. I know whole wheat makes it more nutritious but I want to make it now but don’t have whole wheat on hand.
Thanks in advance for your response and for posting this delicious looking cinnamon raisin bread! Can’t wait to make it and eat it warm with butter, yum!
Hi Cristina! Yes you can definitely use all purpose flour as a sub for whole wheat. Your final proofing time may be a touch longer as whole grain flours tend to ferment faster. Also, the water content may need to be adjusted a bit as all purpose and whole wheat flour will absorb different amounts of liquid. Just reserve about 1/4 cup of water, then add more if needed at the end of mixing if you need it.
I have just been gifted some sourdough starter. And am looking forward to baking with it.
When you say “unfriend starter” ? Do you mean the “discarded starter” ? That you remove before you feed your starter each day?
Yes that’s correct! If you are baking bread with the “unfed starter” you want it to be ripe and bubbly so that it helps the bread rise. If you are using “unfed starter” to feed it to keep the starter going it doesn’t have to be ripe. I hope that helps and best of luck with your sourdough baking!
Sorry sometimes autocorrect gets away from me. Lol
To correct autocorrect “unfed starter” is it the same as the “ discarded starter” ?
What is the best way to store this bread (not freezing)? I have had struggles with homemade breads either losing their crustiness or tasting kind of stale after the first day, so I wondered if you had any storage good tips. Thank you!
My sincerest apologies for not getting back to you earlier! It’s been a crazy week given what’s happening in the world right now. I hope you are safe and healthy. As for storing bread, sourdough stays fresh for longer than bread with dry yeast, but you’ll still want to preserve it after 2-3 days for best flavor. Wrapping it up will cause the crust to soften so if you have a bread box, you can put in there. However, once it’s been sliced you’ll want to wrap it in either plastic wrap or you can use reusable wraps to keep the cut side fresh.
If you don’t see yourself eating the whole loaf in 2 days, cut the loaf in half and freeze half. When you’re ready to eat the other half, thaw it and enjoy. Once your bread is cut, you’ll likely want to toast the slices to crisp them up again no matter if it’s fresh or frozen. Hope this helps and be safe.
Just a note: I’m not sure why, but the recipe shown looks is the old recipe with larger whole wheat flour. I adjusted it myself to 50/50 yesterday when I mixed it. Although when I printed the recipe, the recipe showed 550 grams of each of the flours. I’m not sure if it’s my phone or something about the web site. It can be misleading.
I actually made 3 smaller loaves that are finishing proofing right now after an overnight proof in the fridge. I added walnut to one of the loaves. I can’t wait to try it. Thanks for the share.
Oh my gosh you’re right, the desktop and phone versions of the recipe are showing differently! Yes the recipe is supposed to be 50/50 whole wheat flour and all purpose flour, so I’m unsure why it’s not showing properly. Let me see if I can fix it now. Thank you for alerting me to this as I probably wouldn’t have caught it otherwise. You made a good call doing 50/50 ratio of the flours.
Hi! Fun recipe! I added some orange zest into the brown sugar and it reinforced the orange juice soak.
Question is how do you get your fermented dough so dry? Mine was really wet and it was impossible to roll up and transfer to my pan without becoming a big messy ball. Do I need to work and form it a bit on a floured surface?
Thanks for the many different ideas…was getting bored of plain sourdough.
Hi Mike! Actually the surface had dried a little bit initially while I was photographing it because it was uncovered for about 20 minutes. Wet doughs are trickier to handle but I’ve found that if the dough is a bit drier the texture ends up being too dry in the center after it’s baked. I usually either wet my hands first so that the dough doesn’t stick to my hands so much or I flour my hands liberally (instead of the adding extra flour on top of the dough).
The orange zest sounds amazing, love that idea!!
Hello! This recipe looks delicious, but I’m not sure about the flour…should it be 550g ww flour AND 550g white flour? I’m just mixing it now and either it’s a huge recipe or it’s quite wet looking when it proofs (coming on an iPad and none of the images have loaded so I can’t check against what yours looks like). Thanks for any help 🙂
Hello! Yes those are the correct measurements. This recipe makes two loaves. Although it might seem like a lot of dough, you will cut it in half then flatten out each half into 20 inches by 6 inches, then roll it up so that the loaves make nice fluffy bread loaves. It does have a lot of water so that it’s a sticky dough which gives better flavor and texture, otherwise the whole wheat flour will dry it out.
The photo in the post of the dough mixed looks a little drier than it actually looks like because it dried out a little while I was photographing it uncovered. You are welcome to send me a pic of the mixed dough to messenger on my Facebook food blog page in case you aren’t sure about it.
One last thing. I’ve been reading a lot in sourdough groups about what people are experiencing with the flour they can find in stores. There have been comment threads about bleached flours not absorbing water like unbleached flours, which can cause the dough to be much wetter. One person recommended using up to 15% less water when using bleached flours. Don’t know if you are using bleached flour, but thought I would mention that just in case.
Here is my FB page: https://www.facebook.com/bessiebakes/
Love the recipe! Two questions: 1) how to make a bit less sour; and 2) wondering if you could use this recipe for a savory loaf (sun dried tomatoes, olives, cheese, etc.)?
Hello Carole, you can definitely make this savory with the add-ons you like since there isn’t sugar in the dough itself, but rather rolled in. You could add a thin layer of the add-ons and roll then in the dough when you shape it, just as you did with cinnamon raisin bread and see how it turns out that way. I like the idea of adding these in right before proofing.
To make it less sour you can add a little bit less sourdough culture but you’ll have to adjust your rising time. I would recommend using only bread flour as whole grain flour sometimes makes sourdough taste a bit more sour.
Hello my dough was so wet it was so hard to work with and just wouldn’t hold any shape. It rose beautifully overnight in the bowl and doubled exactly as it should have. I know there is a learning curve with working with well dough, but I would love some tips. Yours looks like it held shape so good?? Mine just melted into the pan once I finally got it in there. Ha it felt like I needed 6 hands to get it in there without melting into a mess.
Nevertheless I am waiting for the second proofing and am excited to try it, thank you I appreciate your help!!
Oh gosh I’m so sorry to hear this! This is one of the reasons why it’s difficult to show exact recipes for bread as there are always variables that cause issues with the texture of the dough. One of the likely issues is that different brands and varieties of flours absorb different amount of water at different times of the year.
It could have been that the flour you used wasn’t absorbing enough of the water (for whatever reason) so it made it too loose. Did you use a scale or cups for measuring? I always recommend using a scale as this is much more accurate. One of the things that always helps me is to not add all of the water at once. Only add up to 80% of the water and mix the dough together. Add the rest in stages until it’s the right consistency and withhold some of the water if need be. In my photos the dough looks a bit drier than it will actually be because I was slowed down by the process while taking photos. Because it was uncovered for about 30 minutes the dough dried a bit making it firmer. However it was still workable before it sat out uncovered.
I hope this helps and I’m sorry to hear the dough was difficult to work with!
Hi! About to make this for the first time and curious if I can half the recipe so I only have 1 loaf?
Yes you can absolutely cut this recipe in half! The best way to do this is to weigh your ingredients so it’s much easier and far more accurate to cut the recipe in half.