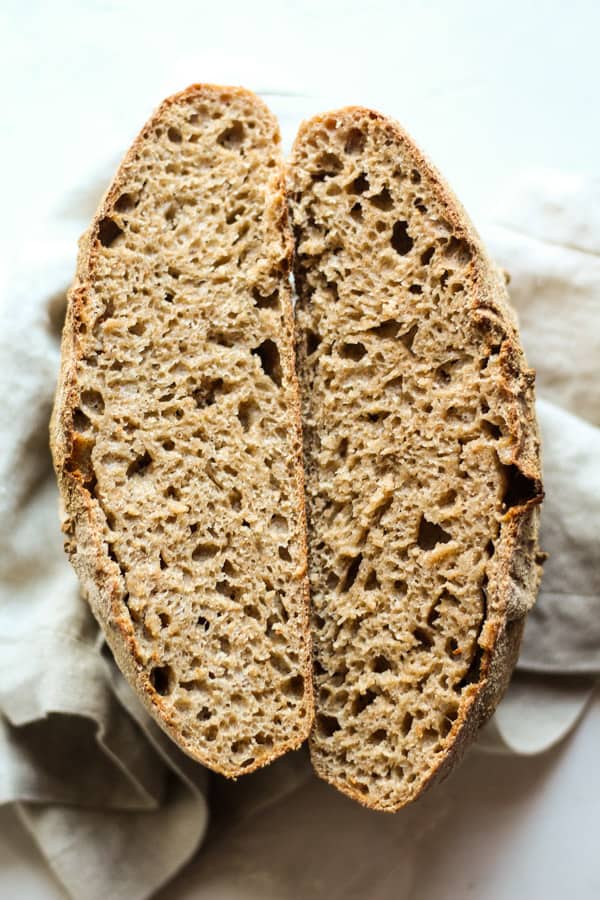
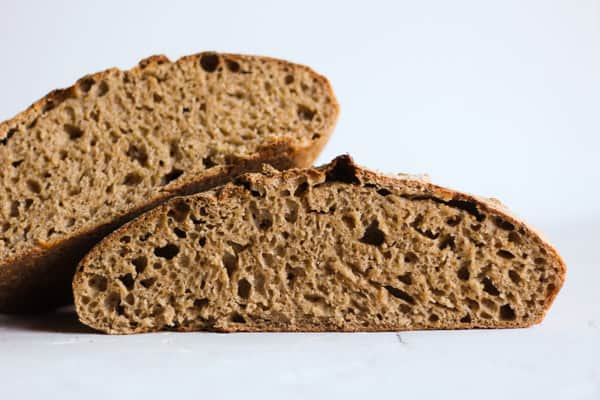
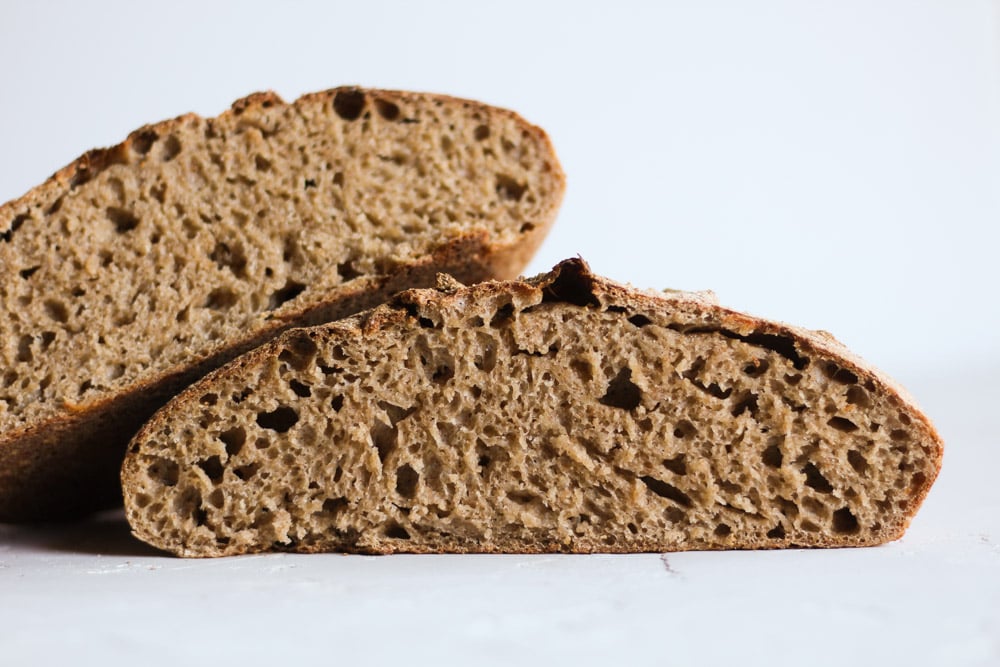
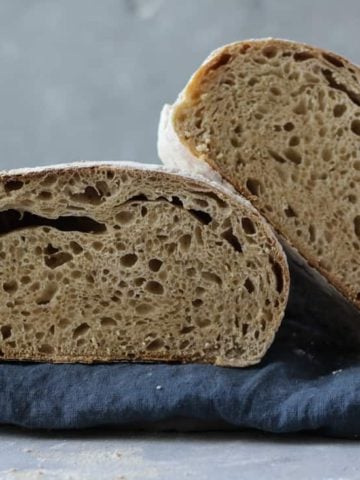
Imagine slicing into a loaf of artisan sourdough honey spelt bread that has come out of the oven and has permeated your house with an intoxicating aroma. You hear the crackle of the beautiful crust as your knife cuts through the loaf.
Yes, creating this experience at home is easier than you think, with little to no effort. All it takes is allowing a sourdough starter and time to do 95% of the work for you. In just a few minutes, you mix the dough by hand without worrying about kneading. You go about your day, or go to bed at night. You divide the dough in half, shape it, and ferment it again. Invert in a cast iron skillet or pan, bake, and you just made yourself the best damn whole grain sourdough bread you’ve probably ever eaten.
For this honey spelt sourdough bread, we are going to be fermenting the entire dough for at least 20 hours. But again, fermentation and time are doing the work for you. The wonderful thing about using a sourdough starter in your bread is that it’s very forgiving for long fermentation periods. After the bread is shaped, you can slow down the fermentation even more by popping it in the fridge, so you could easily ferment this bread for 48 hours! This comes in handy if you don’t have time to bake your bread before or after work.
THE IMPORTANCE OF LONG FERMENTATION
The longer a bread ferments, the more enzymes are created in the fermentation process, and the easier it is to digest. Long fermentation also breaks down gluten and allows for the creation of CO2 and alcohol to create beautiful open holes in the interior, which is a good indicator of a gentler gluten structure.
TIMING YOUR BAKE
Figure out when is a good time to bake your dough. If you have some free time on a morning during the week or on the weekend, then you would start mixing your dough the previous morning.
If you prefer to bake your bread at night, begin your dough the previous evening. The dough will ferment twice with only a few minutes of work in between fermenting.
MIXING THE DOUGH
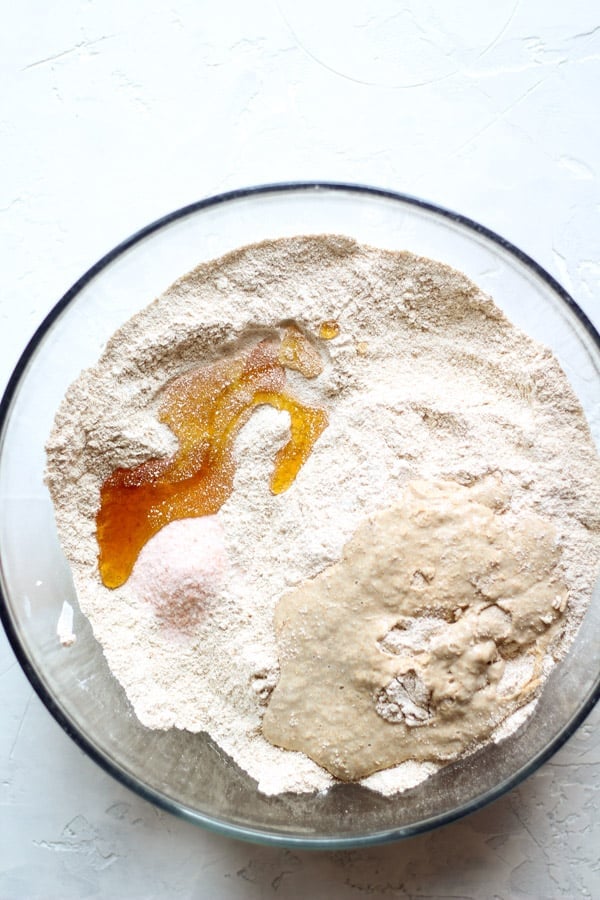
I used sprouted spelt flour for this recipe, but any spelt flour will do. I cut it with some bread flour for added structure. Add salt to the flours and mix together. Then the honey, water (room temp), and sourdough starter.
A stand mixer is not necessary, and it might be trickier to use one for this recipe because the batch is too big for a standard mixer. You can certainly knead the dough for about two minutes by hand, but we are going for a gentler gluten structure that is easy to digest, so it’s not necessary.
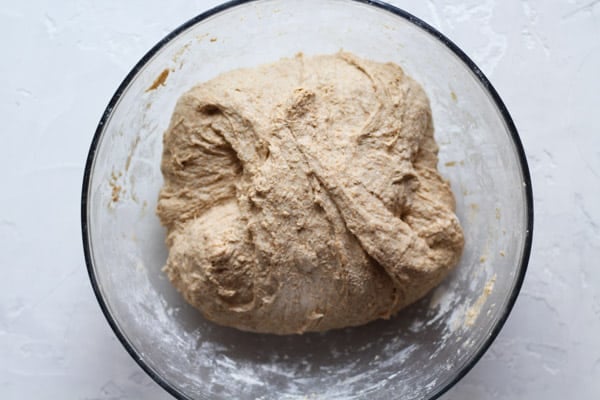
Once your dough has come together, we are going to give it a “fold“. This will naturally help strengthen the structure of the bread without making it tough. As you can see below, stretch and overlap the left and right sides toward the center.
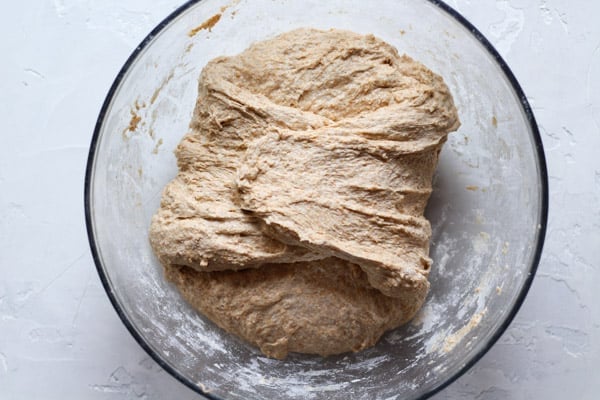
Then take the top and bottom sides, stretch, and bring toward the center. Flip the dough over, and cover with plastic wrap.
I like to give 3 folds 30 minutes apart for the first 90 minutes to help strengthen the dough.
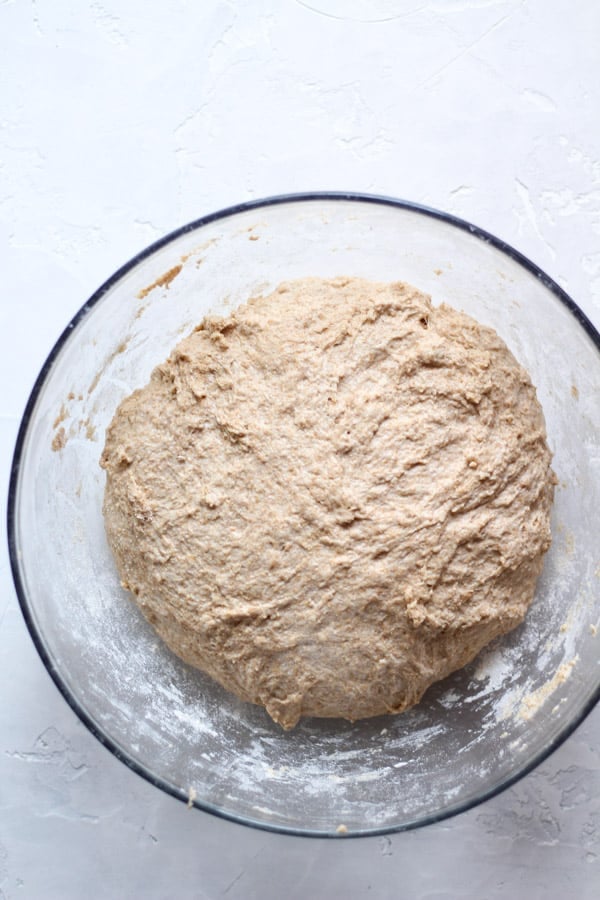
Once you’ve completed the folds let ferment for 8-10 hours in a warm spot in your kitchen.
8-10 hours later, your dough should look like this below! See how nicely it’s expanded?

SHAPING BREAD DOUGH
Before you decide which shape to use, you will need to know what type of pan you will bake it in. If you have two loaf pans, then you can certainly shape it into two loaf shapes. But if you want a nice round shape, then you will need to bake it in a round pan.
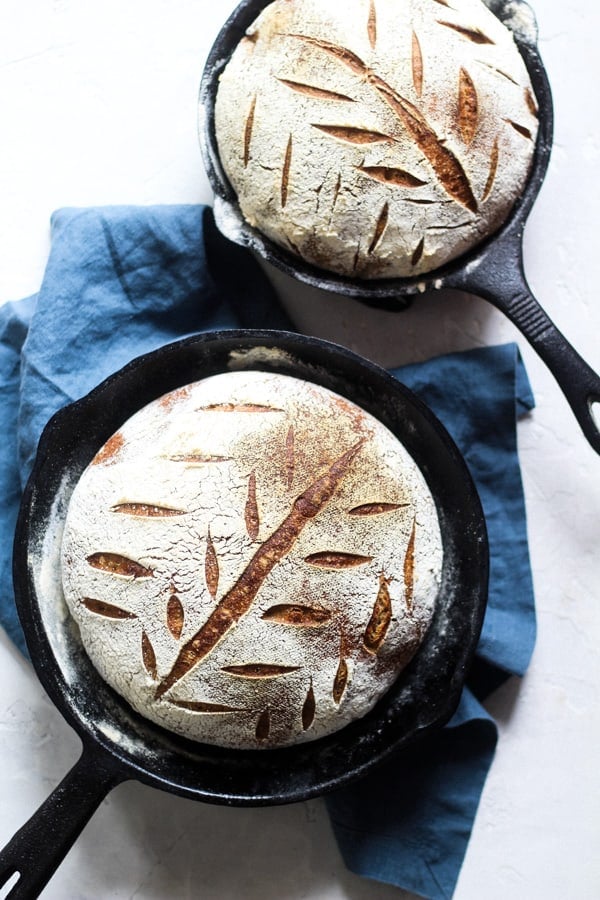
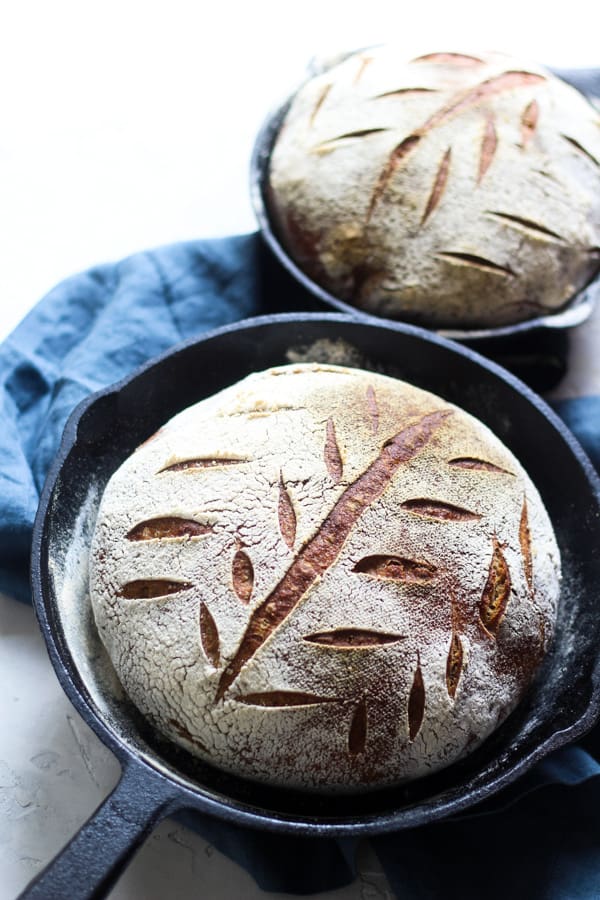
I used a 9 1/2-inch wide cast iron skillet for the round loaf. Many regular sized cast iron skillets vary in size anywhere from 9 inches wide to 12 inches wide. I also had one smaller cast iron skillet, so I cut the dough in two pieces, but one piece was 2/3 of the dough since my skillets were two different sizes.
If you only have one cast iron skillet you can bake them separately. You’ll want to keep the second loaf in the fridge while baking the first so it slows down fermentation.
BREAD PROOFING TOOLS
I recommend choosing one of these two options. You can buy just the linen couche if you don’t want to buy multiple bread baskets and you have bowls on hand you want to proof them in. These are Amazon affiliate links.
Ferment them in large bowls with either linen couche or clean kitchen towels. You want to use a bowl that will allow the dough to double in size. Flour the linen or the towels really well through a sifter to evenly distribute, then place the bread in the bowl bottom side up (meaning the bottom of the round you shaped).
For a beautiful presentation, flour with white flour so that when it bakes you get a nice deep color from the bread and white top from the flour.
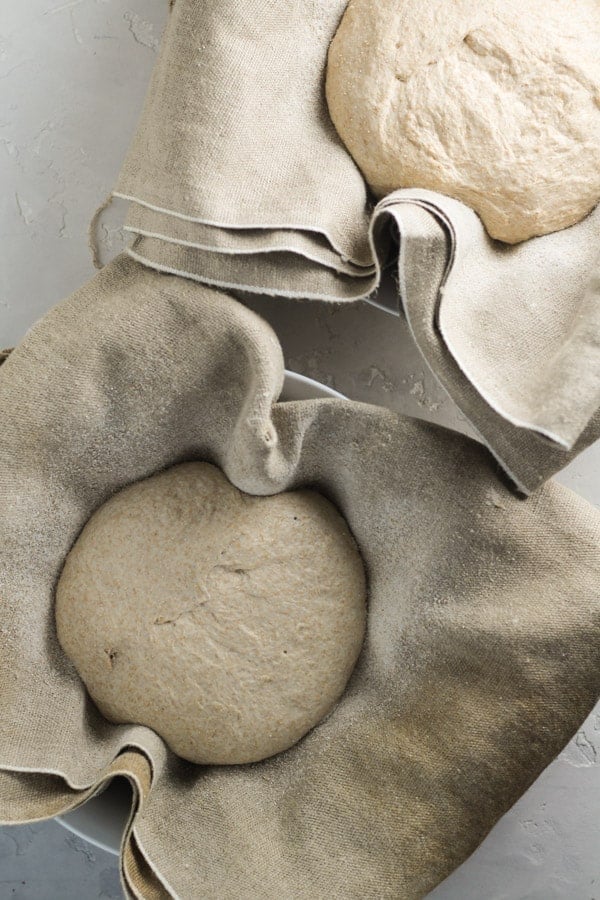
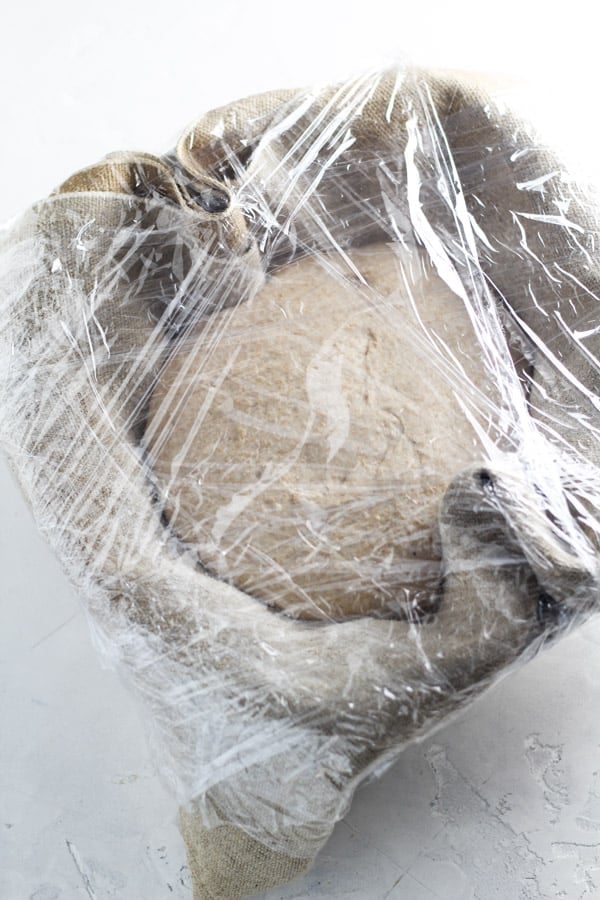
Cover them in plastic wrap so that there aren’t any air pockets. If you place the plastic wrap underneath the bowl, then wrap around the top (with a few long pieces), you will seal the plastic wrap really well and it won’t come undone. As you can see below, there is plenty of room for the dough to rise without sticking to the plastic wrap.
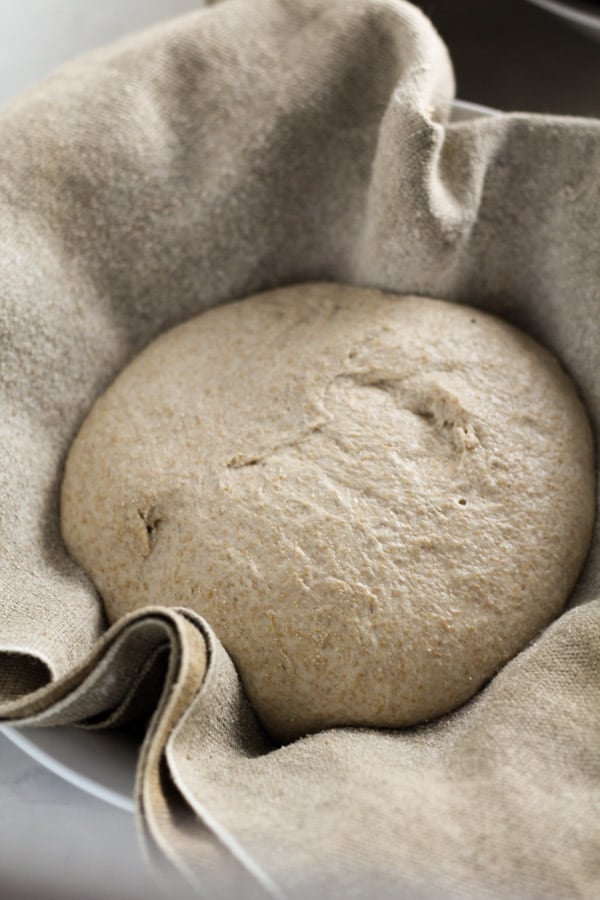
Let it proof for about 12 hours in the fridge until it’s about doubled in size. If your fridge is really cold it may stall fermentation so you can take it out of the fridge to finish proofing at room temp.
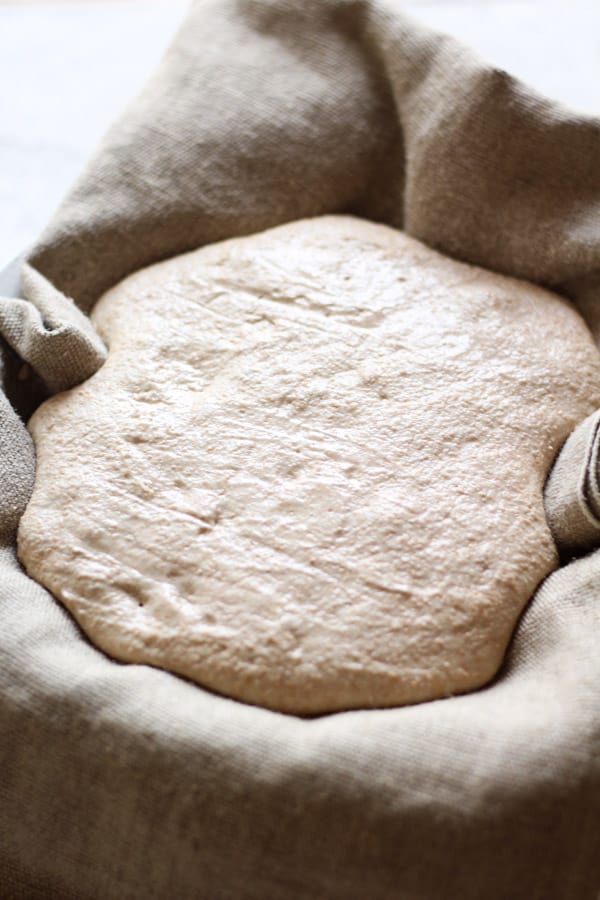
And voila, it has risen beautifully again!
To prevent sticking, cut out a piece of parchment paper that is the size of the bottom of the round and stick it to the dough before inverting into the skillet. Use a pizza peal or a cutting board to invert the dough. Then slide the dough into the skillet from there.
Because you sifted flour on the towels in the bowl, it should invert really easily into a pan or a cast iron skillet. My cast iron skillet is 9 1/2 inches wide so it was actually a little too big for the size of the loaf I had, but it still ended up working out just fine. I didn’t want to risk baking it without a pan because I was worried it wouldn’t hold its shape.
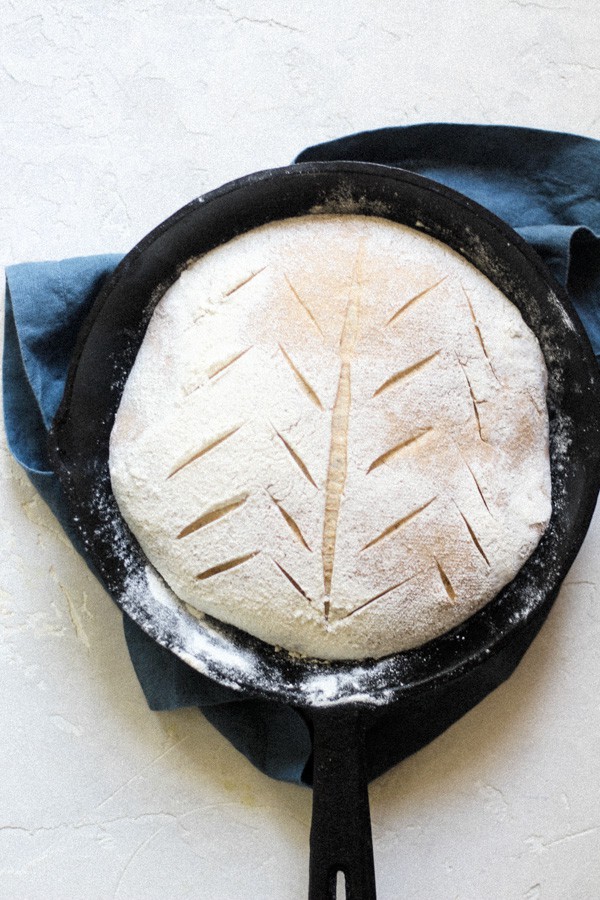
SCORING YOUR BREAD
Next I scored the top with a line down the center, then little diagonal lines down each side. This scoring helps to let the bread spring up in the oven. I am using a tool called a bread lame, but you can certainly use a thin serrated knife too.
BAKE BREAD WITH STEAM IN YOUR OVEN!
If you want a nice crispy crust on your bread, STEAM is essential! But how do you get steam inside a home oven?
Place a sheet pan, cast iron skillet, or oven-safe skillet on the bottom rack of your oven while the oven is preheating. When you place the bread in the oven, throw a cup of ice on the hot sheet pan or skillet and close the oven door immediately to trap in the steam.
Although there was a lot of information here, there is literally just minutes of actual work. Raise your hand if you are making this bread and comment below!
Bon Appetit Ya’ll,
Leslie O.
Sourdough Honey Spelt Bread
Ingredients
- 4 1/2 cups plus 1 Tbsp. Spelt flour (or Sprouted Spelt flour) 696 grams or 24.65 oz
- 1 3/4 cup plus 2 Tbsp Bread flour 232 grams or 8.25 oz
- 1/2 cup plus 1 Tbsp sourdough starter (ripe) 148 grams or 5.25 oz
- 3 cups plus 1 Tbsp Water (room temp) 668 grams or 23.85 oz
- 2 tsp salt (preferably sea salt) 18 grams or 0.65 oz
- 4 tsp Honey (or maple syrup for vegans) 37 grams or 1.35 oz
Instructions
For the Sourdough Starter
- Feed your sourdough starter about 8-10 hours before mixing your dough to ensure it's ripe and ready to use.
For the Dough
- In a large bowl, mix the spelt flour, bread flour, and salt together. Mix the water and honey in another bowl.
- Mix the water and honey mixture with the flours until it starts to combine. Add the sourdough starter and continue to mix with your hand or a wooden spoon until it forms into a ball of dough. It will be wet and sticky.
- If you want to develop the gluten a little more, you can knead it by hand for about two more minutes, but it's not necessary.
- Scrape the dough from the sides of the bowl and add it to the bottom of the dough. Give the dough a fold as shown in the photos. Give two more folds 30 minutes apart for a total of three folds.
- Cover with plastic wrap and let it bulk ferment for about 8 hours.
Shaping the Dough
- Scrape the dough from the bowl onto your counter and for two large loaves cut the dough in half. Shape into rounds or loaf style. Since I had one 9 1/2 inch cast iron skillet and one small one, I cut the dough so that one piece was two thirds of the dough and the other was one third the size. You can also shape into two equally-sized rounds and bake one loaf at a time.
- Line two large salad bowls or bannetons (or bowls of that size) with linen couche or two clean linen or tea towels. Sift lots of flour on the couche or towels to prevent the dough from sticking. Place the shaped dough bottom-side-up and wrap thoroughly in plastic wrap to prevent air holes from getting in. You can also use clean shower cap to cover the bowls. Buy shower caps to use only for bread so they are sanitary.
- Let the dough ferment again for about 12 hours in your fridge. If your fridge is colder than 37-38 degrees Fahrenheit it will likely stall fermentation. If after 12 hours it still needs to proof more, finish proofing in a warm spot in your kitchen until it's almost double in size.
Baking the Spelt Sourdough
- Preheat the oven to 450 degrees and place a sheet pan, or oven-safe skillet on the bottom rack to allow it to heat up.
- When you are ready to bake your bread, remove the plastic wrap from the dough.To prevent sticking, cut out a piece of parchment paper that is the size of the bottom of the round and stick it to the dough before inverting into the skillet. Use a pizza peal or a cutting board to invert the dough. Then slide the dough into the cast iron skillet from there.
- If you only have one cast iron skillet that is 10 to 12 inches wide, then bake each dough separately.
- If you wish to bake two rounds and you only have one cast iron skillet, then just bake one round at a time and keep one piece of dough covered in the fridge.
- For a large round loaf, score the dough with one line down the middle and diagonal lines down the sides. You can also score with a Plus sign too with small diagonal lines in between.
- Place the loaves or the rounds in the middle rack of the oven. Throw in one cup of ice onto the sheet pan or skillet on the bottom rack and close the oven door imediately to trap the steam.
- Bake for about 35-45 minutes, or until the top is a deep brown. For the round, you can check for doneness by removing it from the pan and tapping the bottom. If it sounds hollow, it's ready.
- Let cool for at least 30 minutes to one hour before cutting into the bread.
- You can cool the bread completely, wrap in plastic wrap and freeze for future use.
Notes


I’m just it’s getting my sourdough starter going and spelt is going to be my first go at it. Can I make this recipe in say a Dutch oven so I get a higher loaf? So I can make larger size sandwiches kinda thing.
Actually, the size of this entire dough would be great in a dutch oven. Just put some parchment paper in the bottom of the dutch oven that goes up the sides a bit to ensure the bread doesn’t stick.
Would this work in loaf pans?
Yes it will! If you watch the shaping video, I show you how to shape it for a loaf pan. Just make sure not to stretch it out too wide when shaping so it’s not too long for your loaf pan. This recipe makes enough for two loaf pans.
What an incredibly useful article and video! Thank you so much. This is the best bread making online tutorial I have found online. So many do not show us these breads can be baked in loaves. I have even found I can bake these loaves at 375 for 15 minutes and 350 for 15 minutes and have a beautiful loaf with a softer crust for ease of cutting. Am new to spelt and find it to be easy to work with and delicious. I use a rye sourdough starter and ferment in the refrigerator for 24 hours to develop the flavor. Thank you again.
Thank you so much Angie for the kind comment! I’m glad the recipe worked well for you. It sounds like you’ve done a great job at making this bread recipe your own. Although baking is a science, bread requires a bit of science and a bit of alteration based on practice to make it your own. Nice work!
Can you make this recipe using just spelt flour no other type of flour? If so how much would you use? Thank you!
You can, however, it will be much heavier and denser. The more spelt flour you replace with all-purpose or bread flour, the denser it will be. If you use 100% spelt flour, it would be best to shape and bake it in a loaf pan so it will hold its shape, plus you may need to add just a bit more water (a Tbsp. at a time) as whole grain flours absorb more water.
If you are unsure how much spelt to use for your first baking of this recipe, start by using just 1 cup of all-purpose flour and then add an additional 3/4 cup plus 2 Tbsp to the rest of the spelt flour, since that’s the amount you subtracted from the all-purpose flour. See how you like the texture and you can continue to experiment from there, using up to 100% spelt if you wish.
I hope that makes sense! The wonderful thing about bread is that its the same base ingredients (flour, water, salt, yeast or sourdough culture), but you have infinite possibilities for customizing each recipe, so you really don’t need to worry about making a mistake. With each try, you’ll learn what percentage of flours to water you prefer.
can i cut this recipe in half?
Yes that shouldn’t be a problem. I would recommend that if you have a scale to weigh your ingredients, then go ahead and cut the recipe in half with the gram measurements so your measurements will be more accurate. Plus, it’s much easier to weigh everything instead of using cups and teaspoons. Please feel free to check back in and let me know how this recipe turns out!
Can I use spelt or whole wheat even though my starter is only fed with all purpose flour?
Absolutely! Use whatever starter you have for this recipe. Please let me know how it turns out if you make it. Have a great day!
I just tried my go at this but my dough never seemed to firm up after the first ferment. As I go to invert it it is still very loose. Where did I go wrong?
I don’t think you did anything wrong! Sourdough with slow fermentation that’s a high hydration dough like this has a tendency to be more wet and sticky and not as firm before baking. As long as your starter was ripe you should be good to go. Are you currently doing the second ferment now?
I will say I’ve had plenty of sourdough boules or shapes that looked a bit flat before baking and even while in the oven until about halfway through baking. Then they magically spring out towards the end. Spelt flours or whole grain flours are heavier and more dense but they have the ability to give great oven spring once baked. Finish the recipe and let me know how it turns out, and if there are any issues we can continue to troubleshoot from there!
Thanks! After the second ferment it was still quite loose and didn’t hold its shape at all. It did spring up a bit in the oven (yay!) but nothing like the pictures here. Overall it seemed like a pretty flat loaf. :/ When it was done baking, it had a nice crusty outside but was still pretty moist and soft inside… any thoughts? Thanks for your time!!
Although it’s hard to be 100% sure, it could have been that your starter wasn’t as active as it should have been. When you added the sourdough had it risen in the container nicely and was it bubbly? Once you feed your starter it rises until it hits its peak then it starts to deflate back down. As for the moist inside, it could have been that it needed more time in the oven. Plus if it wasn’t rising properly it would have affected the interior as well.
Again, I can’t be 100% sure, but it sounds like these things could have been the culprit. Let me know if you have anything to add or any other questions.
This is my new favorite Sourdough bread. Lovely texture!
Oh I’m so glad to hear you loved it!!
I threw away this dough after 10 hours of rising. I had a nicely double size but when I turned it out onto the counter to shape it was unworkable soup. I halved the recipe and I measured everything twice. Something is wrong here.
Hello Emily,
I’m so sorry to hear this recipe didn’t work out for you! I know how frustrating it can be to purchase flour (especially right now) and take the time to make bread, then it doesn’t work out. I have been trying to re-test all of my sourdough recipes to ensure that I cover every potential issue that a baker could have, but I haven’t been able to find much flour over the last several weeks. I even had to borrow some from a neighbor so I could test a recipe.
I managed to find some spelt flour online and got it delivered today so I’m going to test this recipe again. I’ve made this bread several times in the past but not recently because none of my local stores carry spelt flour anymore.
I remember one time I tried baking a spelt flour loaf a few years ago and when I set out to shape it, it completely deflated on me. I realized that I was using only 100% freshly milled spelt flour, with no other flour added. The problem with certain whole grain flours (especially spelt) is that they often don’t have diastatic malt powder (aka barley malt) added to the flour to ensure that the structure is strong and holds shape during fermentation. I don’t mention it in this recipe because it has all purpose flour in it which always has barley malt so you don’t need to add it to the flour.
If that wasn’t the issue, it could be that I need to clarify the instructions so that either I add some stretch and folds during the first fermentation to strengthen the dough, or adjust the water ratio. High hydration doughs can be more tricky to work with, but can also result in the most wonderful texture. I’ve made doughs that were so wet while trying to shape that I didn’t think they would turn out well. But low and behold they bloomed nicely in the oven and had a wonderful texture in the end.
I haven’t had that experience with this dough, but it’s likely I’ll need to update the instructions to ensure better success with the recipe. I truly appreciate your feedback, as this helps me to improve my recipes. Take care and be safe.
I too ran into this problem – I turned out my well risen dough onto a floured surface to shape before second rise and it turned into a puddle! I scraped it into my cast iron Dutch oven for a second rise, but we shall see…
Hello Kate, I’m so sorry to hear that! I made this bread twice in the last week to re-test it. The first time I made it I realized I was using organic flour that didn’t have any barley malt in it, which can cause bread to collapse. Malted barley flour helps bread hold its shape during fermentation. Most all commercial flours have malted barley flour. The first batch collapsed on me.
So I borrowed some all purpose flour that had malted barley flour from my neighbor (King Arthur Flour unbleached) and made the recipe again. The second time it rose nicely and held its shape. I’m going to make it one more time and shape it like a “batard” or sandwich loaf and see if I like the way it rises better this way.
Another potential issue could be this:
I’ve been reading a lot in sourdough groups about what people are experiencing with the flour they can find in stores. There have been comment threads about bleached flours not absorbing water like unbleached flours, which can cause the dough to be much wetter. One person recommended using up to 15% less water when using bleached flours. Don’t know if you are using bleached flour, but thought I would mention that just in case. If the dough isn’t absorbing water like it should it will be harder to handle and shape.
Oh this is delicious! I only had enough white flour for one loaf so I followed your suggestion of weighing the ingredients. I used a whole wheat starter I began last month and maple syrup because it’s easier to measure. I also kneaded the dough after mixing because that was something I always liked when I used to make bread. The first rise was 12 hours. The second, in a loaf pan was only eight hours because I started to worry that it was beginning to deflate. I baked per your instructions in an old gas oven, and it really never got any higher. Nevertherless, it has a beautiful fine grain texture, and a delicious crusty crust. There are a couple of large holes near the base of the loaf, maybe because I was a bit enthusiastic measuring in my starter, or because I did not shape the loaf as well as I might have, though the video was most helpful. After a toasted slice with butter, my partner says it may be the best bread he’s ever had! Thank you! Getting baking ingredients during quarantine has been hard and this recipe caught my eyer because it only called for things I already had and was reassuring about substitutions and process.Thanks, again!
Thank you for your feedback Ariel, I’m so glad to hear you liked this bread! I’ve still been trying to update the instructions and the recipe, but photographing it takes a lot of time so I’m hoping soon I can update this recipe.
Mainly the alterations need to be on the fermentation time and adding a couple of extra folds to the dough to strengthen the dough naturally, which will help it rise. This bread can be tricky because spelt flour doesn’t normally have diastatic malt added to it which helps the bread hold the fermentation. I baked two loaves last week and they fell flat because I forgot I was using organic flours that didn’t have malted barley flour added like most flour do.
What’s difficult is people are having a hard time finding flour, so they are using what they can find, but even changing from unbleached to bleached flour for example will give you a different result. Unfortunately changing up the flours can cause different issues so I need to do a better job of adding instructions for how to adjust the recipe given that finding basic bread tools and ingredients is difficult right now.
Thank you again!
Delicious, easy. Thank you
Thank you for your feedback, I’m so glad you loved it!
Cannot post a pic but wanted to share that your recipe was great! New to sourdough/ had some spelt flour from another recipe— thought I would try this recipe. The dough was really hard to maintain shape so I DID do A LOT more folds – which helped.thanks for explaining in other comments “the why” it was like that. My crumb was just very slightly gummy but with consistent nice size holes and crust nice. Again tasted great! My dough appears a slight blonder than your picture and my crust also not as brown- despite bread definitely done.
If you have any suggestions- I would love it! Either way, this was a great loaf!!! Definitely repeating- keeper!!
Oh wow thank you Danielle! I’m so glad it worked out for you. Yeah, adding the extra folds I think makes a big difference. The color may have been different because I’ve found some brands of spelt flour are a tad darker than others. As for the gummy consistency, that usually happens if you under bake it by a bit or you cut into the bread too soon after it comes out of the oven. It’s good to let bread rest for about an hour to let the interior set. I’ll be updating the photos soon to reflect some changes to the recipe to ensure better success with it. It’s been hard to find spelt flour so I’ll be ordering more online soon.
Hi. Thanks for this recipe. I had quite a bit of spelt in my cupboard so was happy to see this recipe with the majority of this type of flour. I too, found the dough to be quite ‘soupy’.. but knew that it was a high hydration, so did the best I could with the folds. When I poured it out on to the counter to do a final shape, it was pointless, but you mentioned that despite this, it would rise in the oven. And to my delight, my boule rose nicely.. knowing that it wouldn’t be as high as my boule with all purpose flour… but the taste is lovely.. and was pleased with the end result. I will post my pictures on the Pinterest site. Thank you.
Hello Judy, thank you for the feedback! The dough shouldn’t be “soupy” as much a loose yet still somewhat malleable for folding. Different brands of flours (as well as different types of flour) absorb different amounts of water. I’ve found that bleached flour, for instance, absorbs less water making dough more loose and wet. During the flour shortage earlier this year I could only find bleached flour and found this to be the case when making this recipe. Not saying you used bleached flour, but that’s just an example of different flours behave.
The trickiest part of sourdough baking is looking at a loaf that doesn’t look like it will have much lift and still putting it in the oven. Spelt loaves particularly can have this issue so it’s really important to bake it in a vessel. I’m glad it still worked out for you!